This post was redacted by the lovely marketing people of Lisk, and originally published in medium, dev.to and dzone.
There is a Github repository for the code screenshots you will see below.
When we set out to build an iMessage extension for Lisk Mobile using React Native, we immediately hit an exciting challenge. As it turns out, when it comes to third-party applications, Apple likes developers to play by its own rules. If a company wants to benefit new features of the tech giant’s operational systems and rich user base, it needs to be built using Apple’s tools and programming language. iPhone’s iMessage is definitely worth this hassle. It has proven to be a big hit since its release in 2016. Within the first six months, iMessage has generated thousands of innovative in-messenger extensions including those created by Airbnb and Dropbox. Late in 2018, Mark Zuckerberg admitted this feature is one of Facebook’s 'biggest competitor by far'. Since the release of Lisk Mobile during Lisk’s Berlin meetup in October 2018, our team has been busy implementing features such as Face ID Authentication, as well as developing blockchain-specific solutions. Identifying the opportunity to extend the iMessage option for our users, we got to work on our own integration.
The iMessage extension was included in Lisk Mobile 0.10.0, which was released in February 2019. Our users can now request and send LSK tokens straight from the iOS-based messenger without opening our app. However, the journey to implement this feature wasn’t straightforward — Lisk Mobile is written in JavaScript using React Native, while iMessage requires development in native iOS. During our research, we have found there is just a handful of resources available to help with using React Native to build iOS extensions available out there. There was no clear way to proceed. After thorough deliberation, we have decided to try a different approach by building our own bridge implementation. We found it a very educational and motivational journey for our team to develop the feature in this way. We will show you how by breaking the solution down into native and React Native parts and describing how to bind these separated parts together.
The problem: there was no up-to-date documentation to create an iMessage extension using React Native.
Before we dive deep into the solution, let’s first set out the actual challenge. We used React Native in order to stay aligned with the programming language of the entire Lisk platform. We have been developing our mobile blockchain wallet since April 2018. This means we already have visual components and business logic enhanced by utility functions for cryptographic operations and communicating with the API of Lisk Core, which is a platform containing all information necessary to interact with our blockchain, including security, consensus algorithm and much more. The communication is provided by Lisk Elements, our modular JavaScript library.
The first option was to look for existing React Native component and educational material. Unfortunately, we could not find official documentation or up-to-date resources due to the fast pace of change in both React Native and native iOS development.
The second option was to try native iOS development within the Lisk Mobile codebase. The benefit of this approach was example projects and conference talks provided by Apple. However, introducing a considerable amount of Swift or Objective-C into the codebase was not desirable. Such a move would cause too much code duplication due to us having to rewrite most of our existing business logic and UI components.
The solution: we wrote our own bridge implementation and documented the process.
After careful evaluation, we decided to take an alternative route: writing our own bridge implementation. In the rest of this article, we will explain how we did it. If you want to jump straight into code, we’ve also created this handy demo project on GitHub
Create a React Native Project
First things first! Let’s start by creating a brand new React Native application. Since we are going to use native features, it would be better to follow the related part of the official documentation that suggests using the react-native-cli.
If you don’t have it installed, you can do it by running
$ npm install -g react-native-cli
Then let’s create a new project called, of course, AwesomeProject!
$ react-native init AwesomeProject
Add an iMessage Extension Target
The next step is to add a target for our Xcode project that covers the iMessage extension.
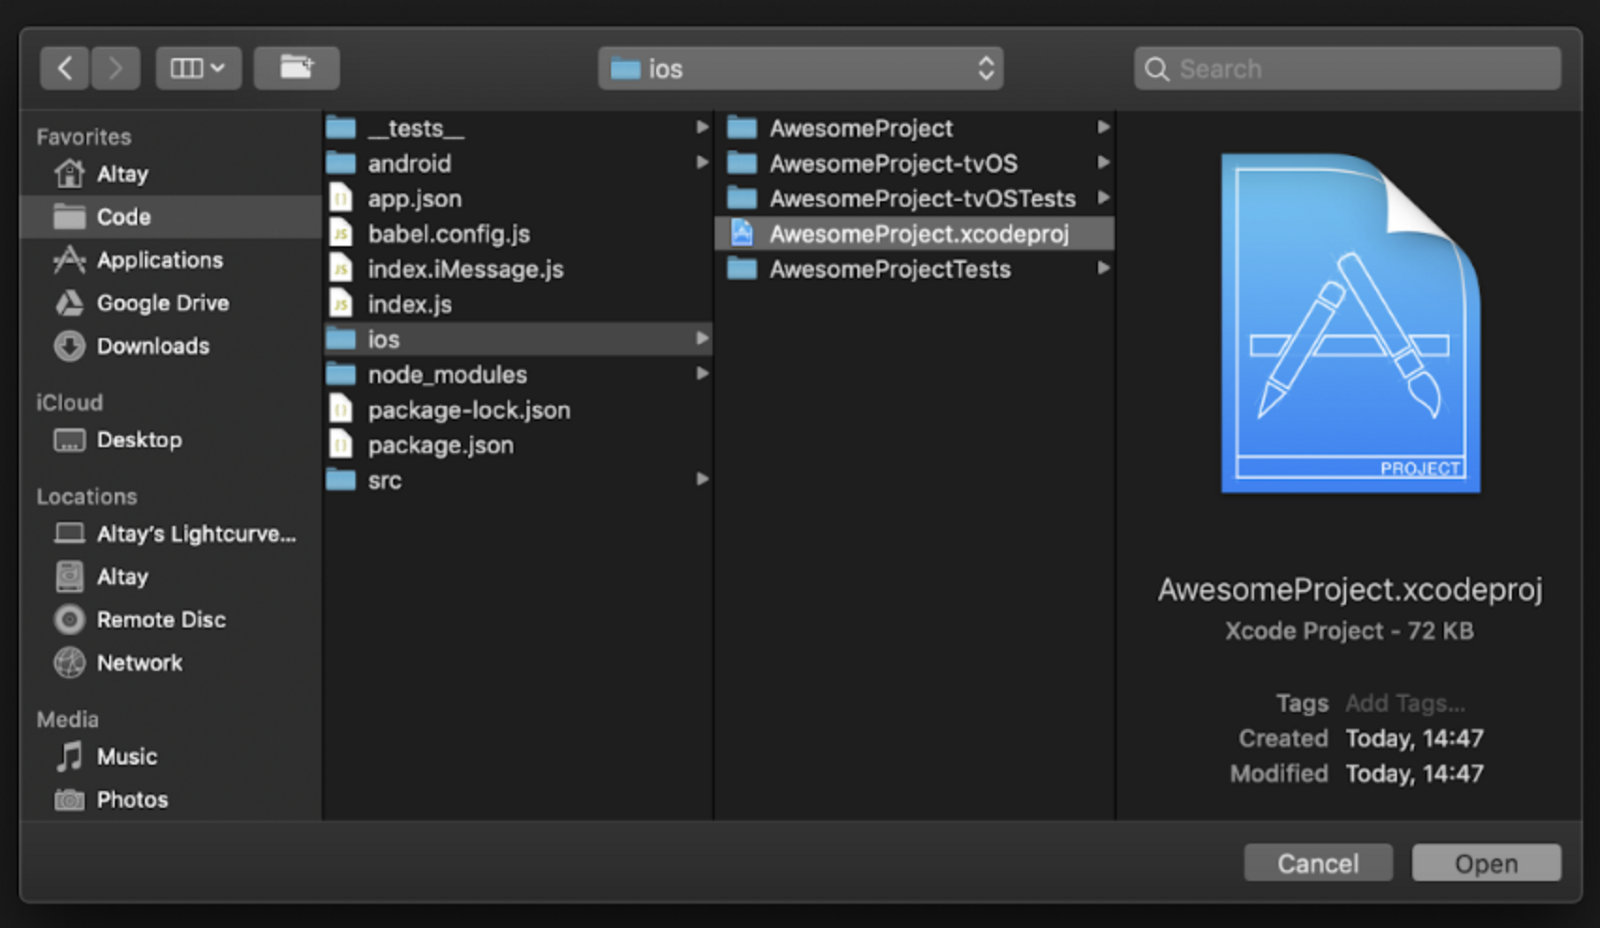 Open the iOS project with Xcode
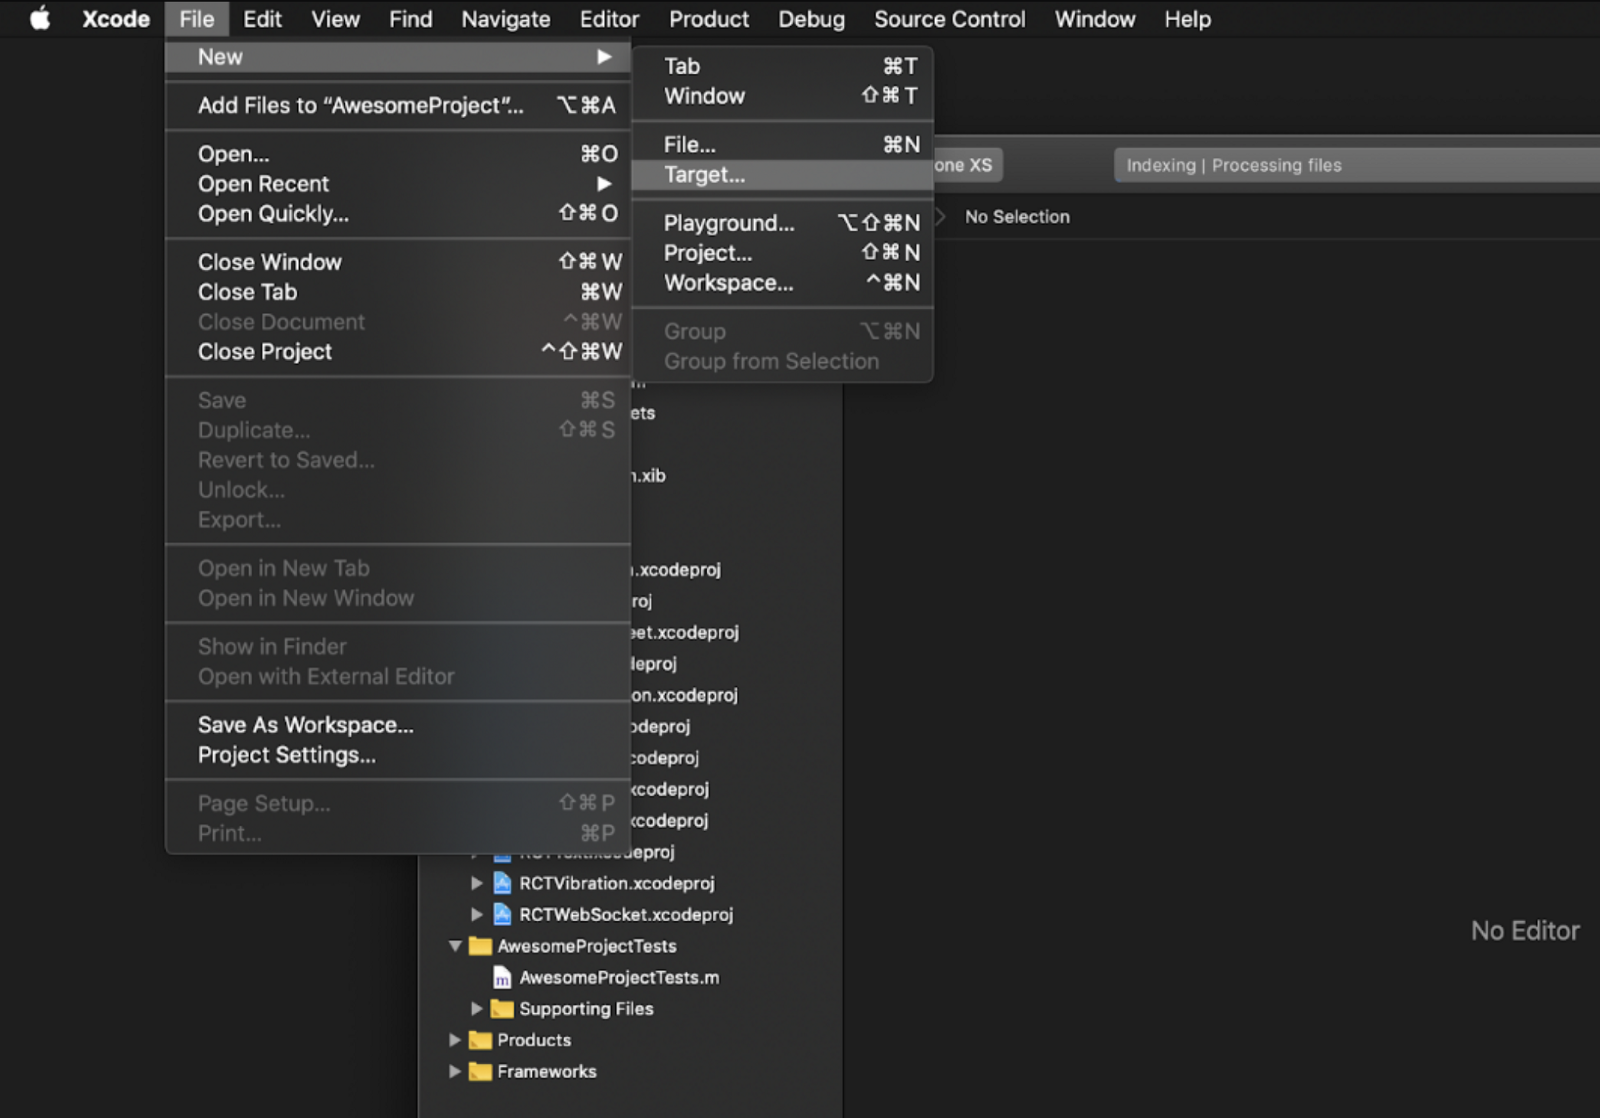 _Add new target to the project by navigating through **_File -> New -> Target _**menu_
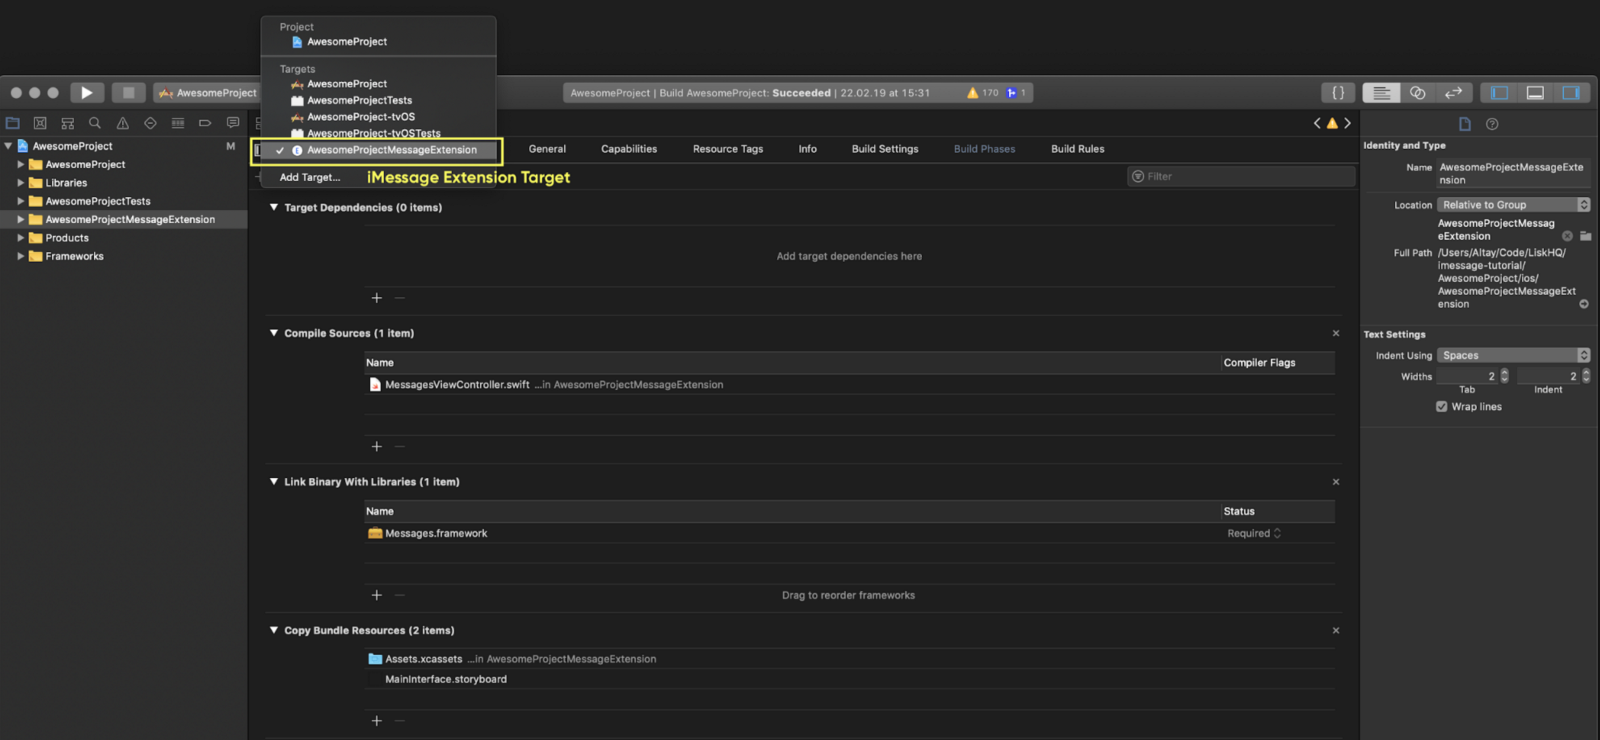
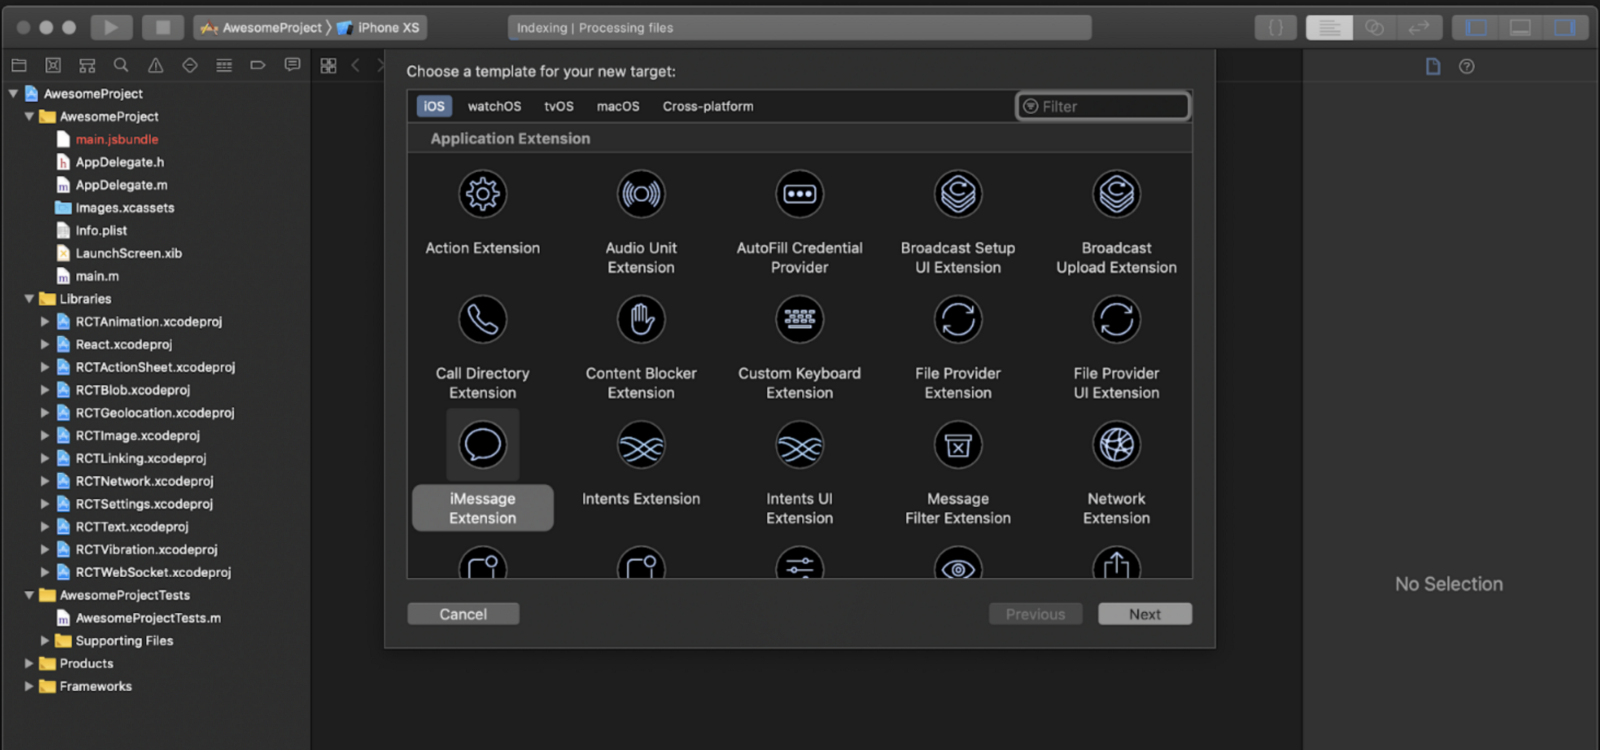 Choose iMessage Extension
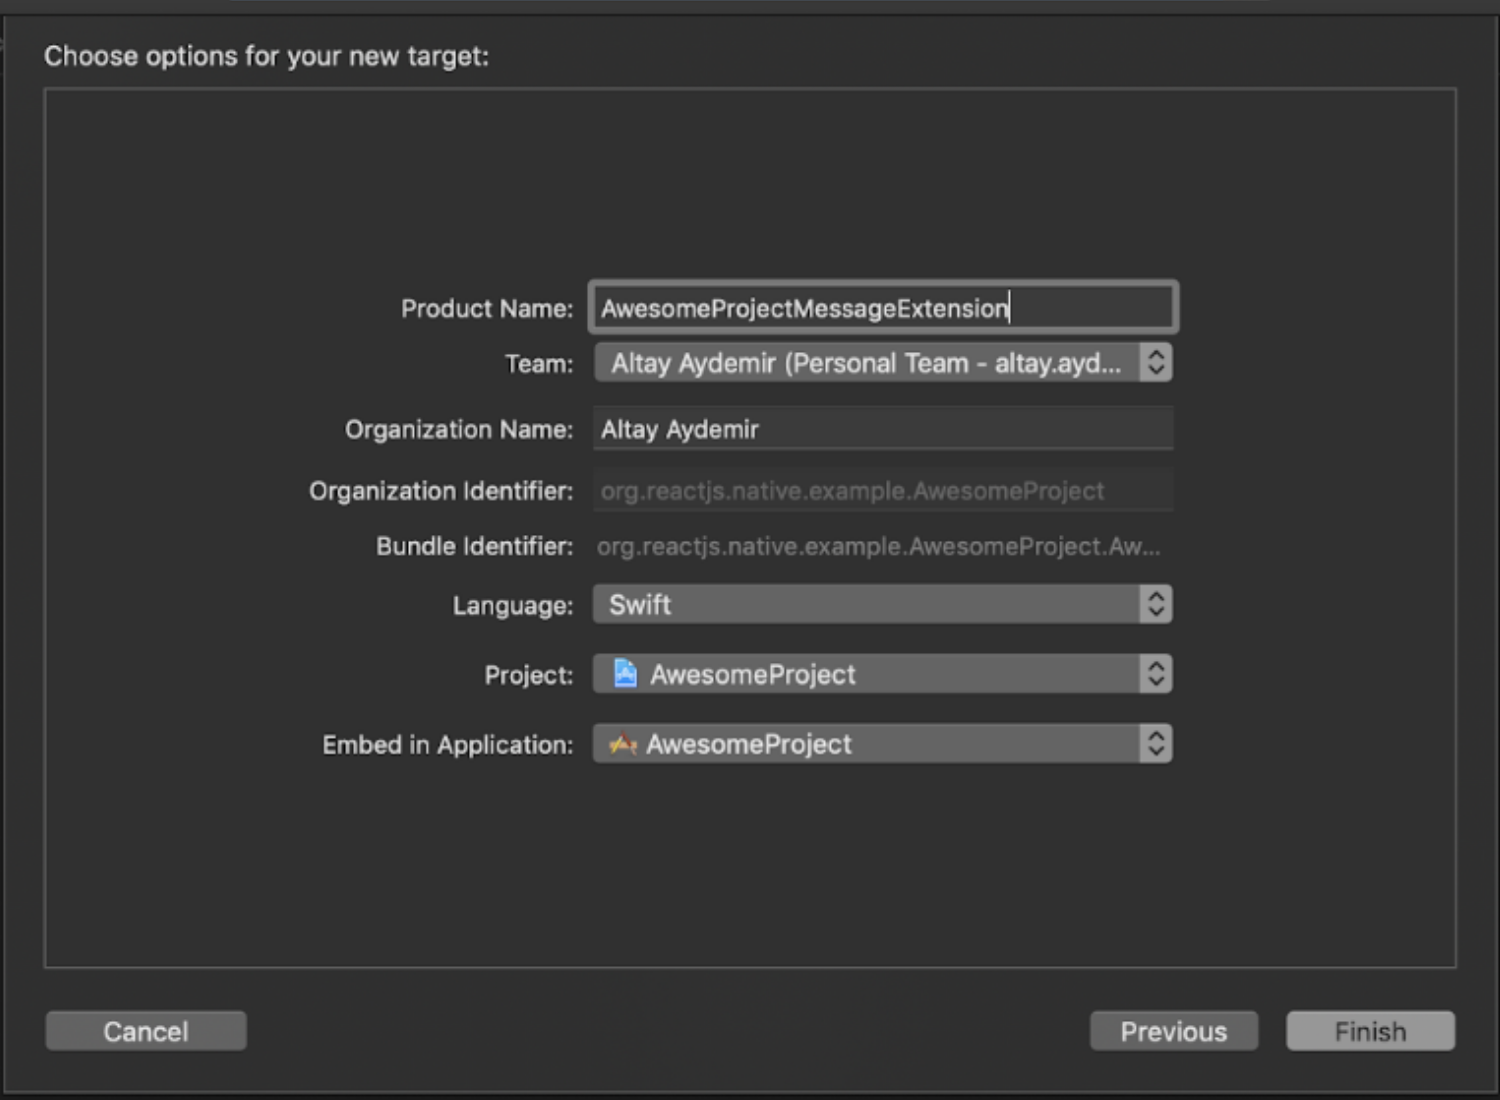 Give it a creative name
Create an iMessage Root on the React Native Side
Now that we have our Xcode target for the iMessage extension, it’s time to create a blueprint for our root component on the React Native side.
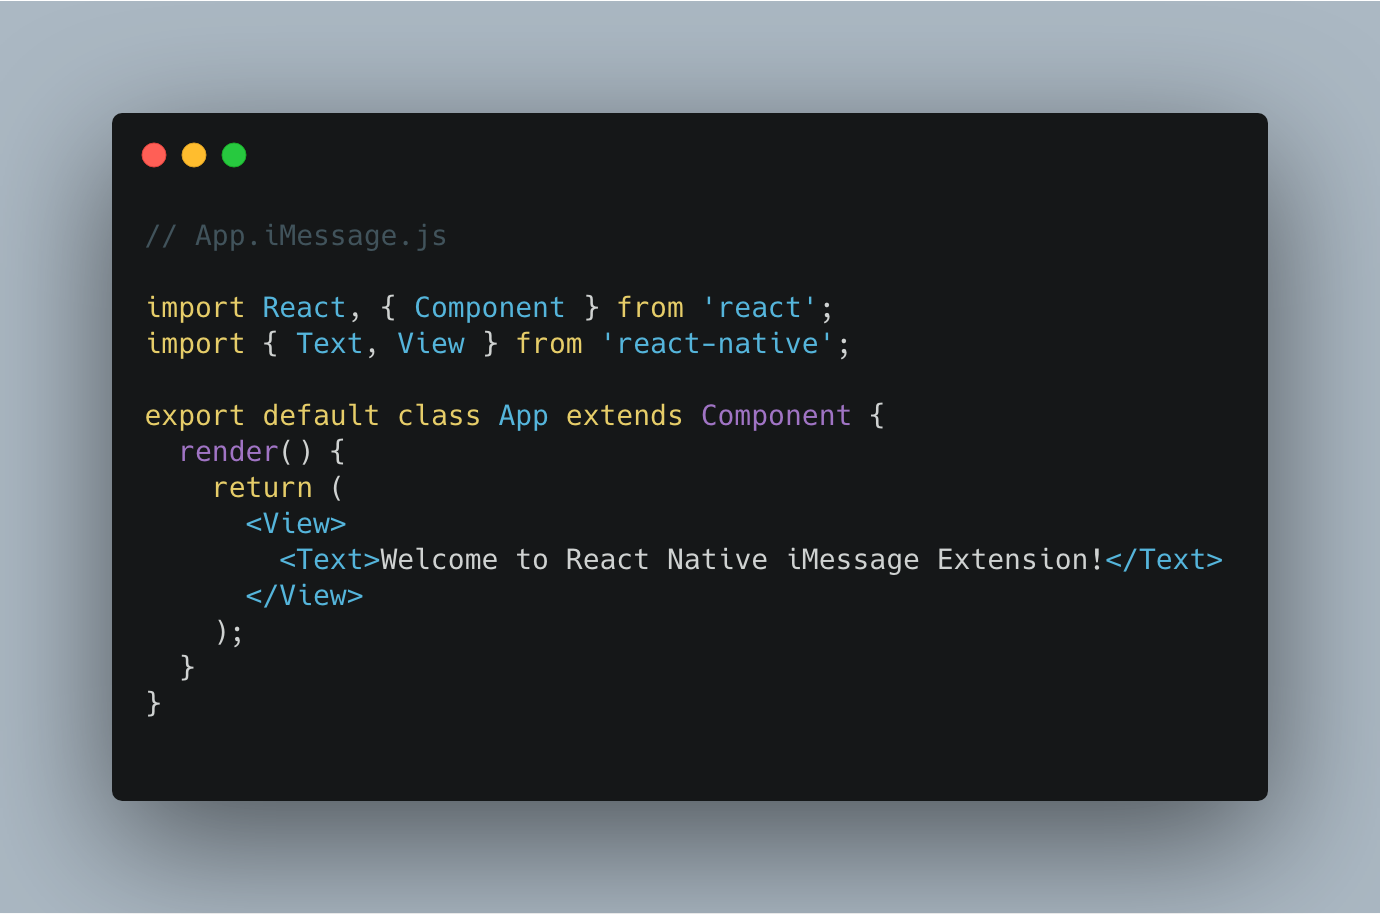 The entry point of the iMessage Extension on the React Native Side
We also need to register that component in order to access it easily in the following steps. Let’s create another file in the project root similar to the one React Native creates for the main application.
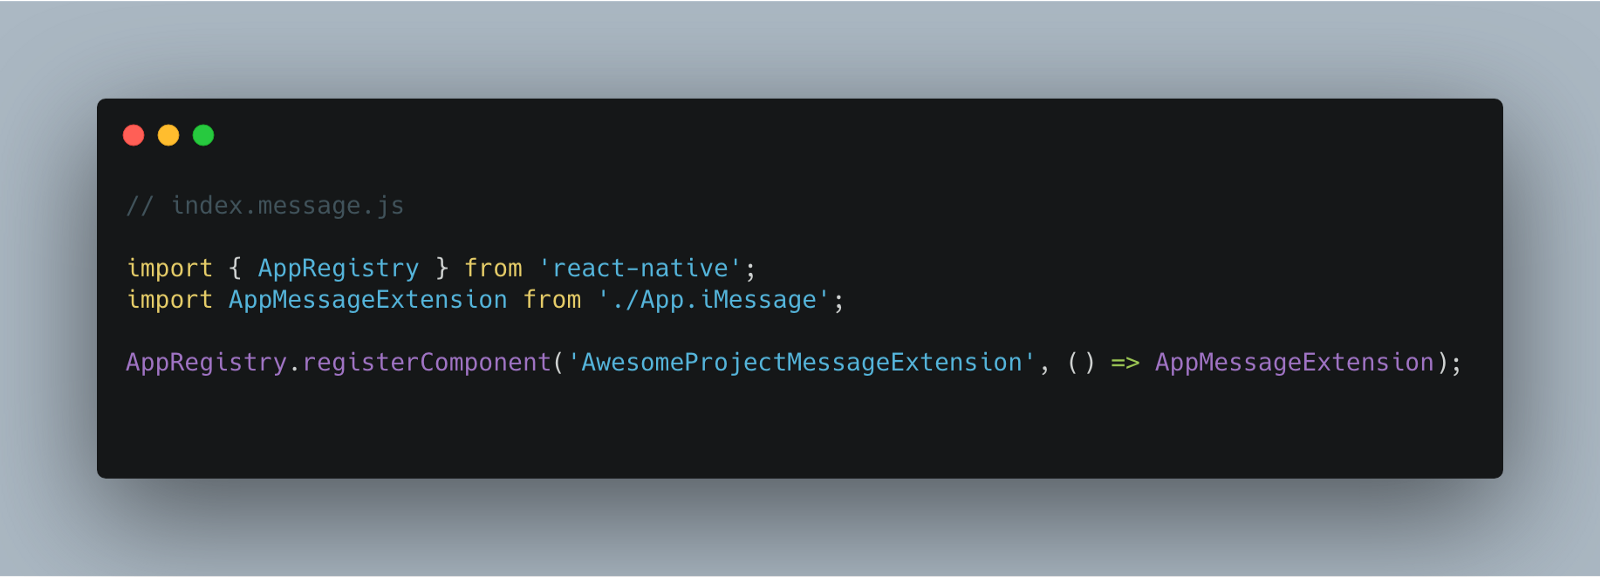 App Registry Part of the iMessage Extension on the React Native Side
Connecting iMessage Component with the Native Side
At this step, we will update our iMessage target to have the capability of rendering a React Native application within a native one. In order to achieve this, we have some manual work to do. In a regular React Native application, this step is actually handled automatically by the boilerplate that we have from react-native-cli, this is the case for Lisk. If you feel something is missing, you can compare the configuration and structure of your iMessage extension target with the main application.
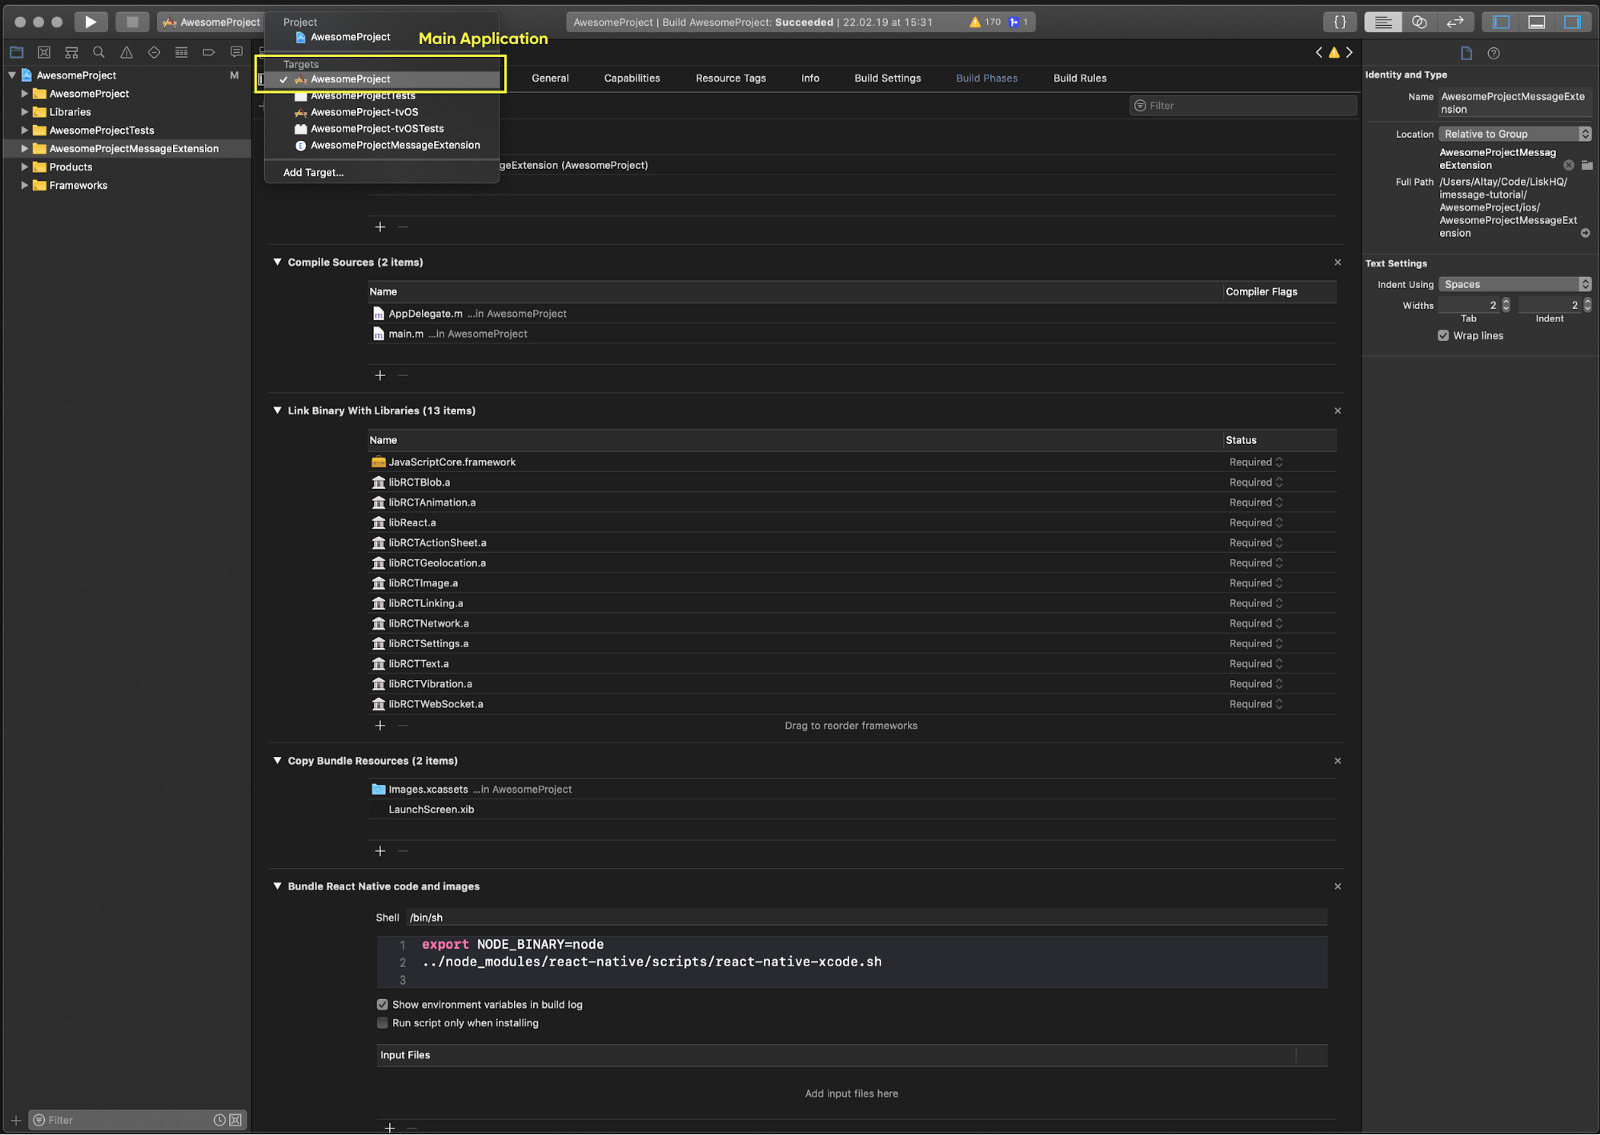 Build Phase configuration of Main Application
 Build Phase configuration of iMessage Extension Target
Linking Libraries
We will start the configuration by linking the React related libraries. Since it’s meant to be a simple application, libraries we add are just the core ones we need at the moment. If you are using some third party modules on your main application and also need them in your iMessage Extension, don’t forget to link them here as well!
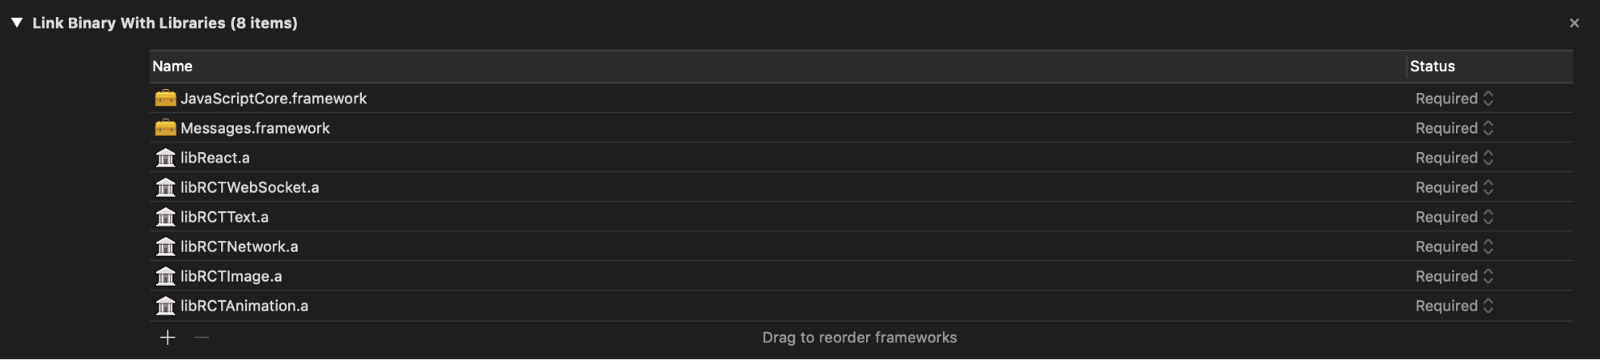
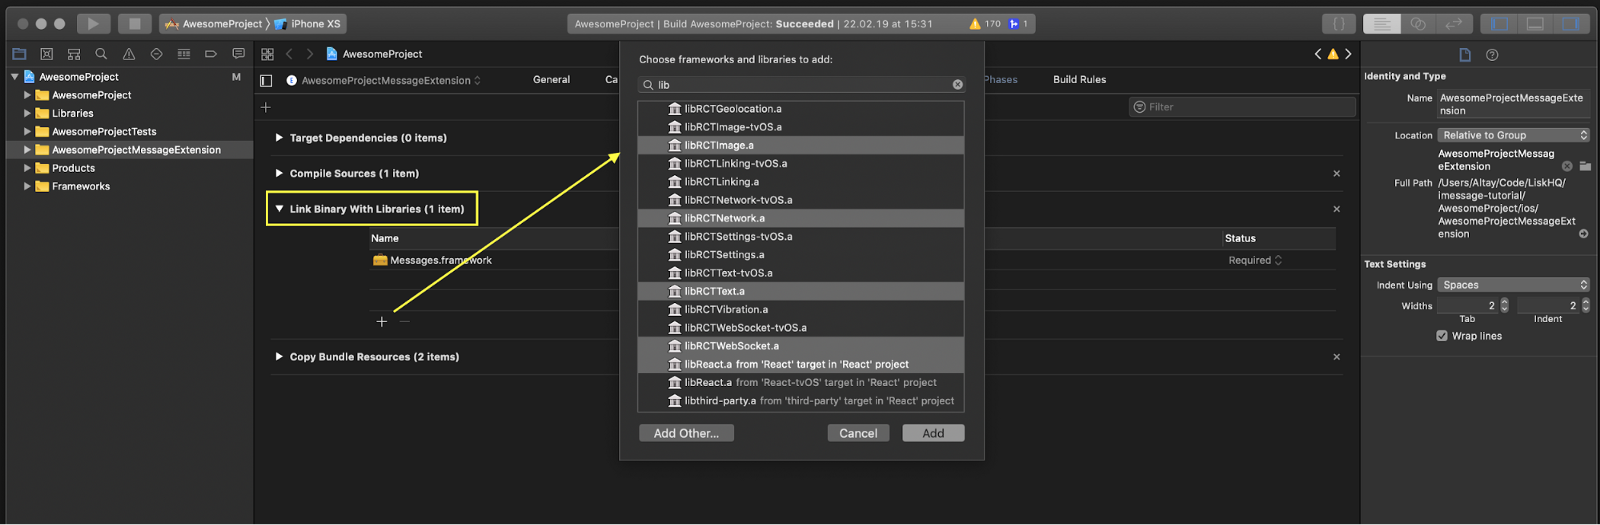 Build Phase / Link Binary With Libraries configuration of iMessage Extension Target
 Build Phase / Link Binary With Libraries configuration of iMessage Extension Target
Creating a Bridge Header file for Swift
Now that we have made those libraries available for our native part, it’s time to create a Bridging-Header file make them recognizable for the Swift compiler. The reason behind this is the libraries we have linked on the previous step are written with Objective-C. This has been a common approach since Apple introduced Swift as the new language of the iOS platform and you can obtain deeper knowledge about it here.
We start with creating a new header file called Bridging-Header.h inside AwesomeProjectMessageExtension folder.
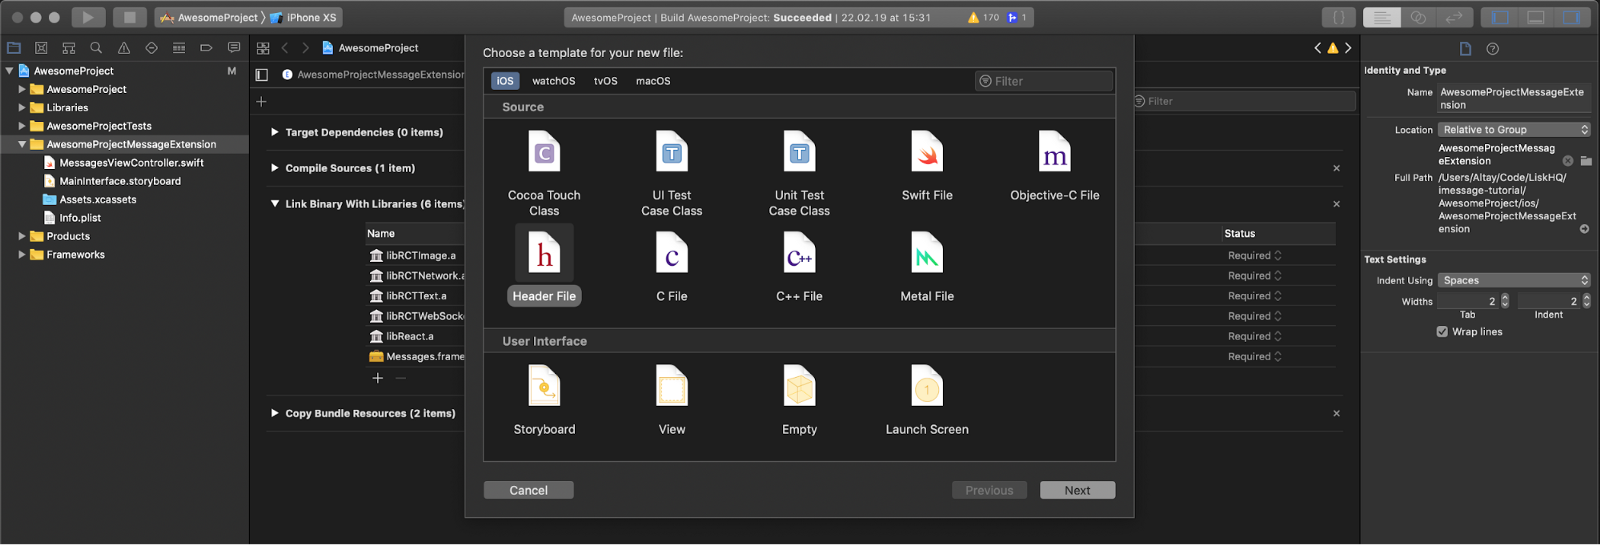 Xcode -> File -> New
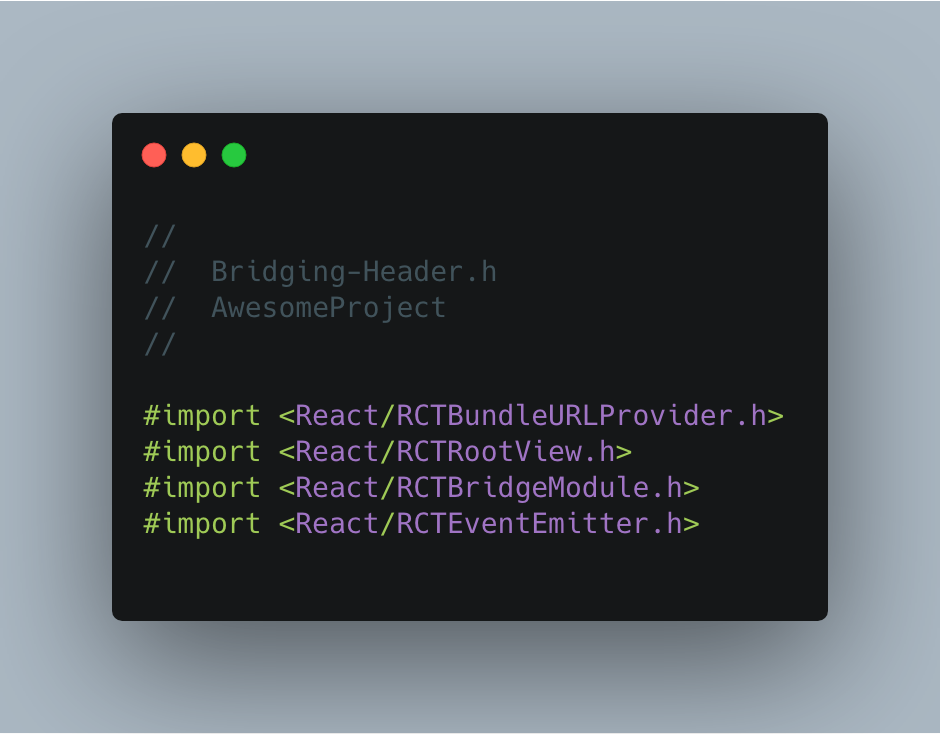 Freshly Configured Bridging Header
Next, by navigating to Build Settings / Swift Compiler — General section of the Xcode configuration, choose that file as the Objective-C bridging header.
 Build Settings / Swift Compiler — General section of the Xcode configuration
Updating Project and Build Configuration
The first one is updating Info.plist, a configuration file placed in every iOS project. In order to make our React Native bundle accessible in development mode, we need to enable loading content from localhost.
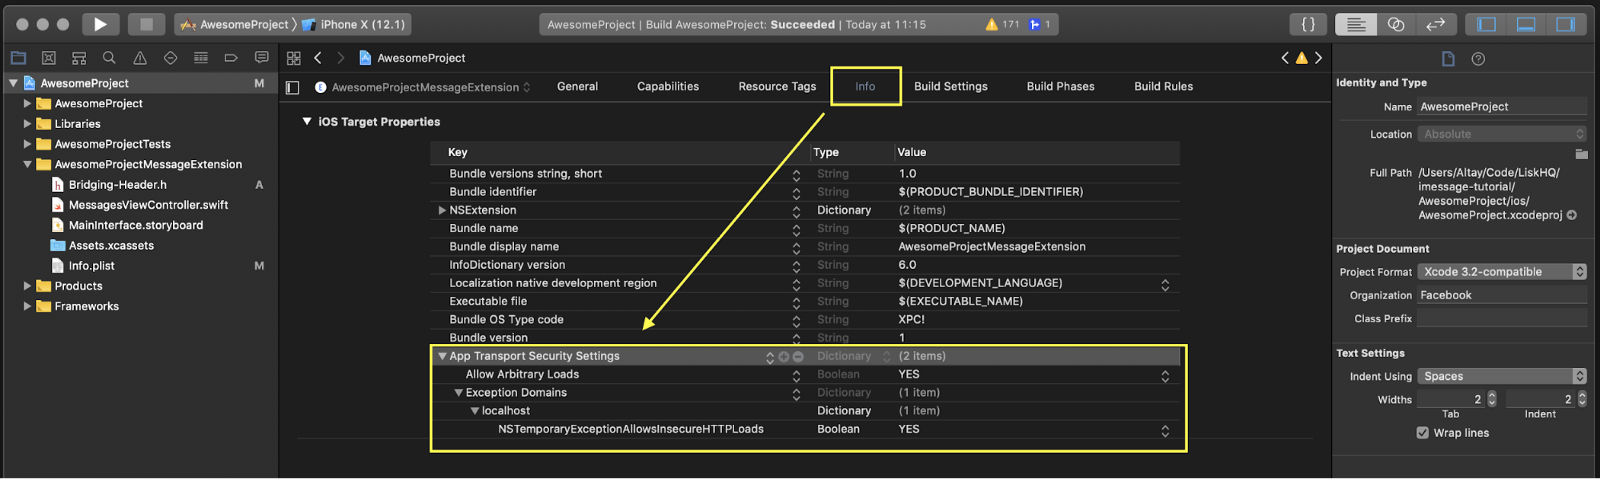 Updating Info.plist to make sure we are able to load bundle from localhost
The next step is to add a Build Phase for iMessage extensions target in order to make sure we trigger the build script of React Native when we are running the extension.
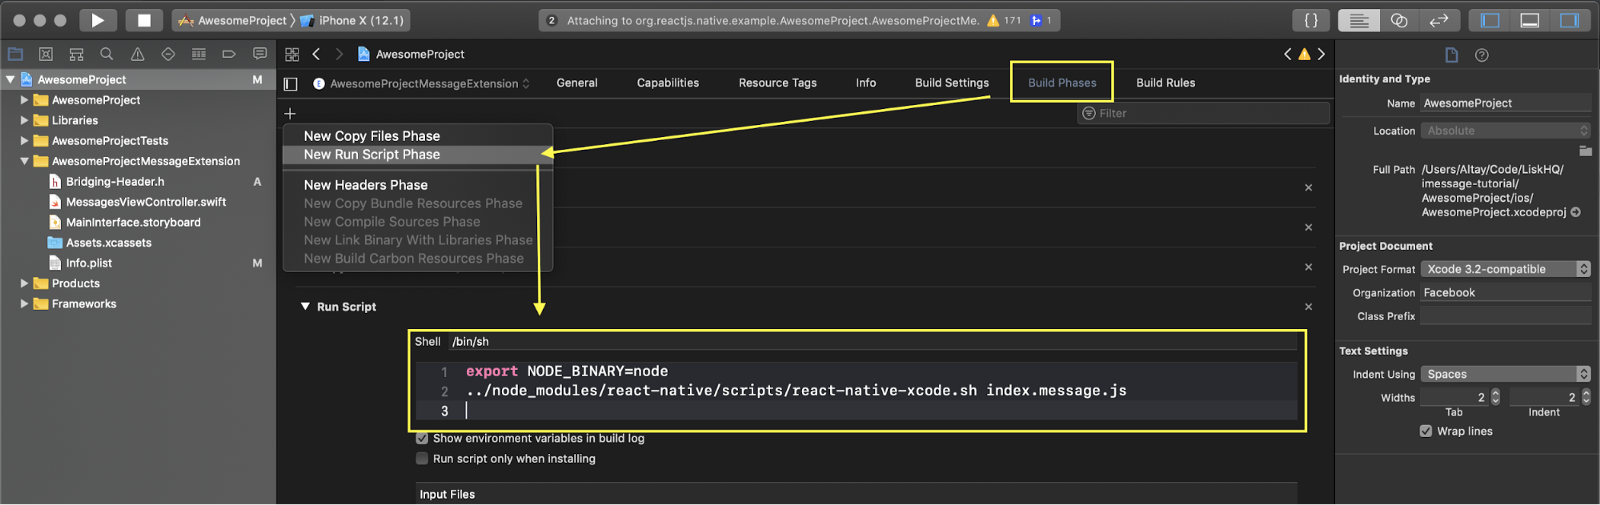 Add a new (Run Script) step to the Build Phases of iMessage Extension Target
The last step for this section is to update the schemes of the project. Each target in the application has a scheme that defines the configuration for actions available within the context of Xcode like Build, Run and Analyze.
We update the schemes of both the main application and iMessage extension to make sure we have all the required content while preparing the app for the release.
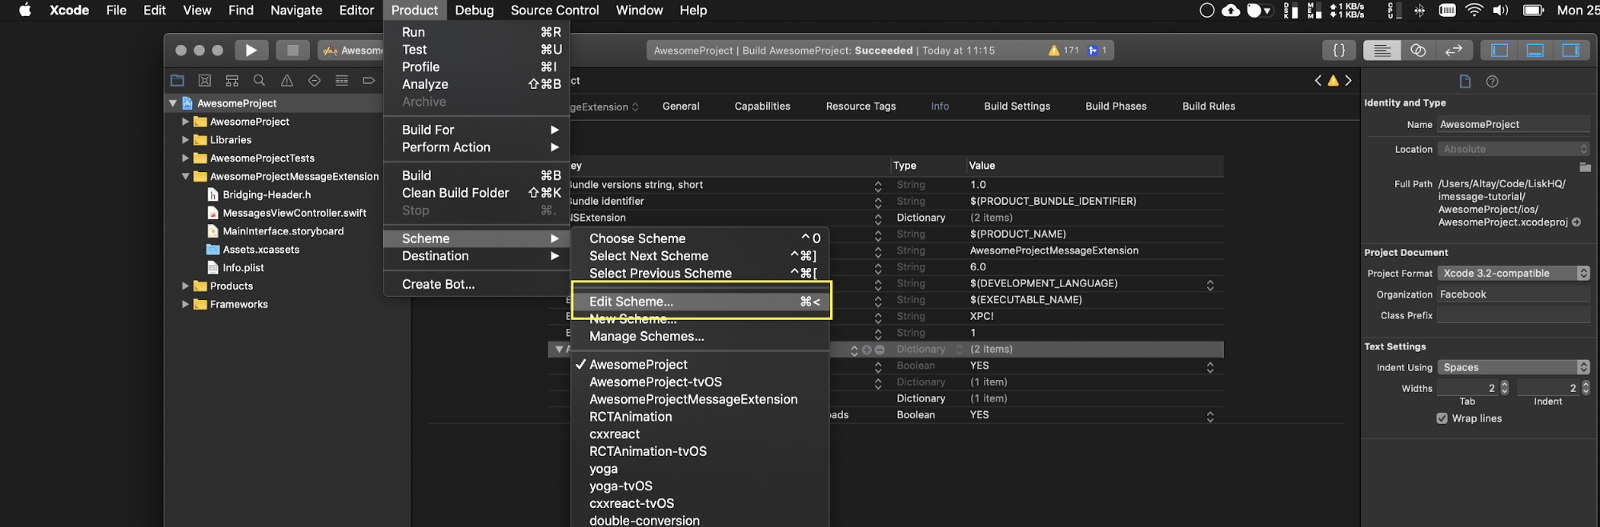 Navigate to the Edit Scheme menu of Xcode
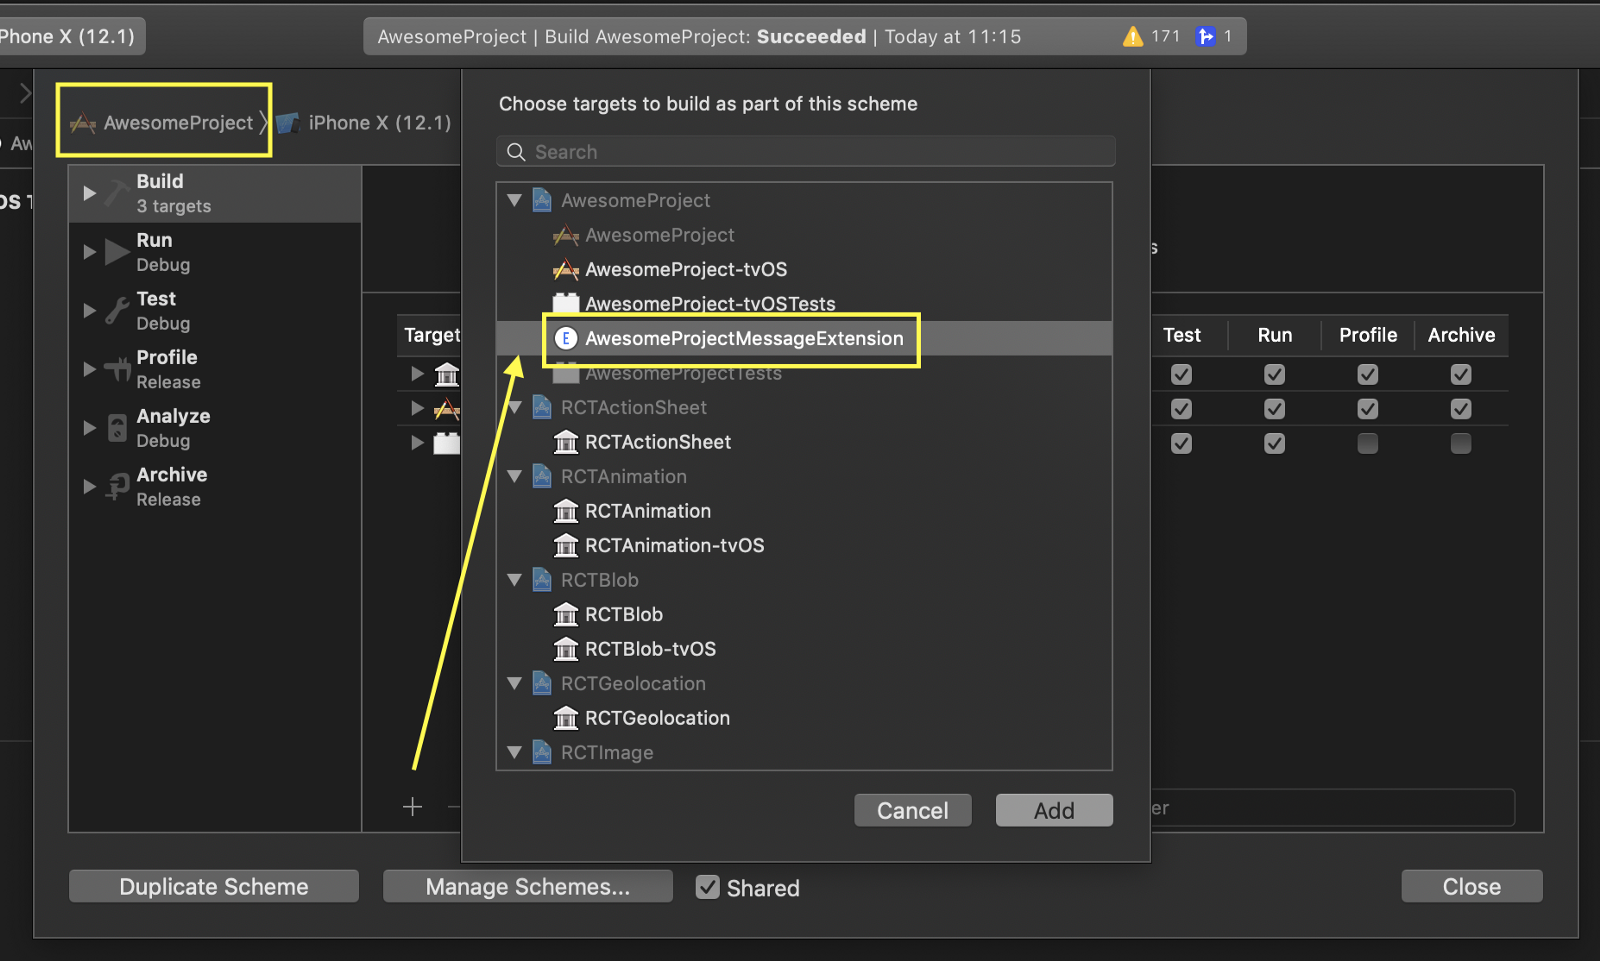 Add message extension to the build targets of the main app
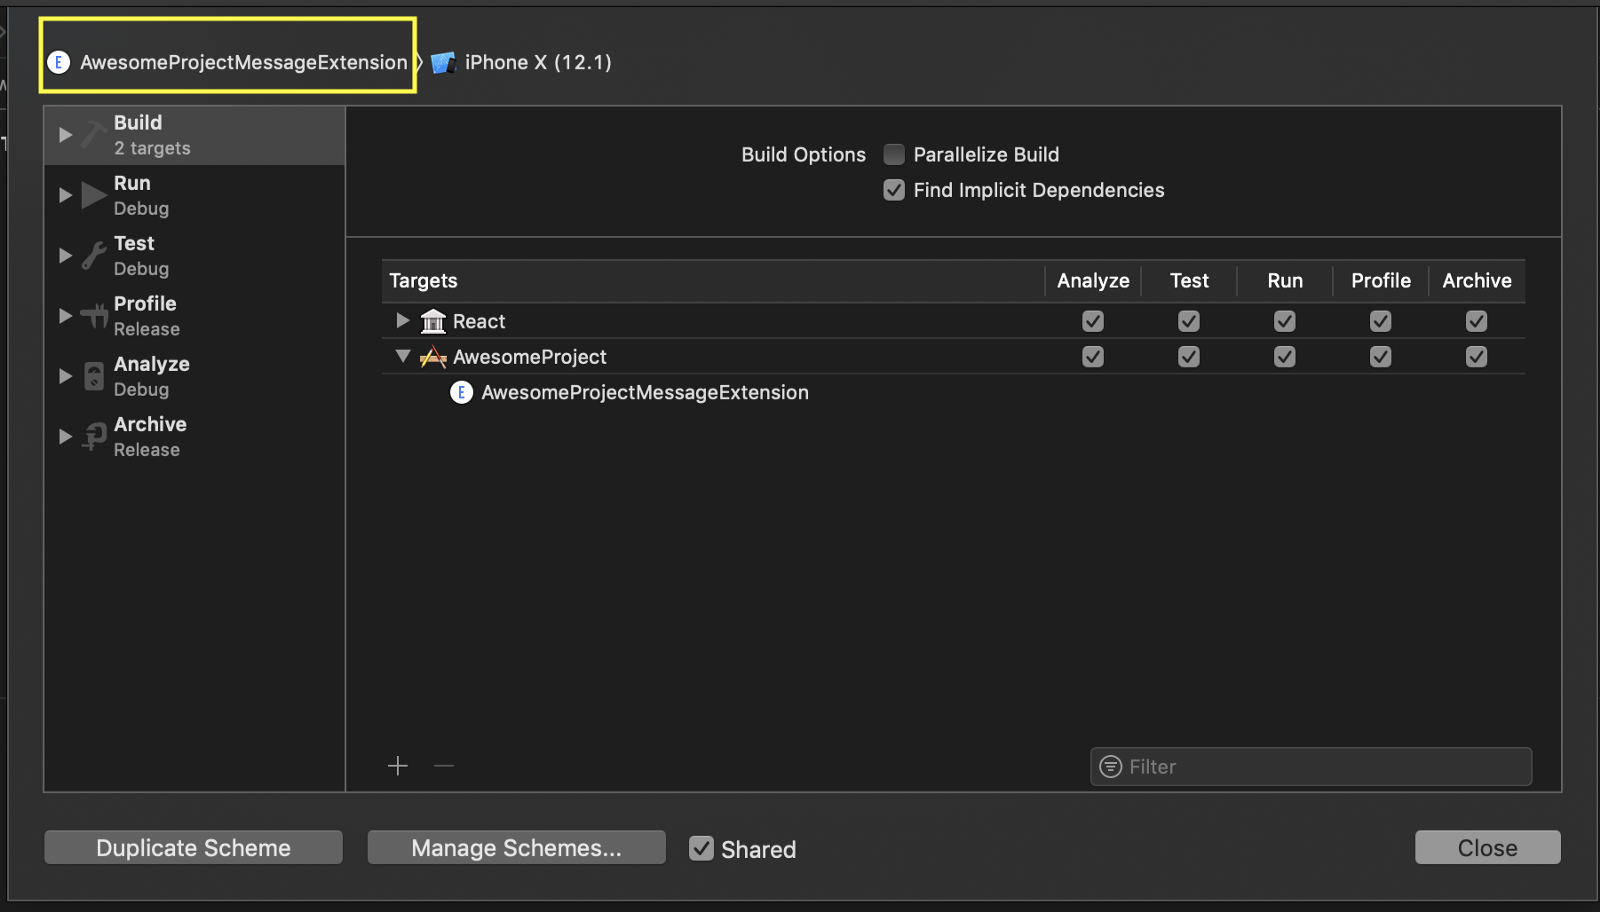 Add React to the build targets of the iMessage Extension
RCTBridge and the Initial Render
Now that we are pretty much done with the configuration, it’s time to start building our structure to render the application we have registered in the Create iMessage Root on React Native Side section.
First, let’s take a quick look at the structure of the iMessage extension. Every iMessage Extension has an entry point called MSMessagesAppViewController which extends the UIViewController class from UIKit and contains lifecycle methods and properties of an iMessage extension instance. This is similar to the AppDelegate in our main iOS application but doesn’t have all the capabilities of it.
What we focus on at this point is to find a suitable way to create our RCTRootView (an UIView subclass exposed by React Native that can be embedded in any part of a native application) and load our iMessage related code on the React Native side as the bundle.
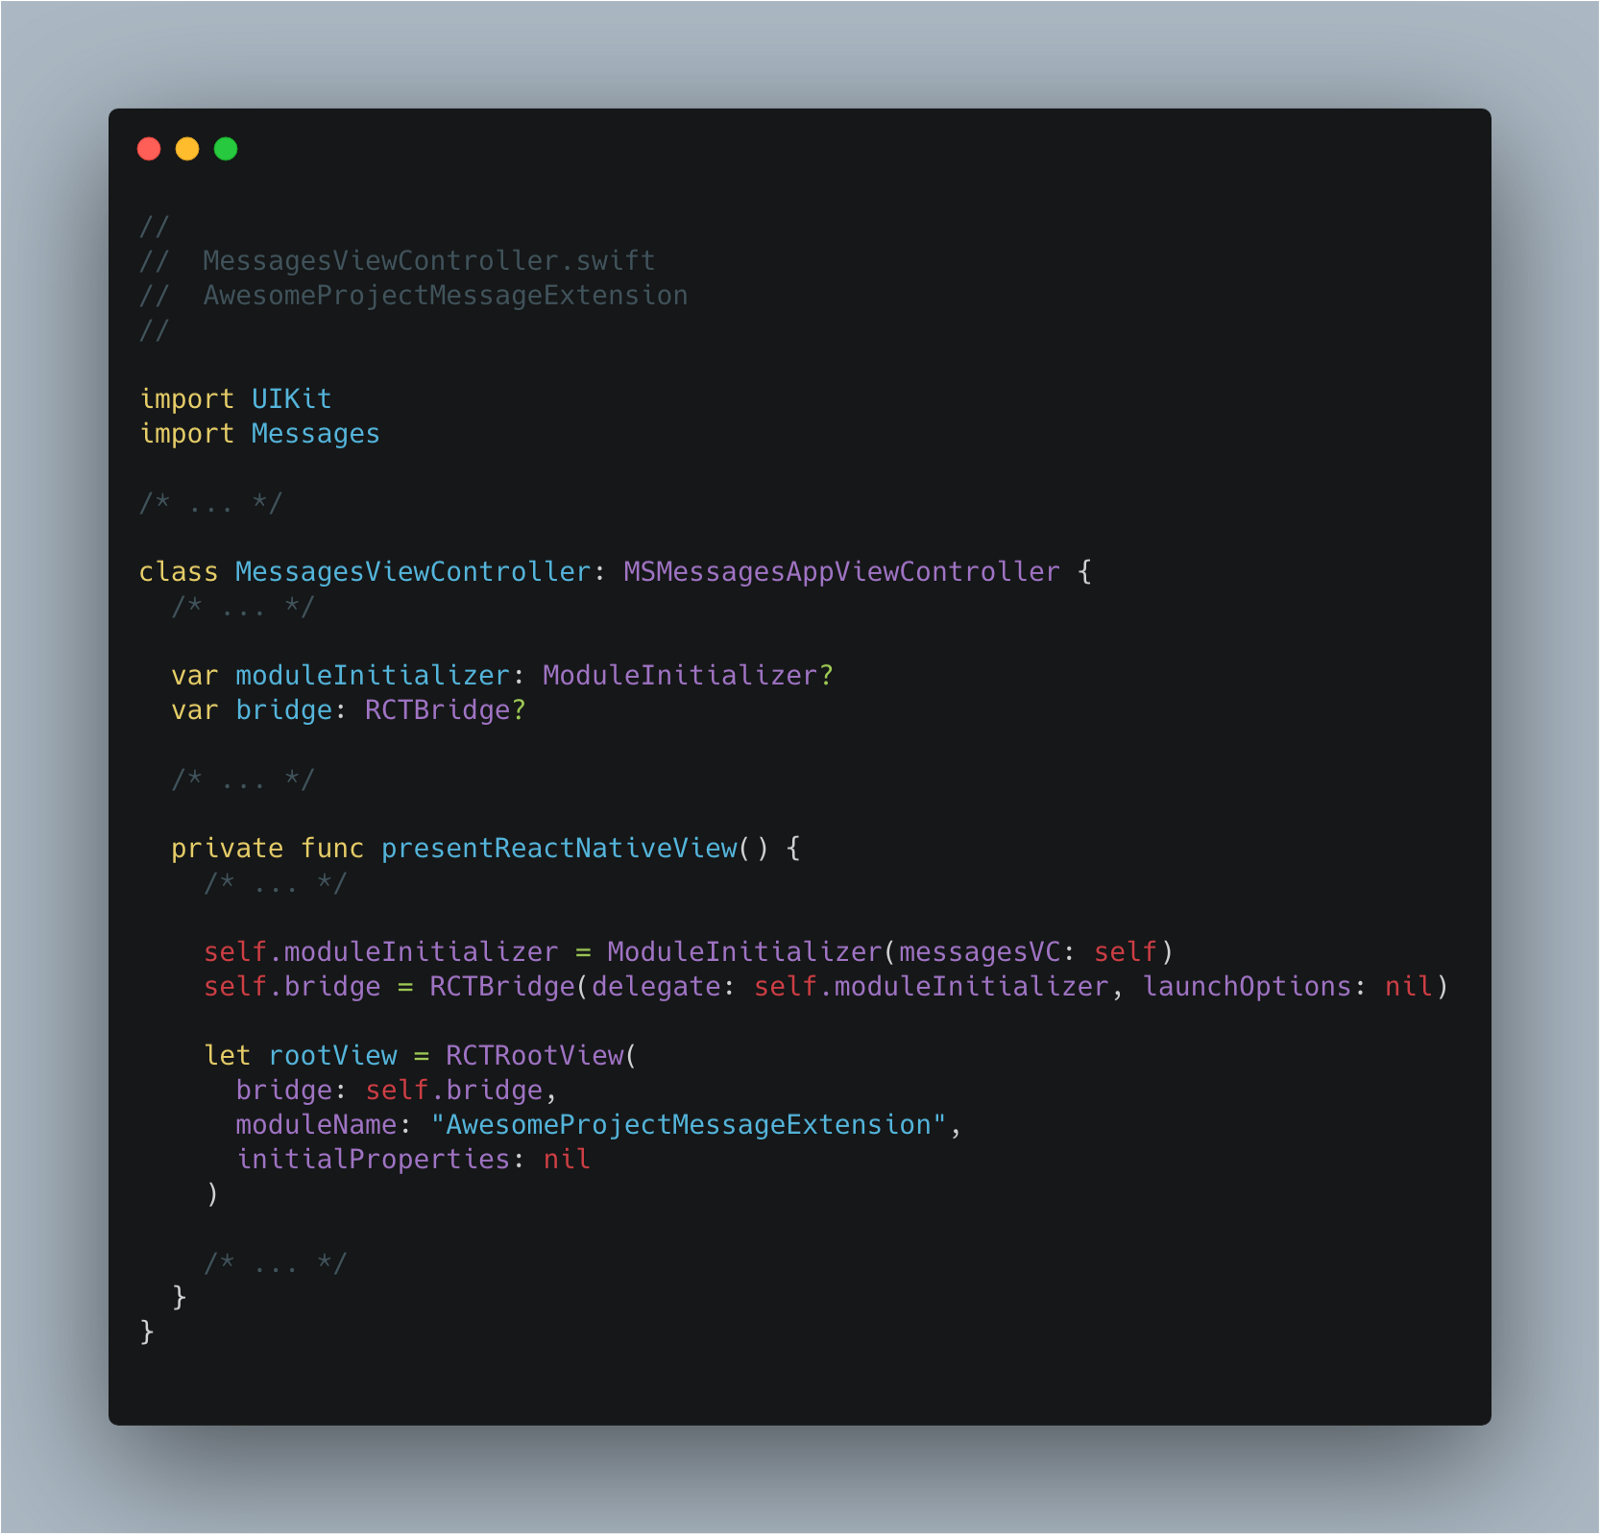
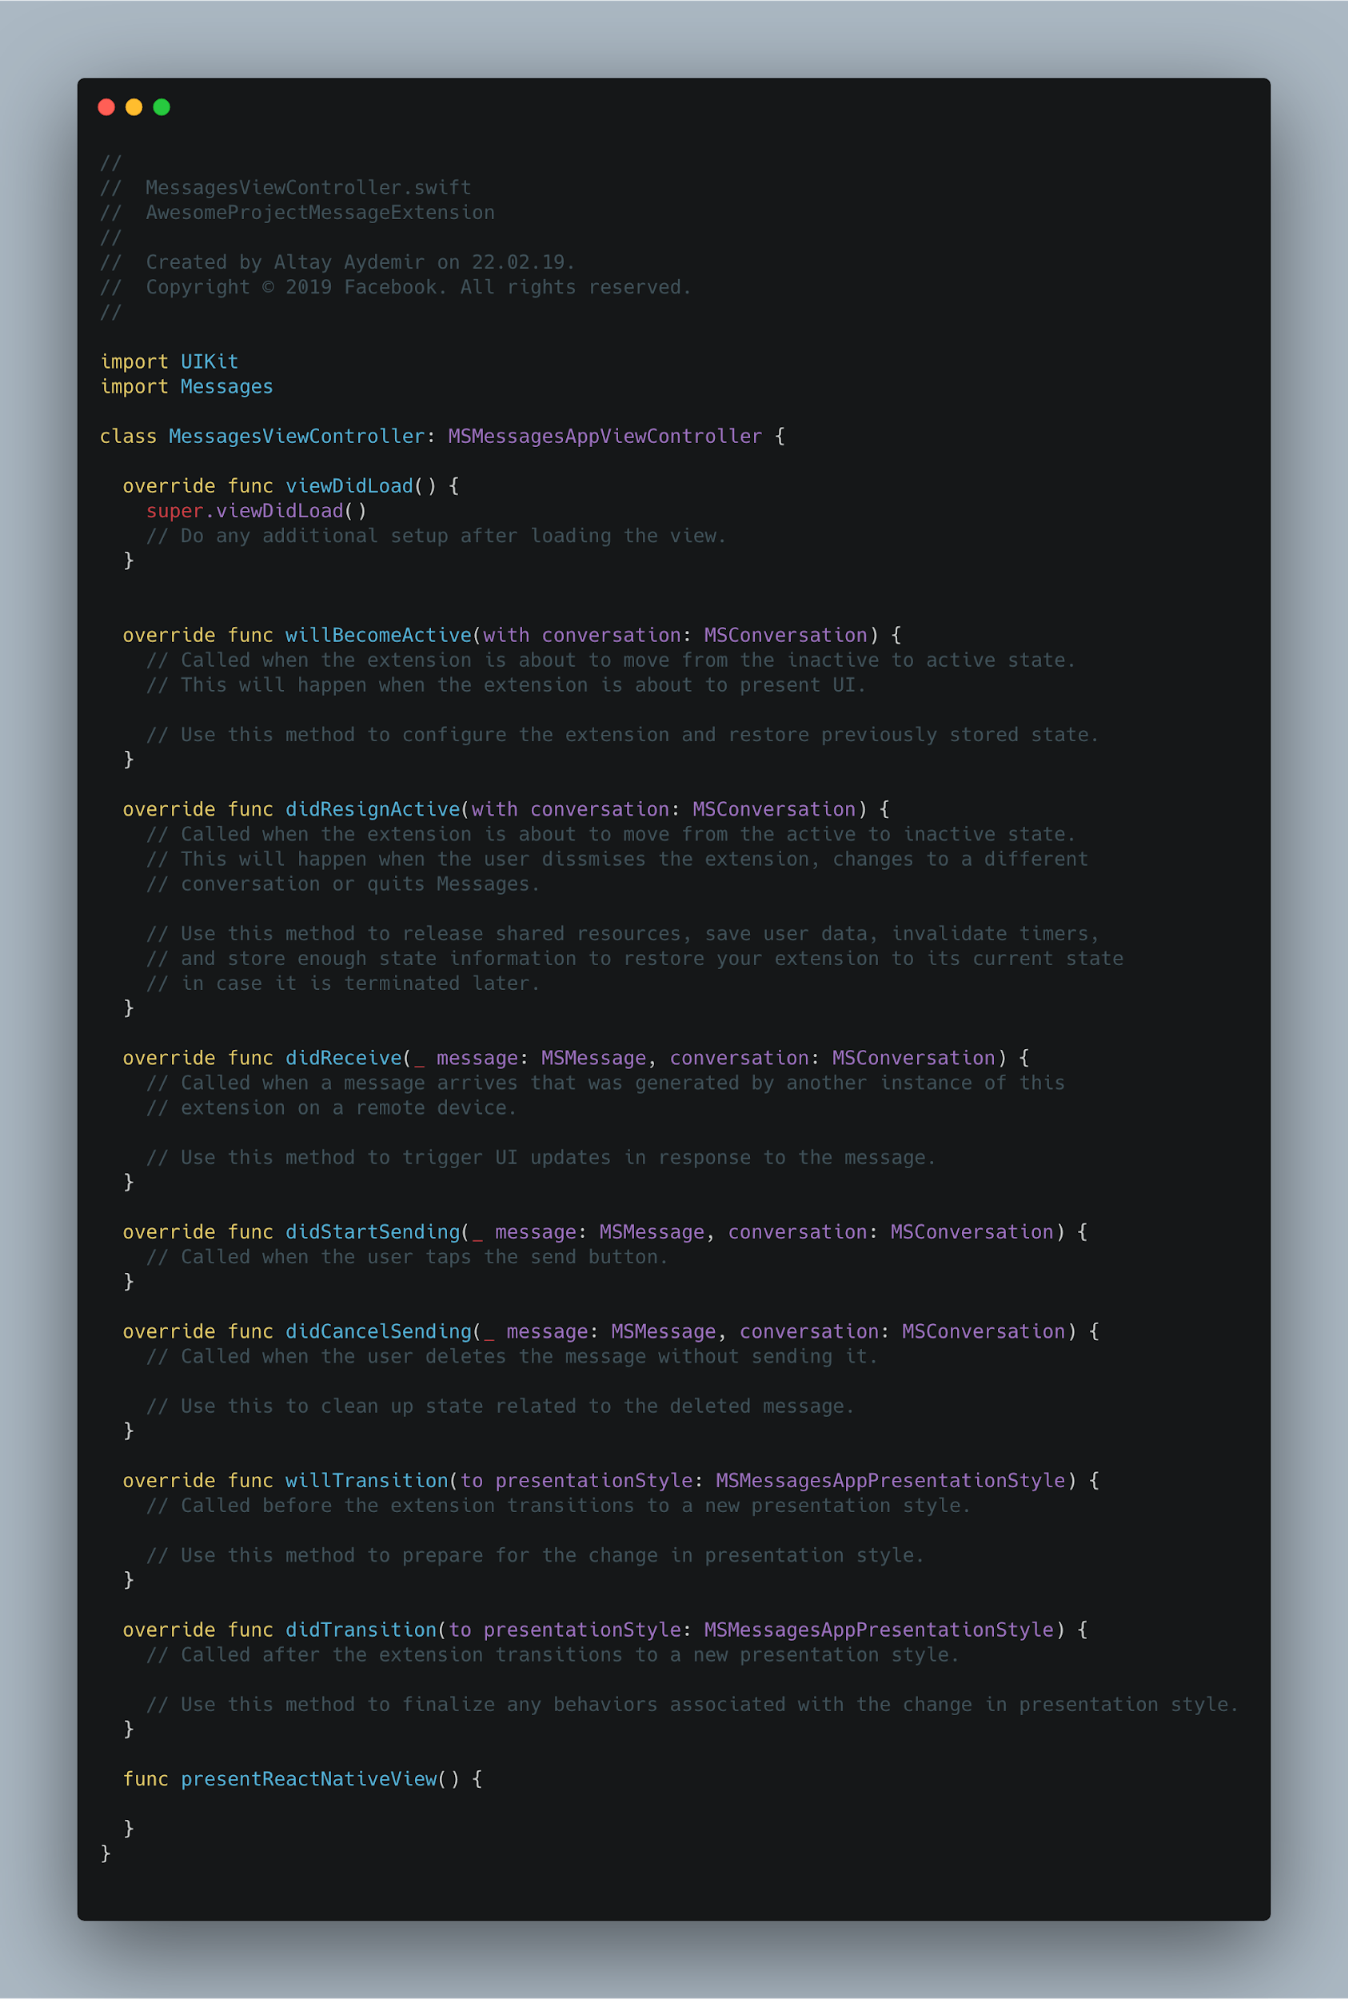 Initial structure of MessagesViewController.swift
First, we start with modifying our MessagesViewController.swift to create an RCTBridge, RCTRootView and render our registered AwesomeProjectMessageExtension module within that view.
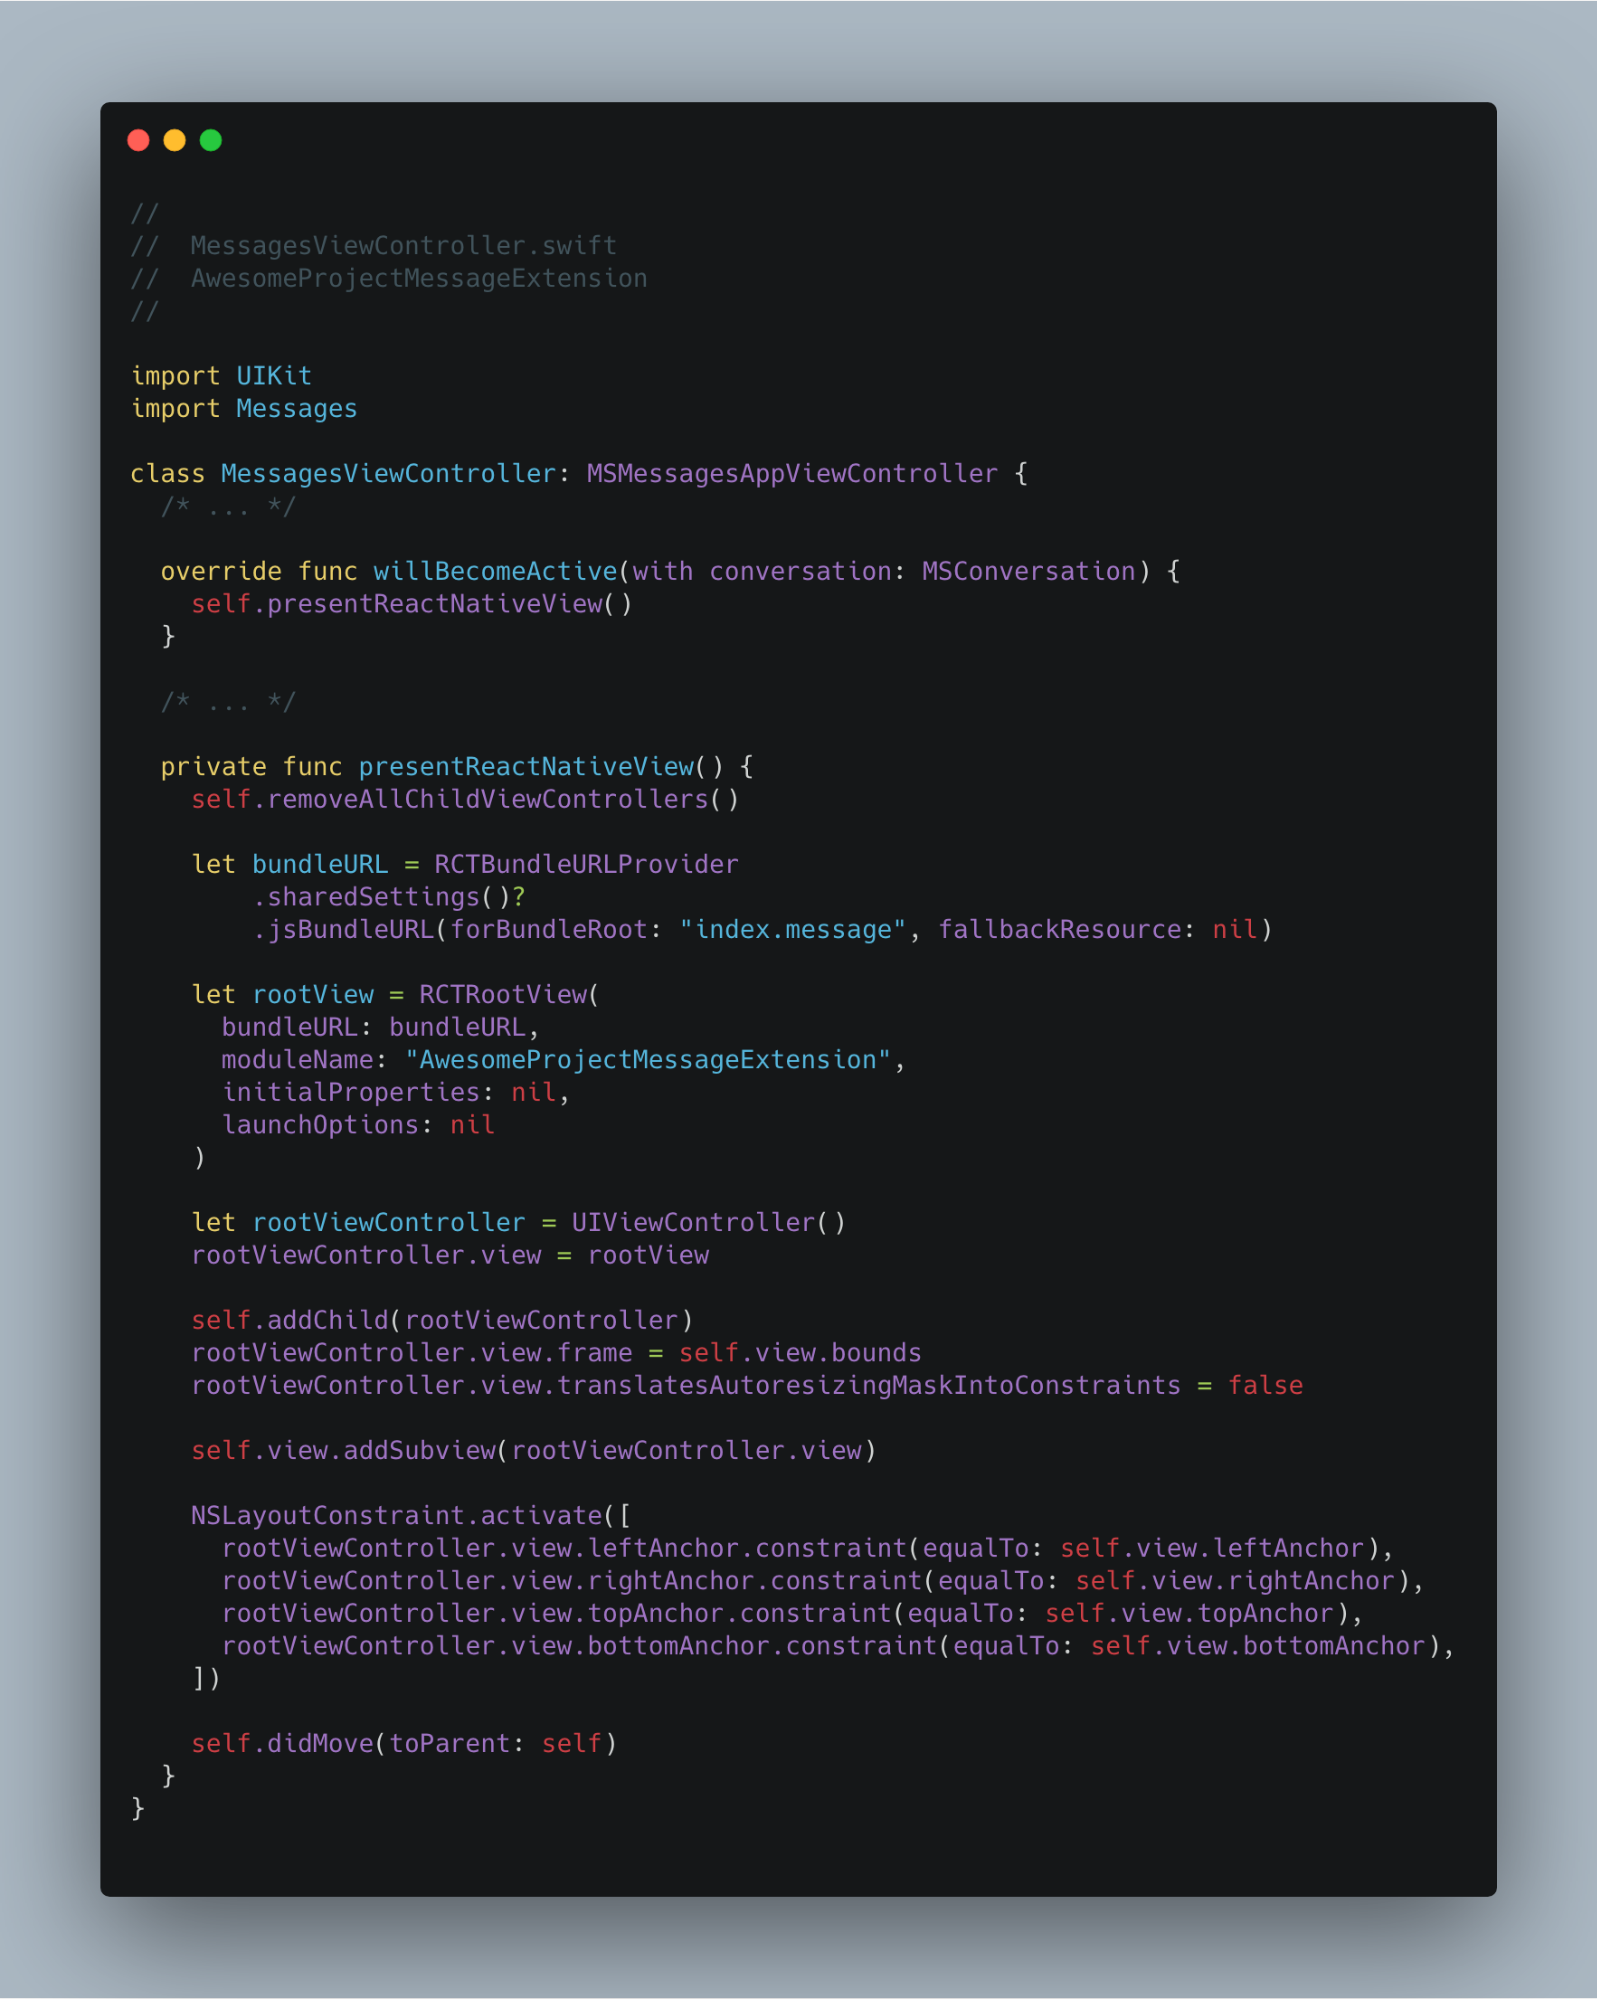 The initial state of the presentReactNativeView method
Since we want to clear out everything in the screen before and after opening the iMessage extension, we also create a little helper module that does the trick for us!
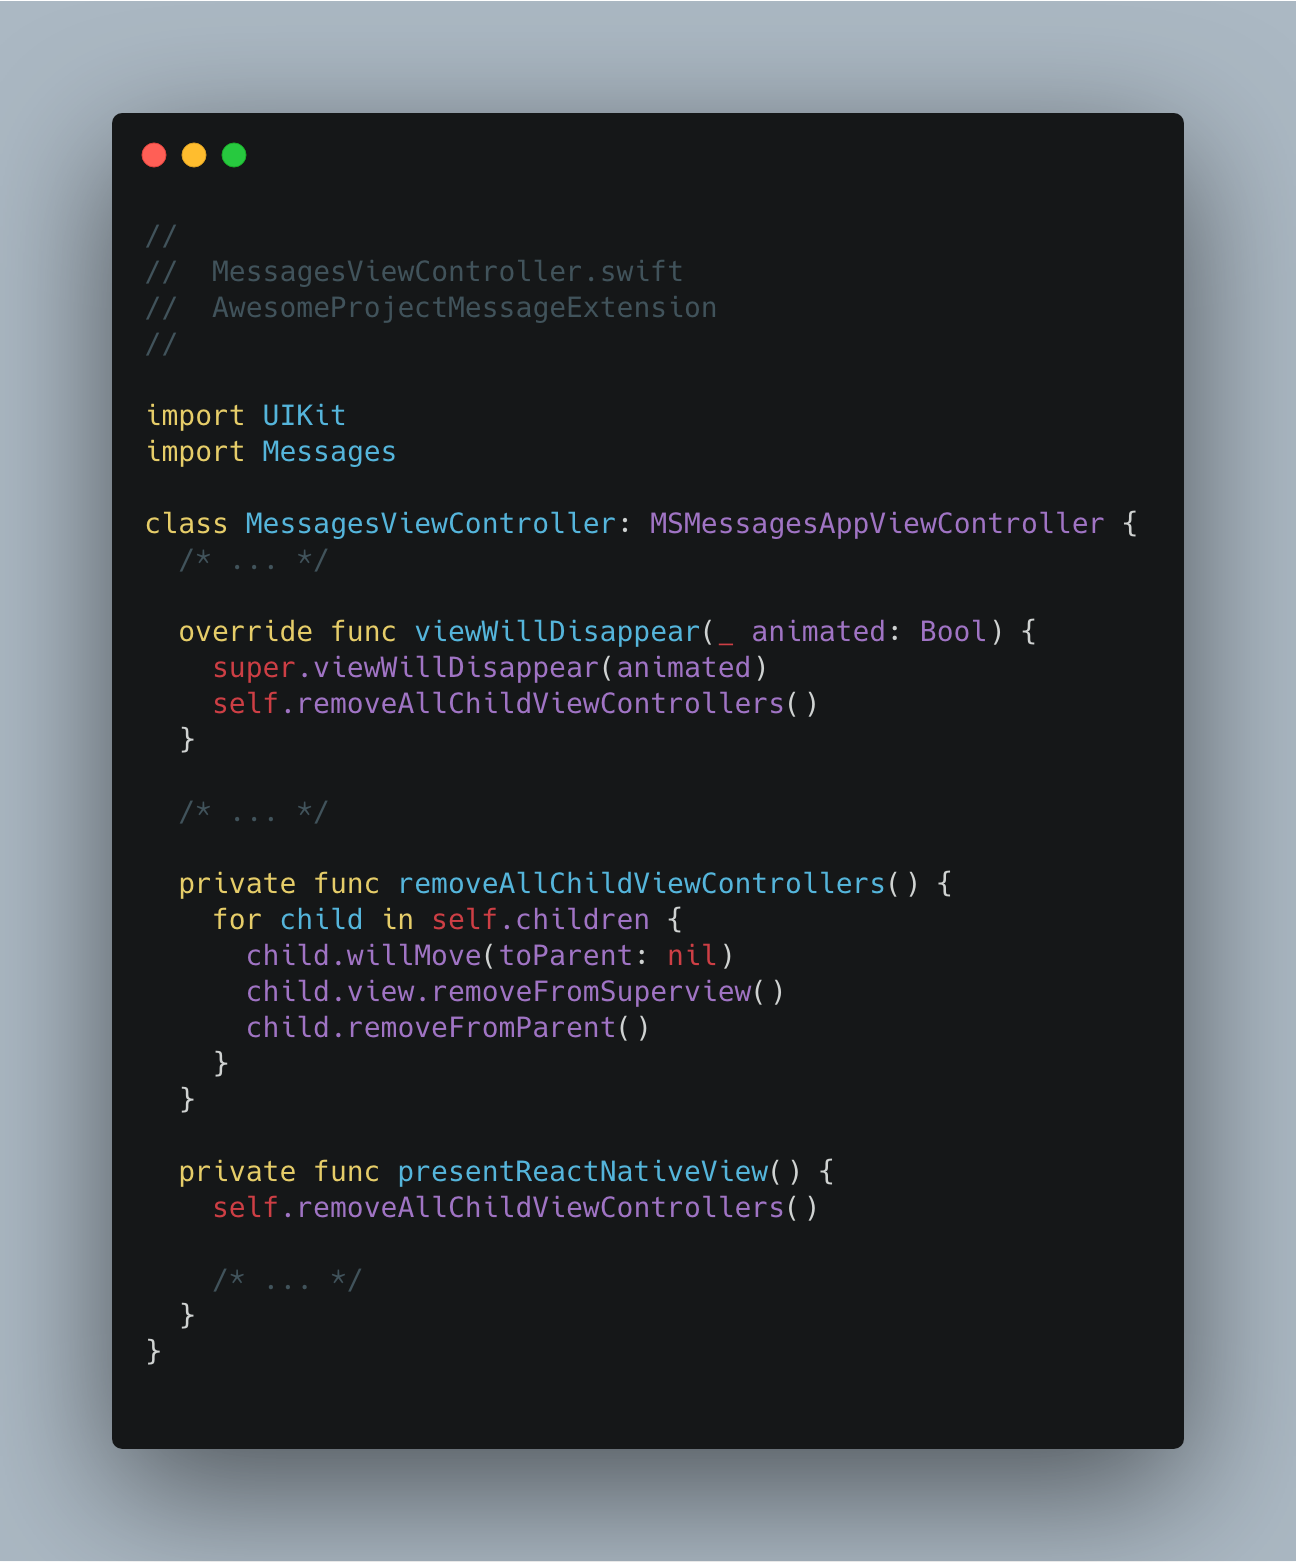 We have added removeAllChildViewControllers utility to clear view hierarchy when needed: Before presenting React Native view and cleaning out the application
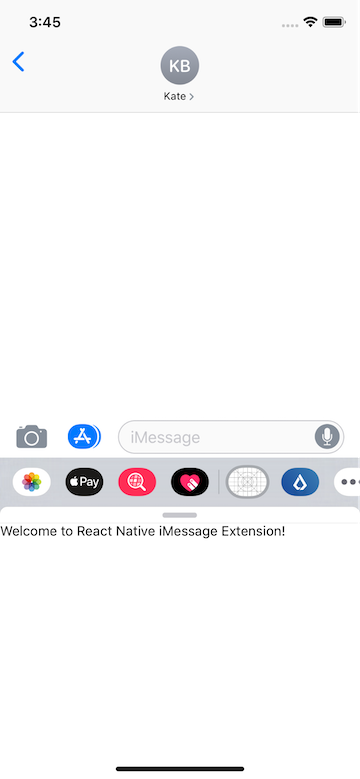 Initial run!
Creating Bridge Modules
In this section, we are going to create our helpers and modules on the Swift side in order to expose the required methods and events to communicate with the React Native side.
Creating a Mapper for Swift — JS Communication
Since we are going to send data from Swift to the React Native, it would be nice to create a mapper utility for formatting that data properly.
 Mapper utility
Creating a Manager for MessagesViewController
Now we are going to create a module named MessagesManager that has a connection with our main MessagesViewController and will help us to interact with from the React Native side.
Based on the guidance from the official documentation we will need access to activeConversion object and presentation style as well as the methods will allow us to modify them.
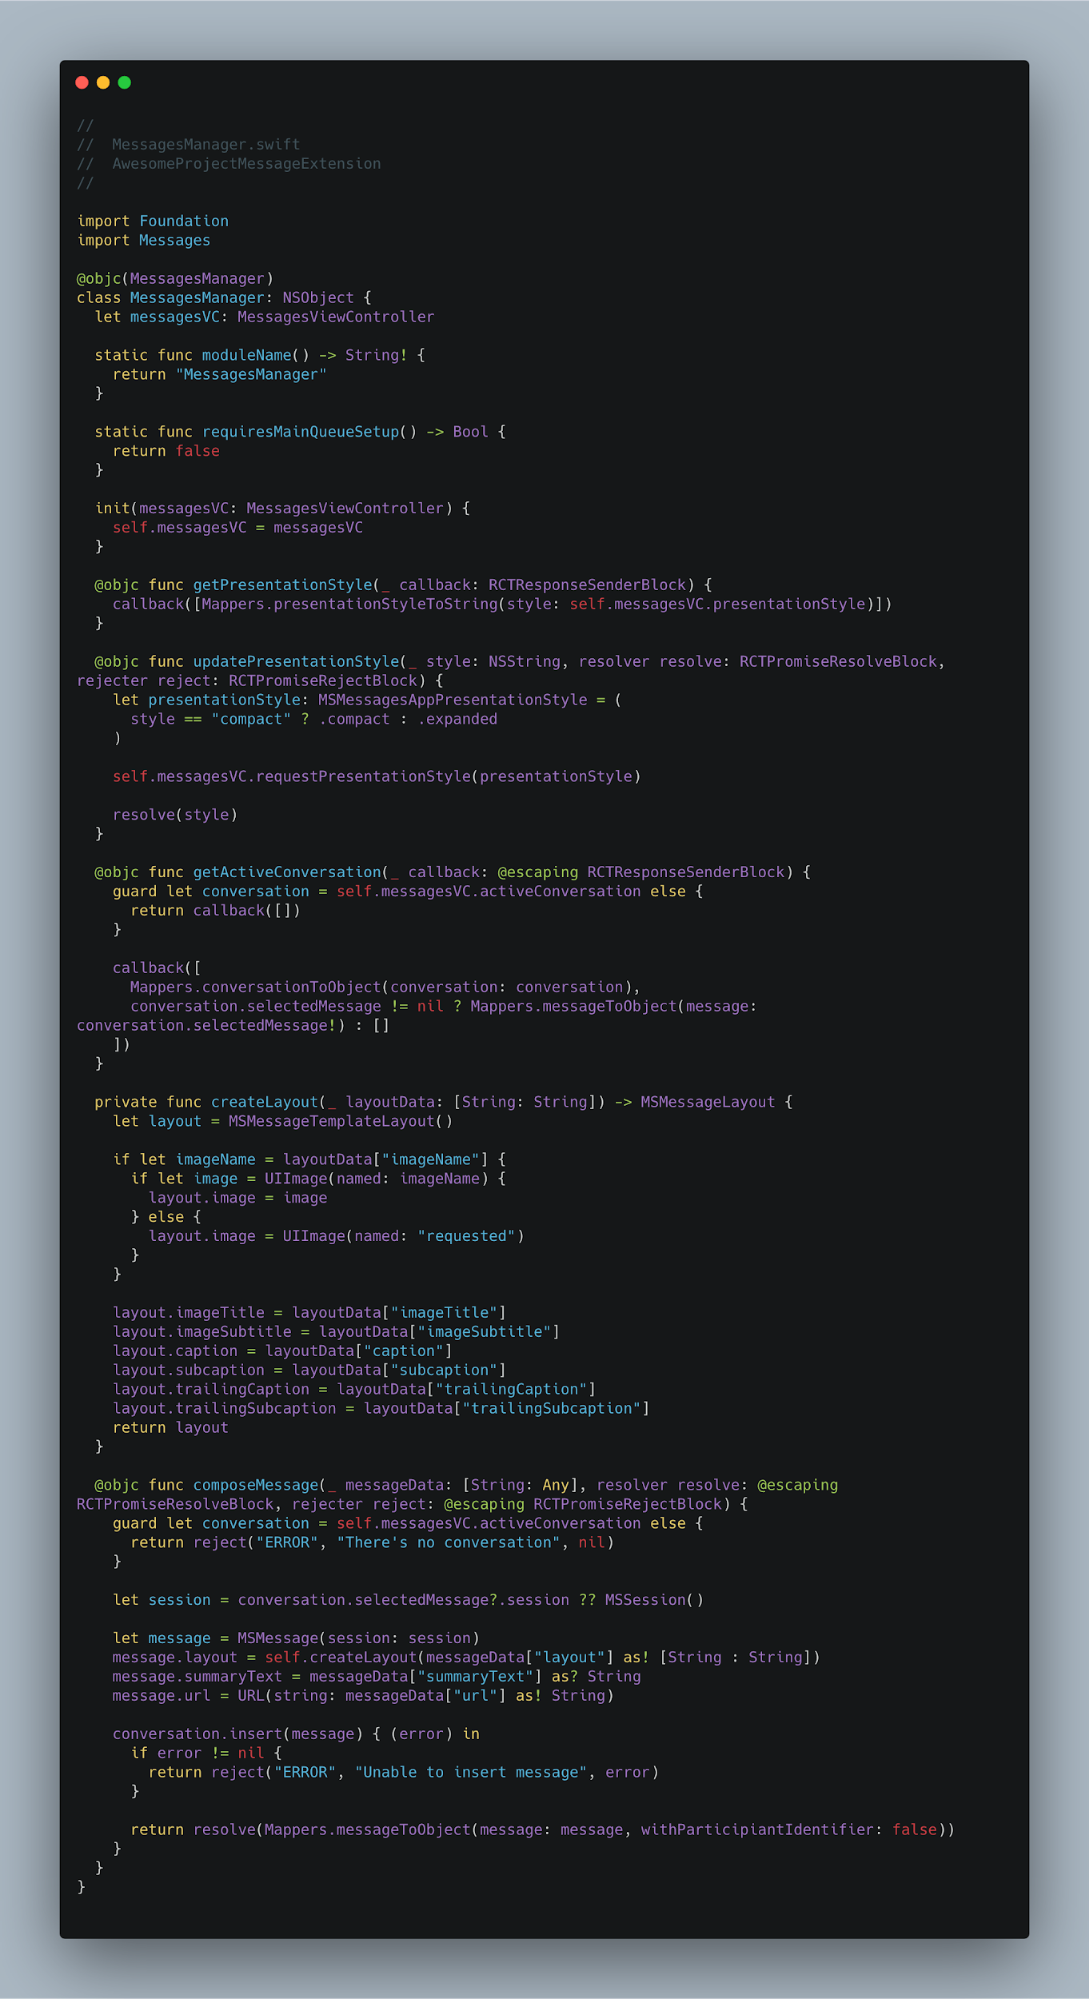 Initial structure of MessagesManager.swift
Since we are creating that custom class with Swift, we also need to provide the interface file to make sure it’s recognized as a native module by React Native.
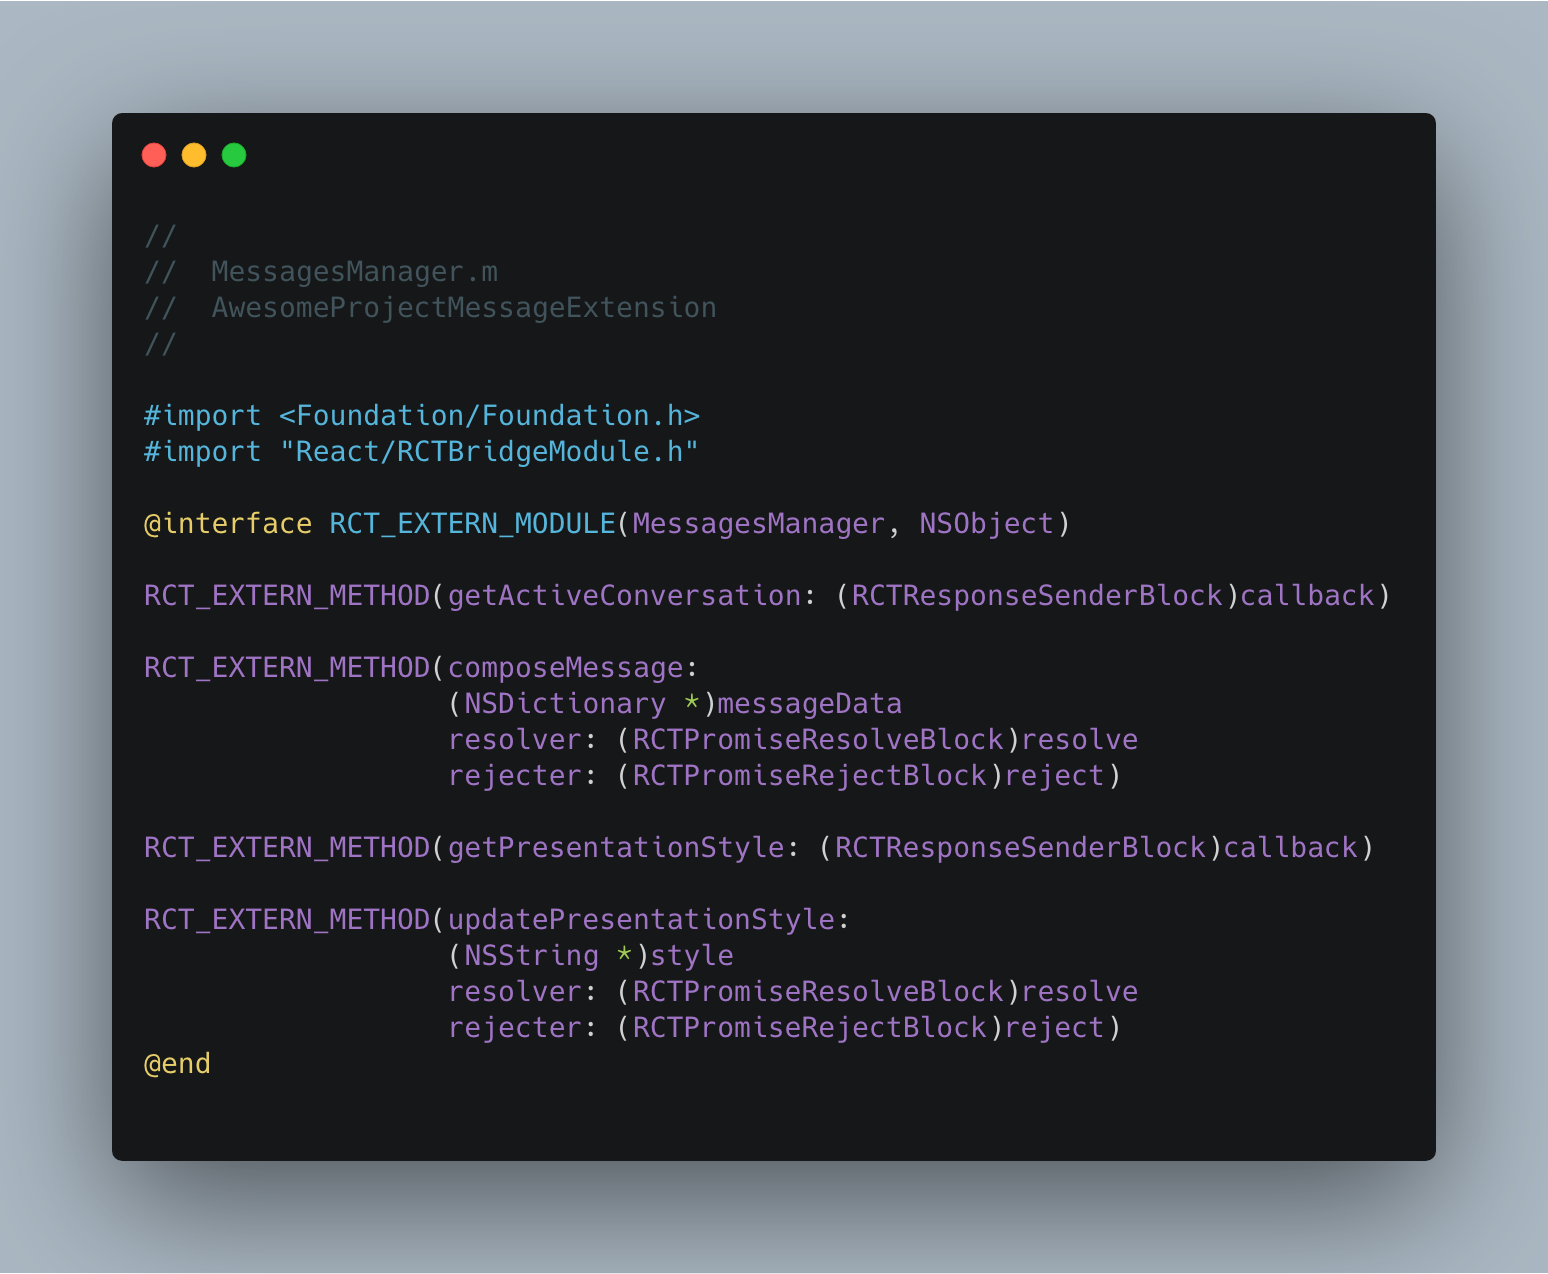 MessagesManager.m file that contains interface declaration for React Native
Creating an EventEmitter for MessagesViewController
In addition to the helper methods we have provided in the previous section, now we will create another class by following the EventEmitter guide from official React Native documentation.
MessagesEventEmitter will help us to keep the JavaScript side informed when there’s a change in the iMessage context. Those changes may be applied as a result of an interaction made by the user (like updating presentation style, selecting a message in a conversation) or receiving a new message from one of the remote participants.
First of all, we update our MessagesViewController to define a protocol that can be easily implemented by MessagesEventEmitter to reduce the effort we need to make (and encourage separation of concerns) in order to follow an event-based design pattern.
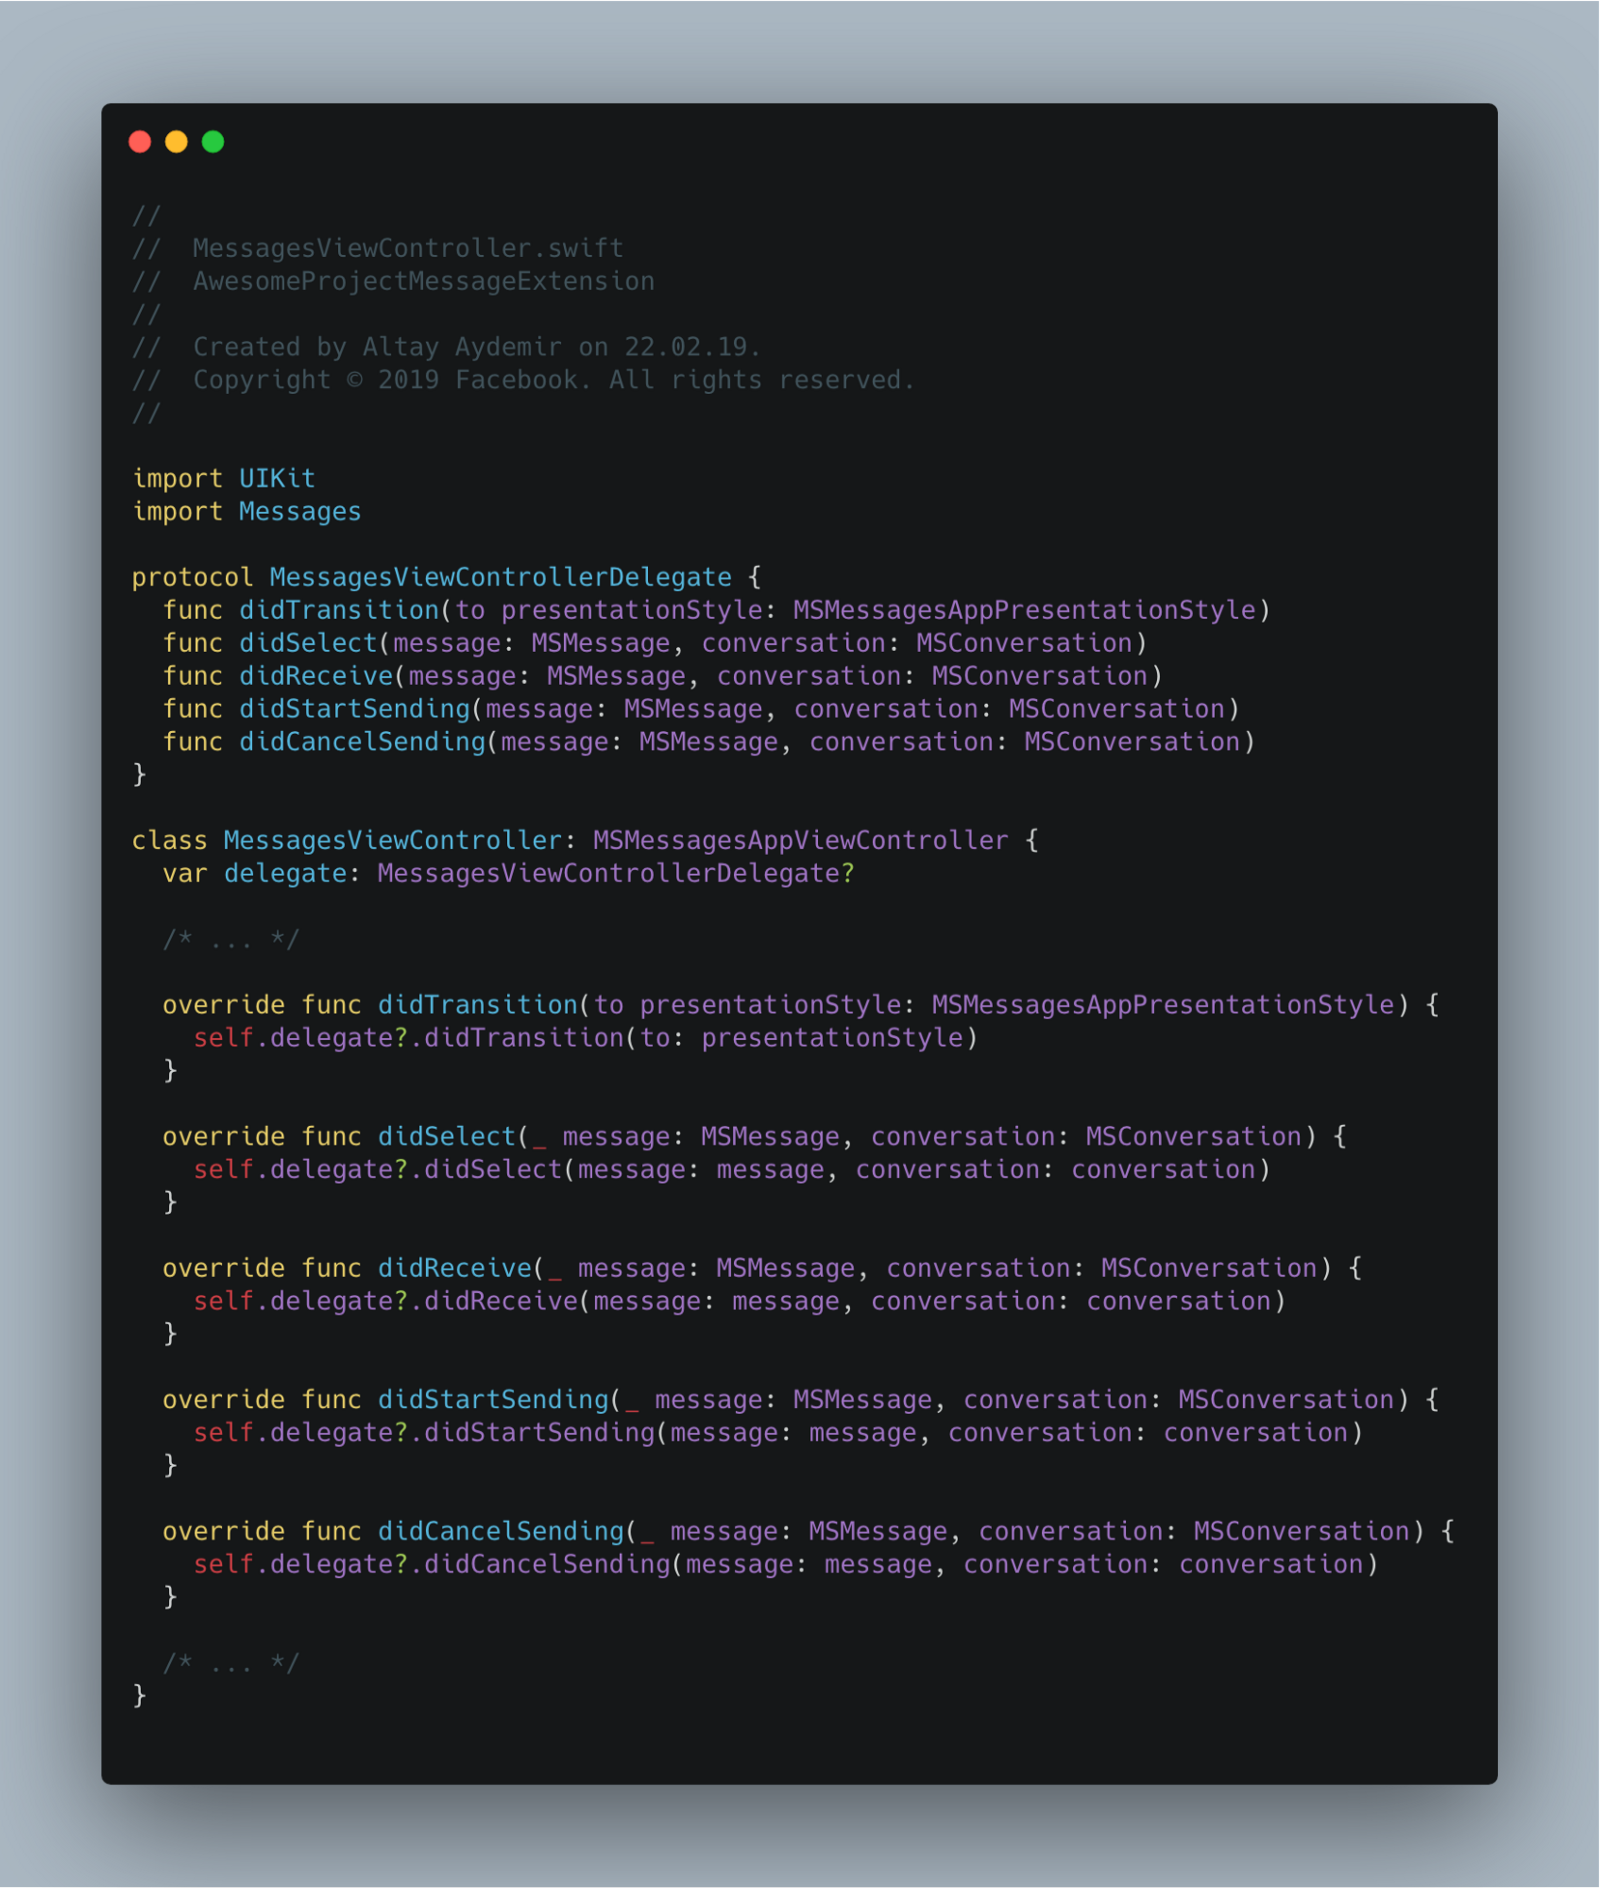 Updates we have made on MessagesViewController file in order to use protocol pattern
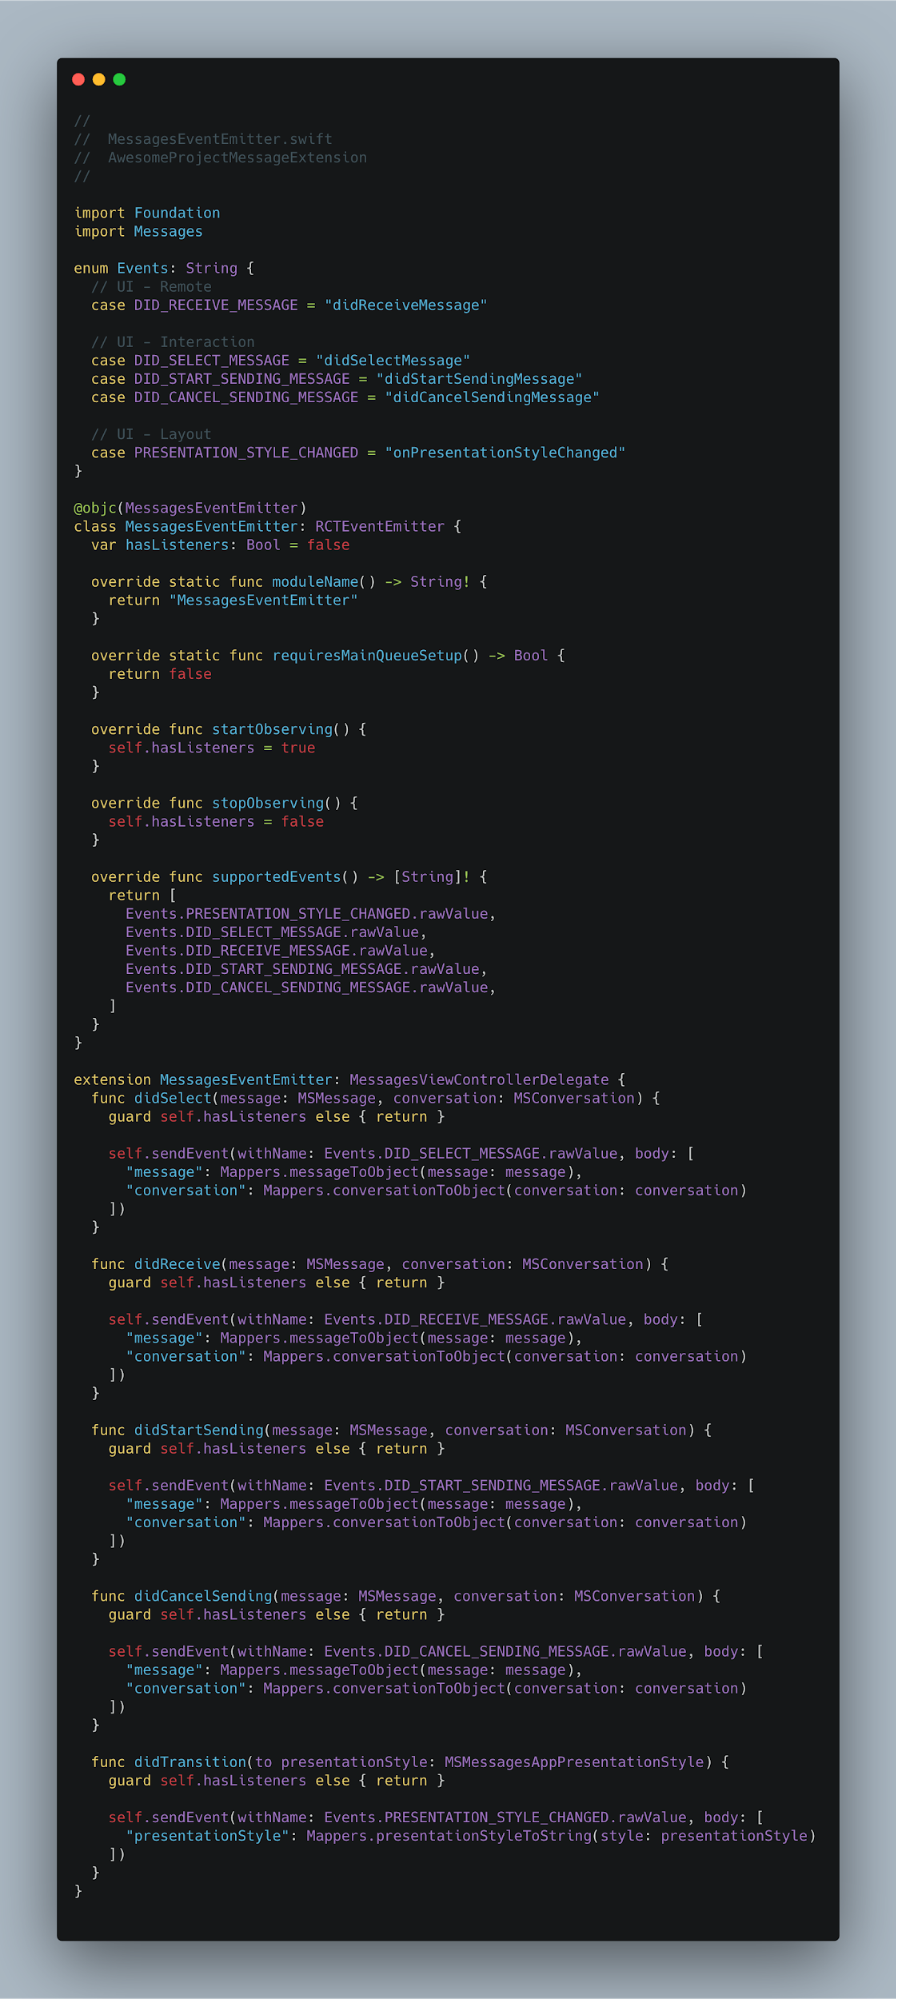 Initial structure of MessagesEventEmitter
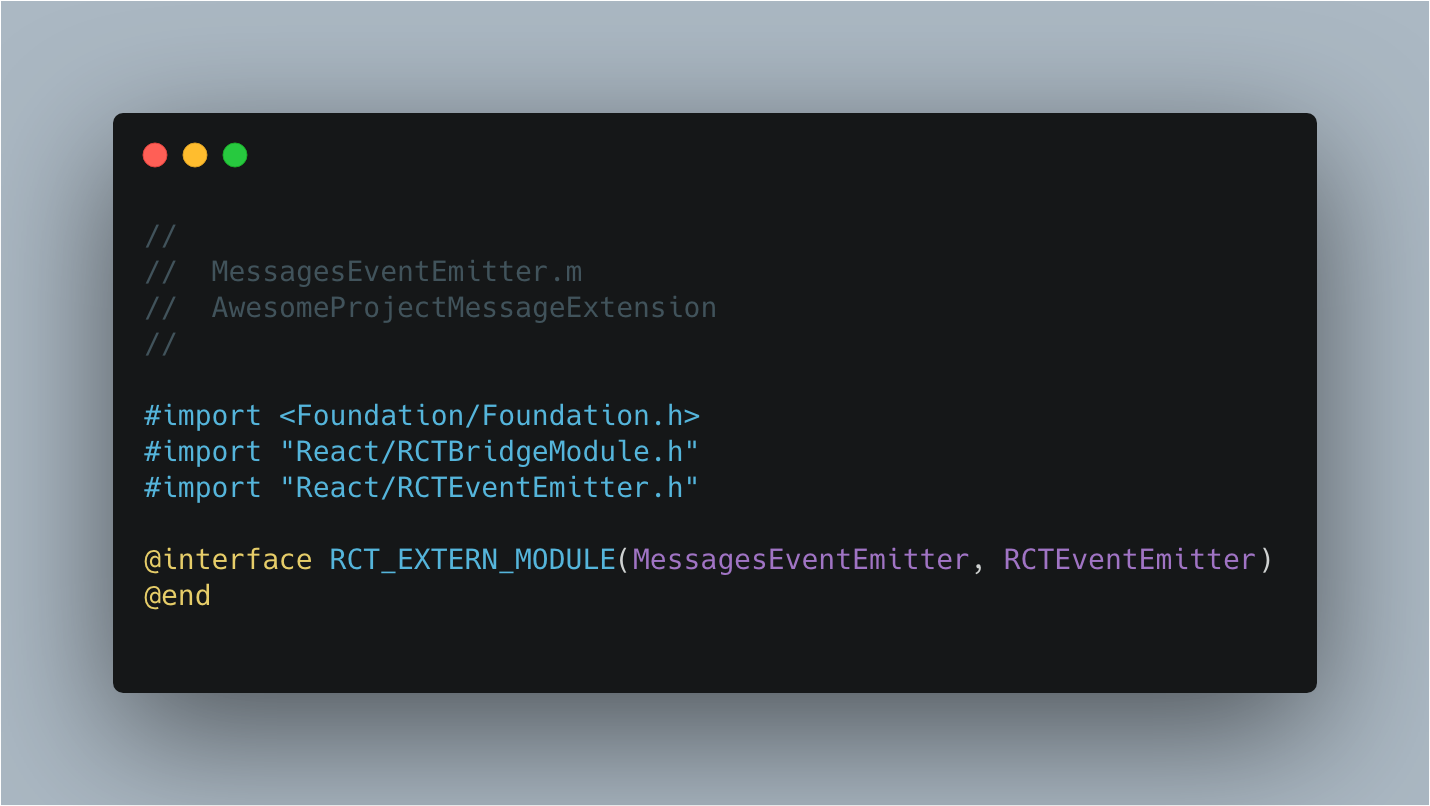 MessagesEventEmitter.m file that contains interface declaration for React Native
Custom Module Initializer
If you create a native module with React Native by following the basic flow, you’ll end up with a pre-instantiated object that is created during the initialization step of the bridge. If it was a regular iOS application, we would have a chance to communicate with the root view controller by using UIApplication’s shared property but that’s not what we were exactly looking for.
Considering that our Native Module needs to be stateful to communicate with the MessagesAppViewController instance, we ended up creating a custom module initializer by following an approach derived from the the dependency injection guide on React Native documentation.
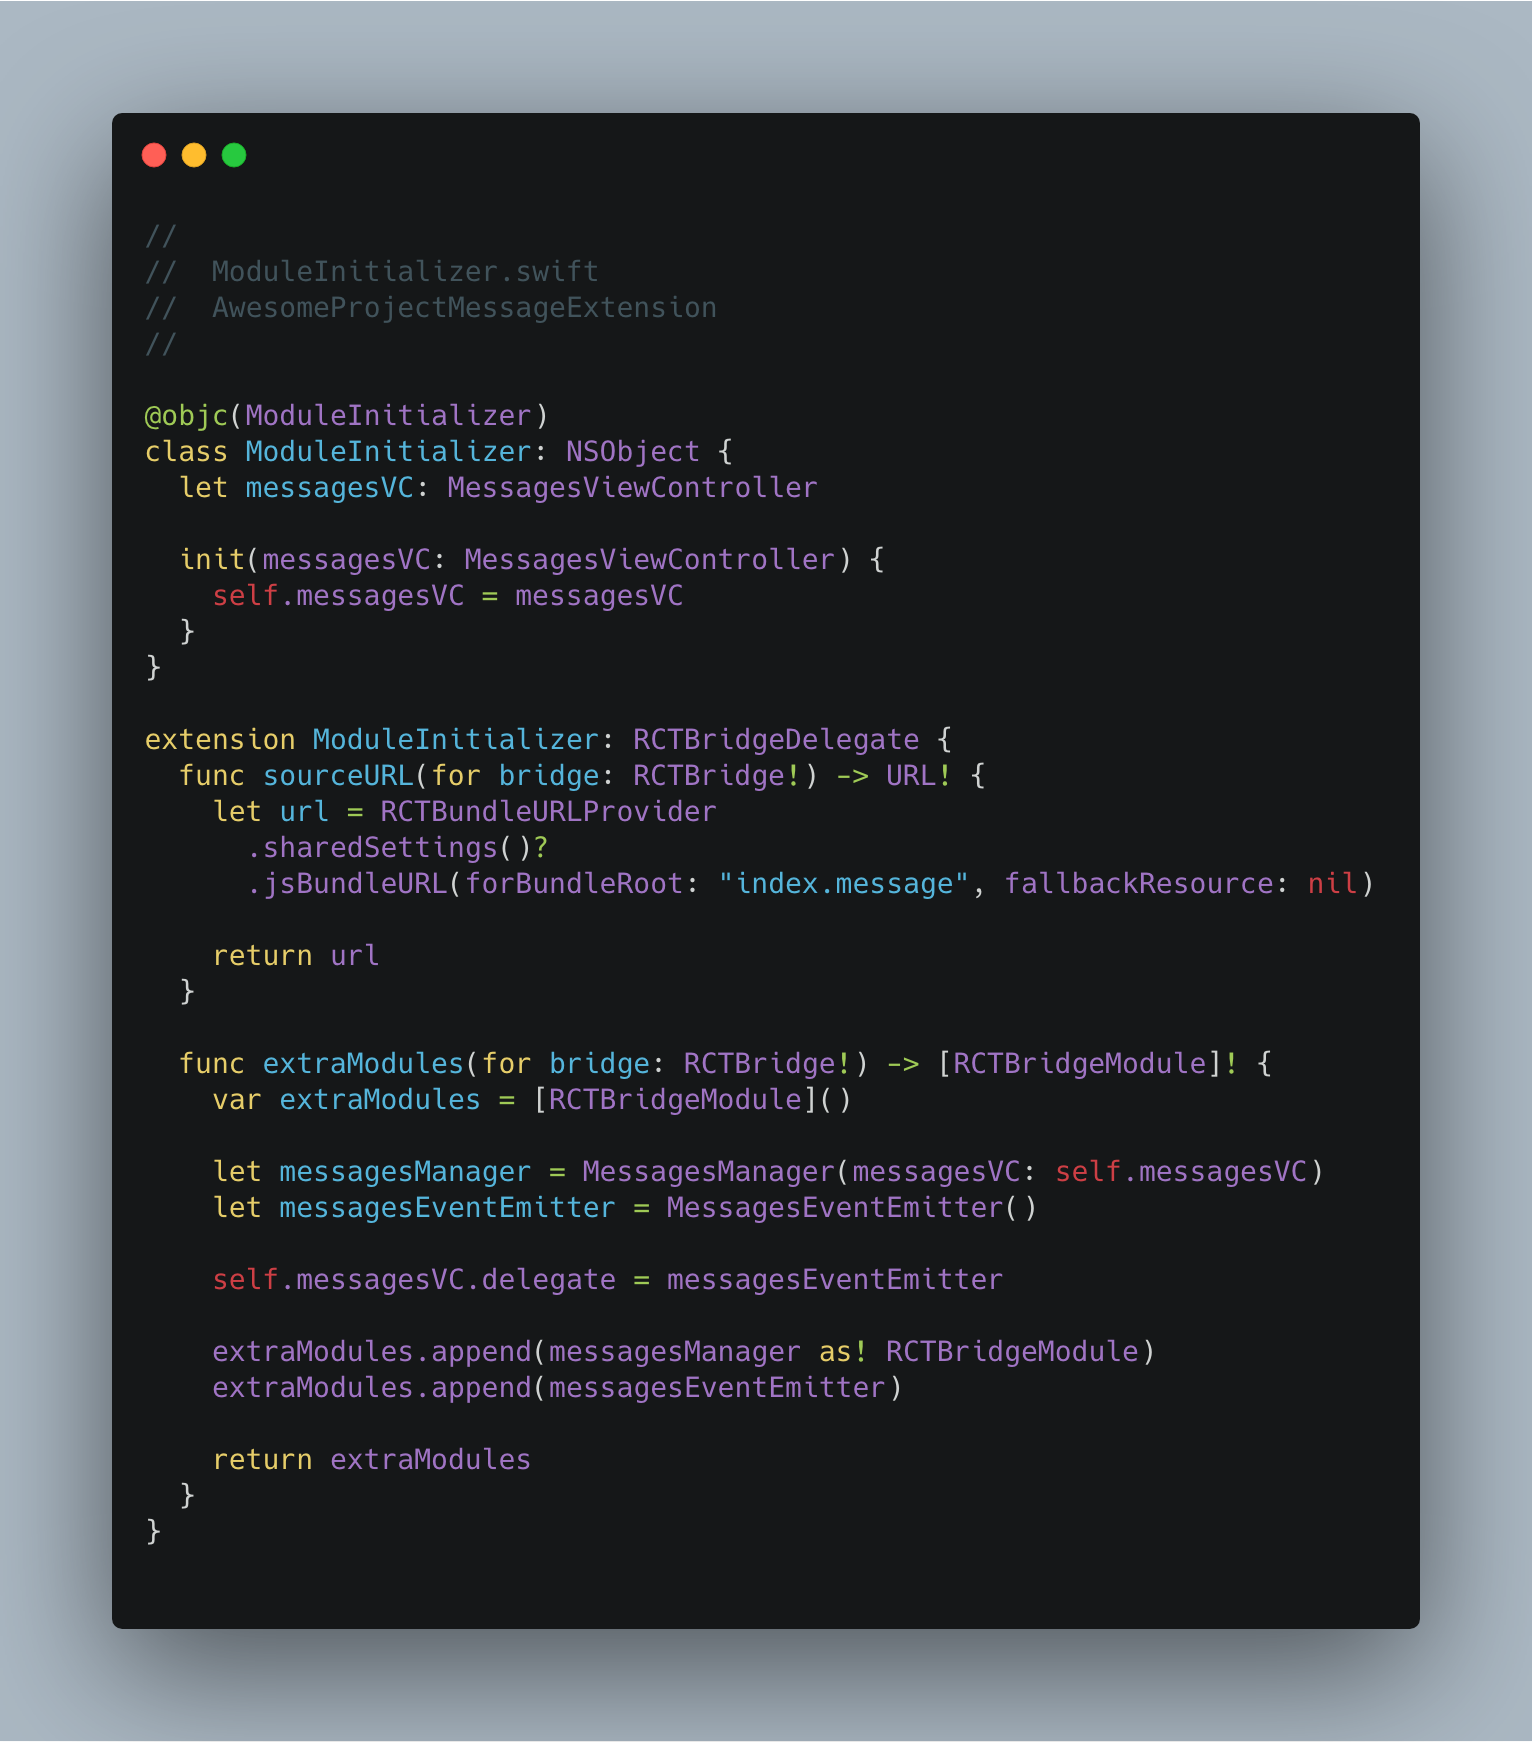 Custom ModuleInitializer that allows us to use dependency injection pattern at the initialization step of MessagesManager and MessagesEventEmitter modules
Then we will update the presentReactNative method of MessagesViewController to use that custom module initializer.
 Updating related parts of MessagesViewController to use custom module initializer
Consuming Native Modules on React Native
Now that we have covered pretty much all the things we need from our native modules, we can start playing with them on the React Native side.
Updating Presentation Style
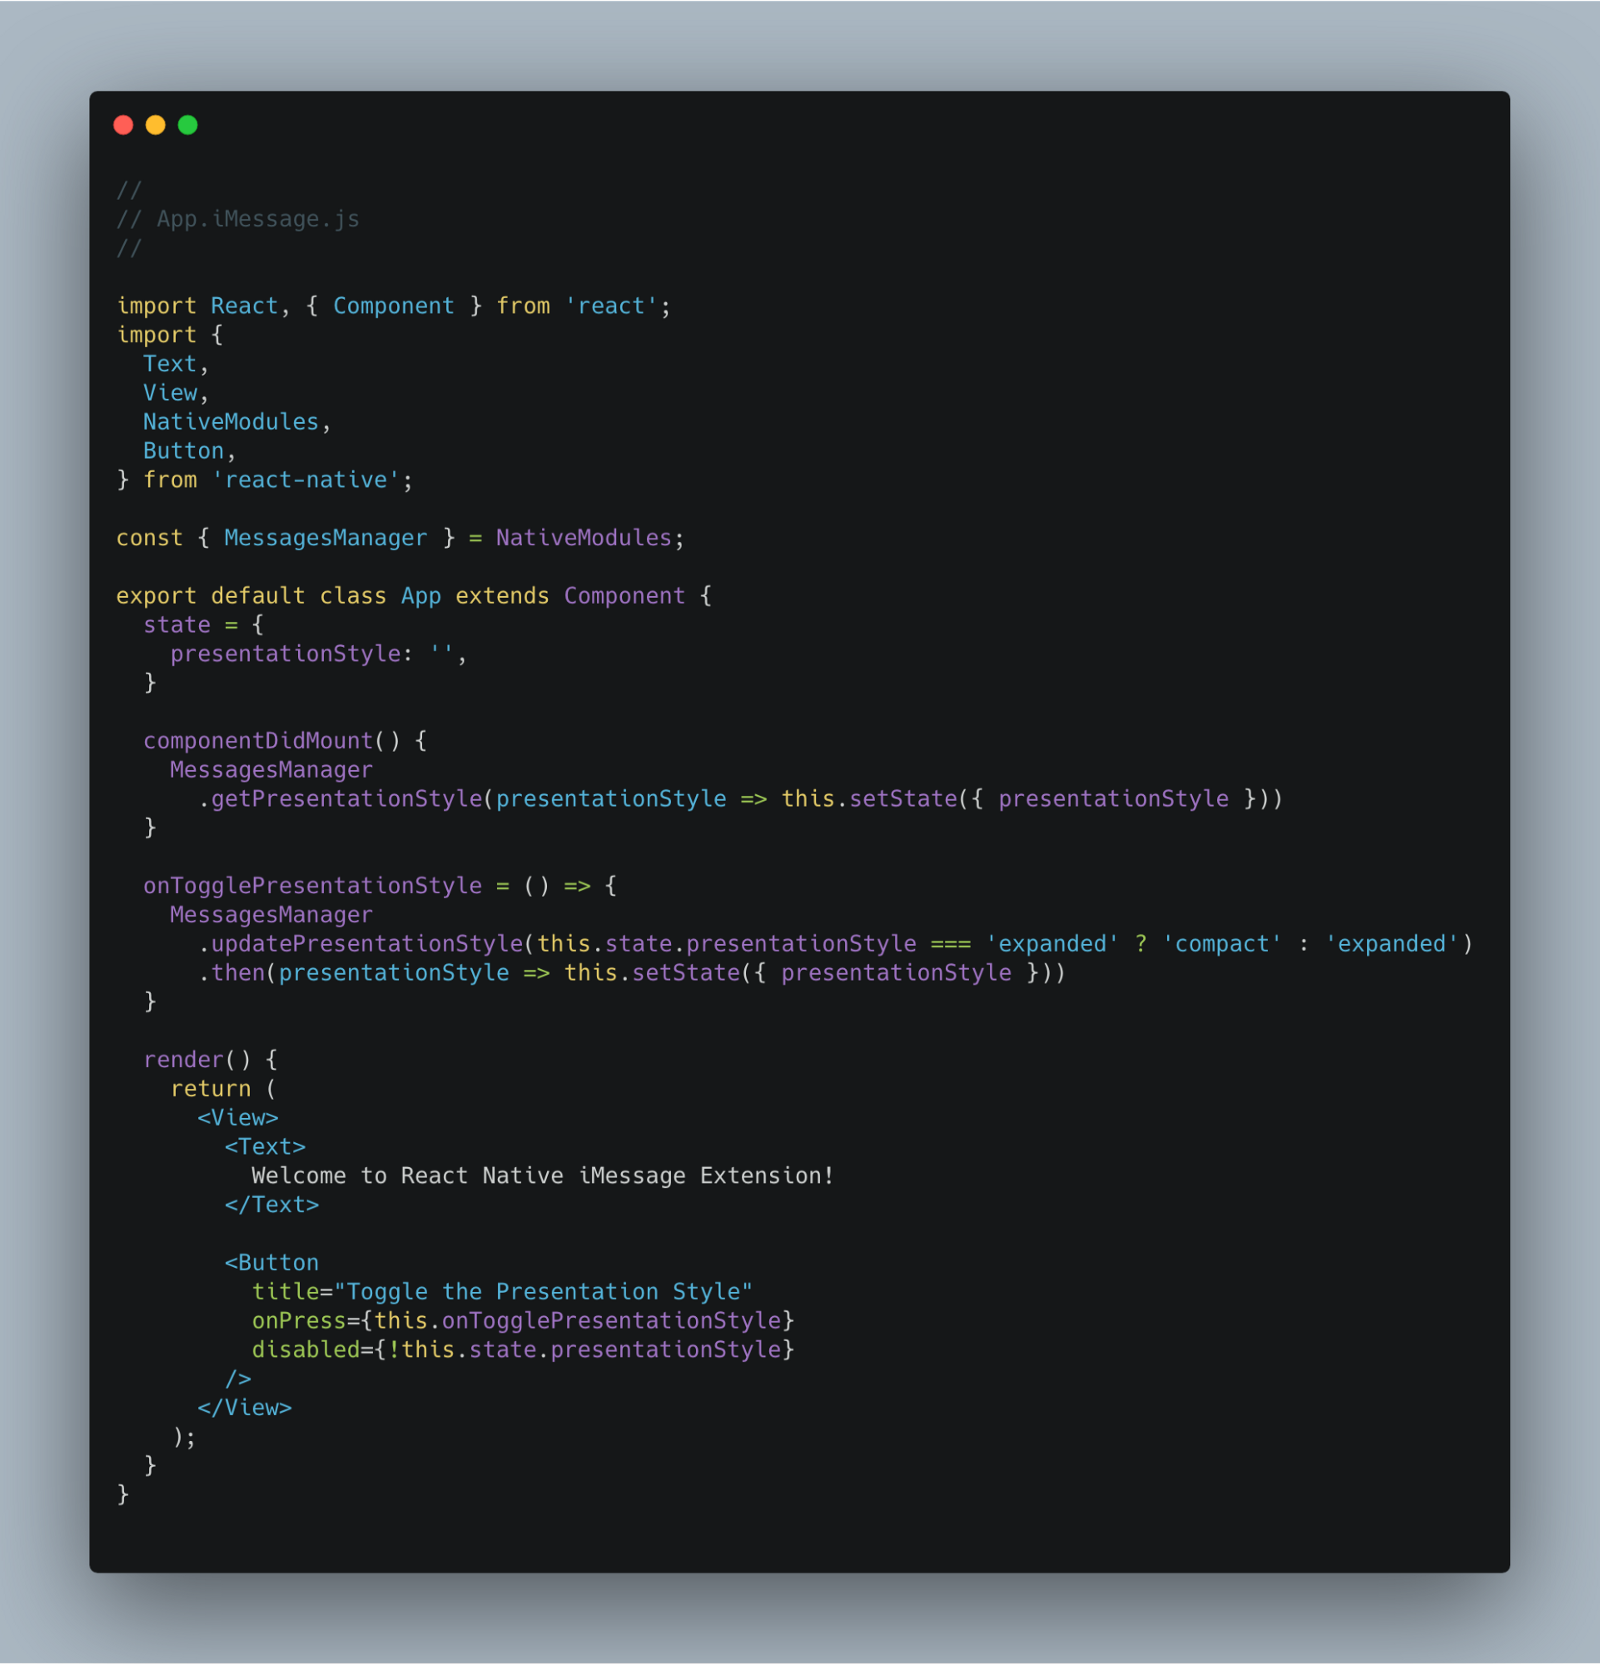 Making use of getPresentationStyle and updatePresentationStyle methods on the React Native side
 onTogglePresentationStyle Method in Action
So far so good huh? But we forgot something. Let’s look at the recording below and try to catch what’s missing.
 🤔 🤔 🤔
🤔 🤔 🤔
Since we are not listening to the events related to the presentation style changes triggered by the native UI, we end up in a loop with the sheet continually opening, we don’t have the correct value of presentationStyle right after it’s been updated. In order to resolve this, we are going to use the MessagesEventEmitter module.
This will allow the sheet to receive updates on the state from both the native Swift environment (for when users manually close the sheet) and from within our React Native app.
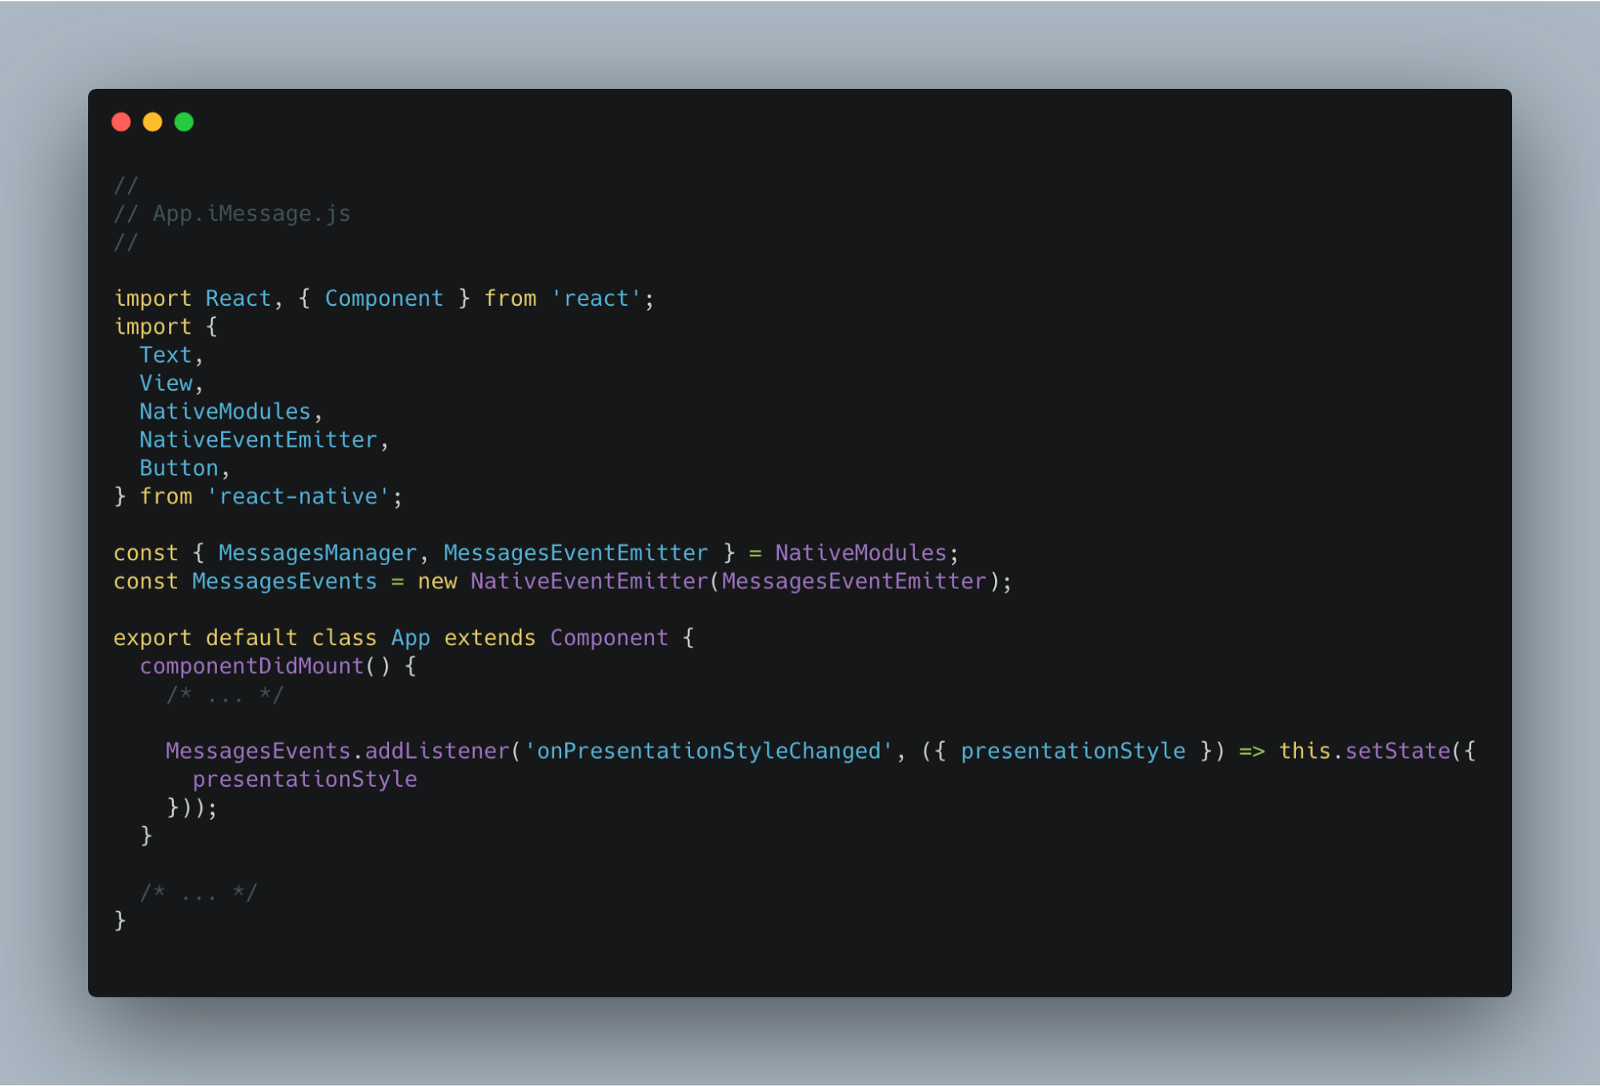 Using MessagesEventEmitter for listening changes on presentationStyle
Now the app responds to both triggers from the codebase, and users manually close or open the sheet.
Composing a Message
Now we are so close to our main goal, composing an iMessage from the React Native side!
Let’s start with initializing our blueprint to create the data of a message object that we can through our MessagesManager module.
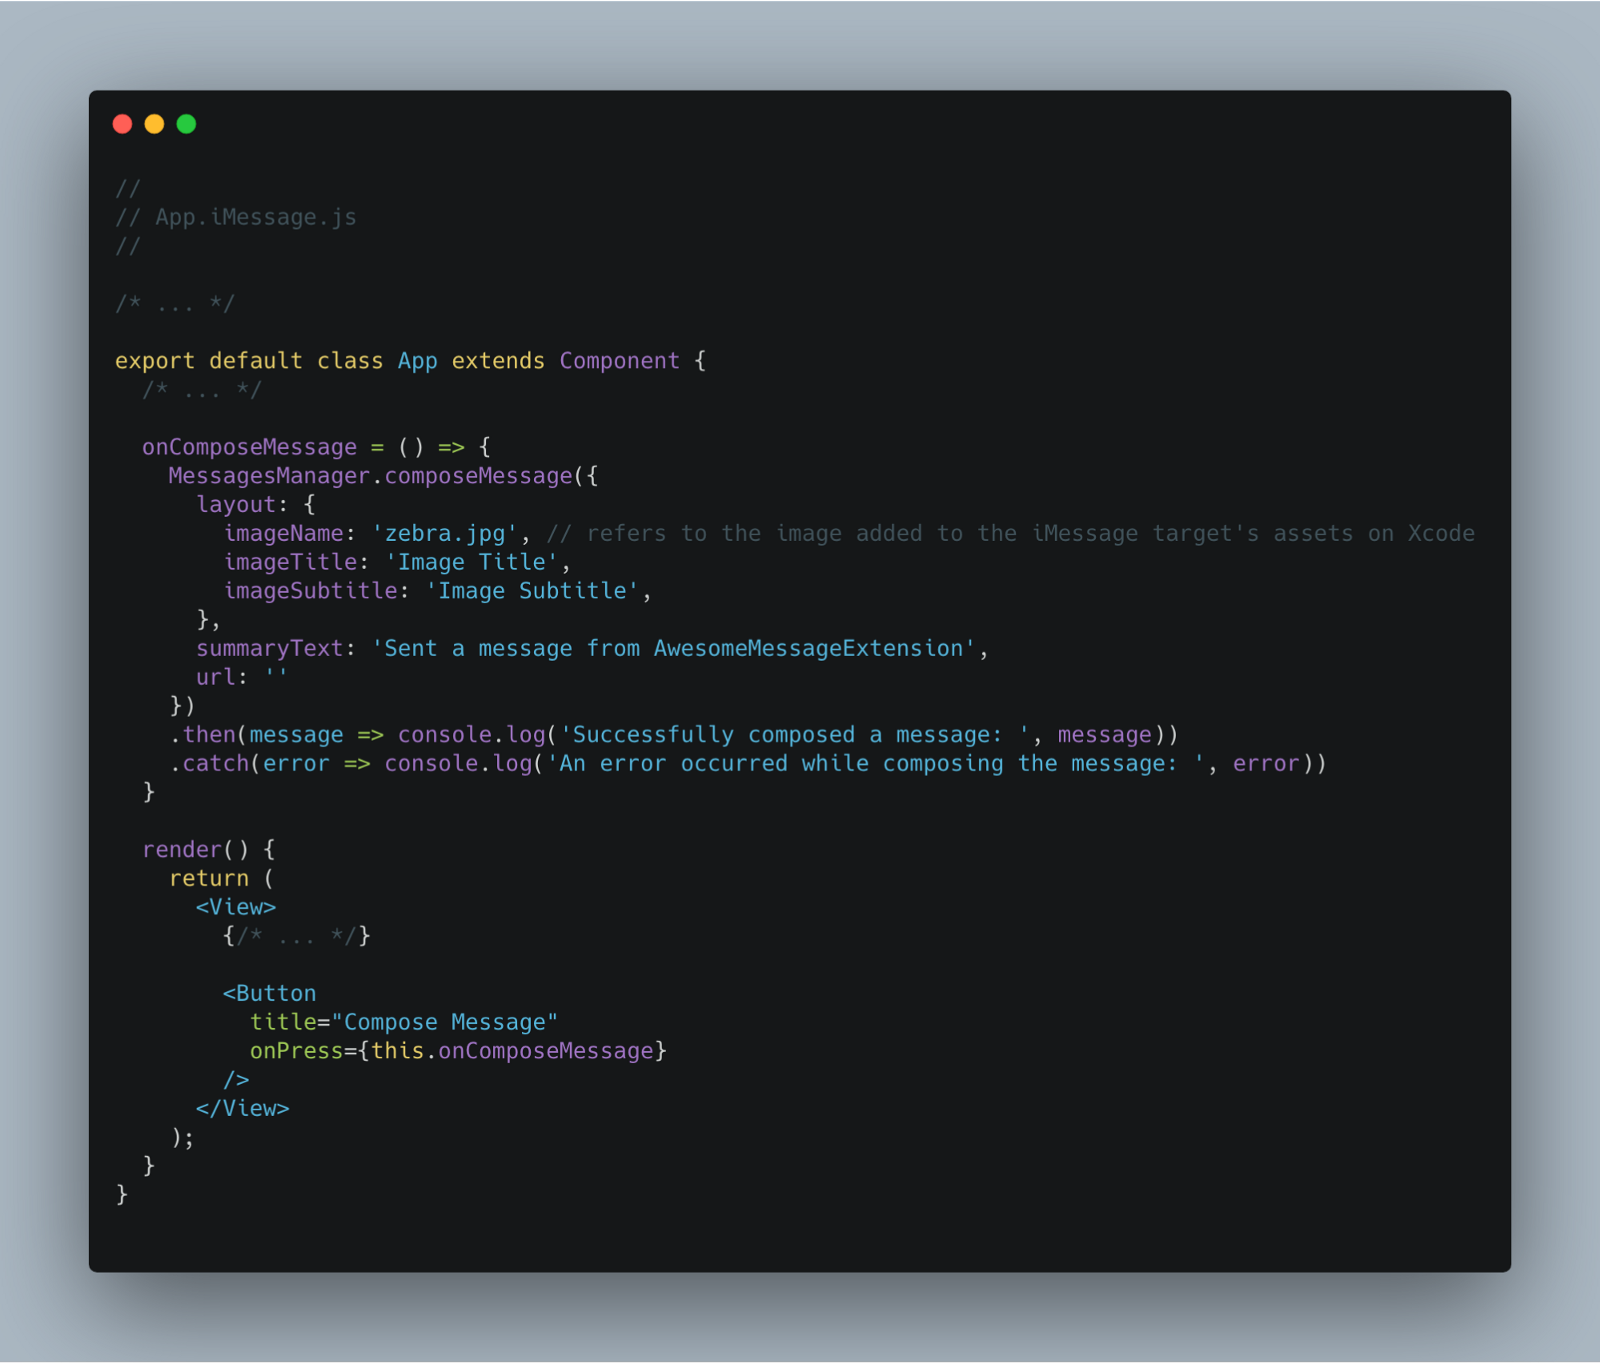 Using composeMessage method of MessagesManager to create a test message
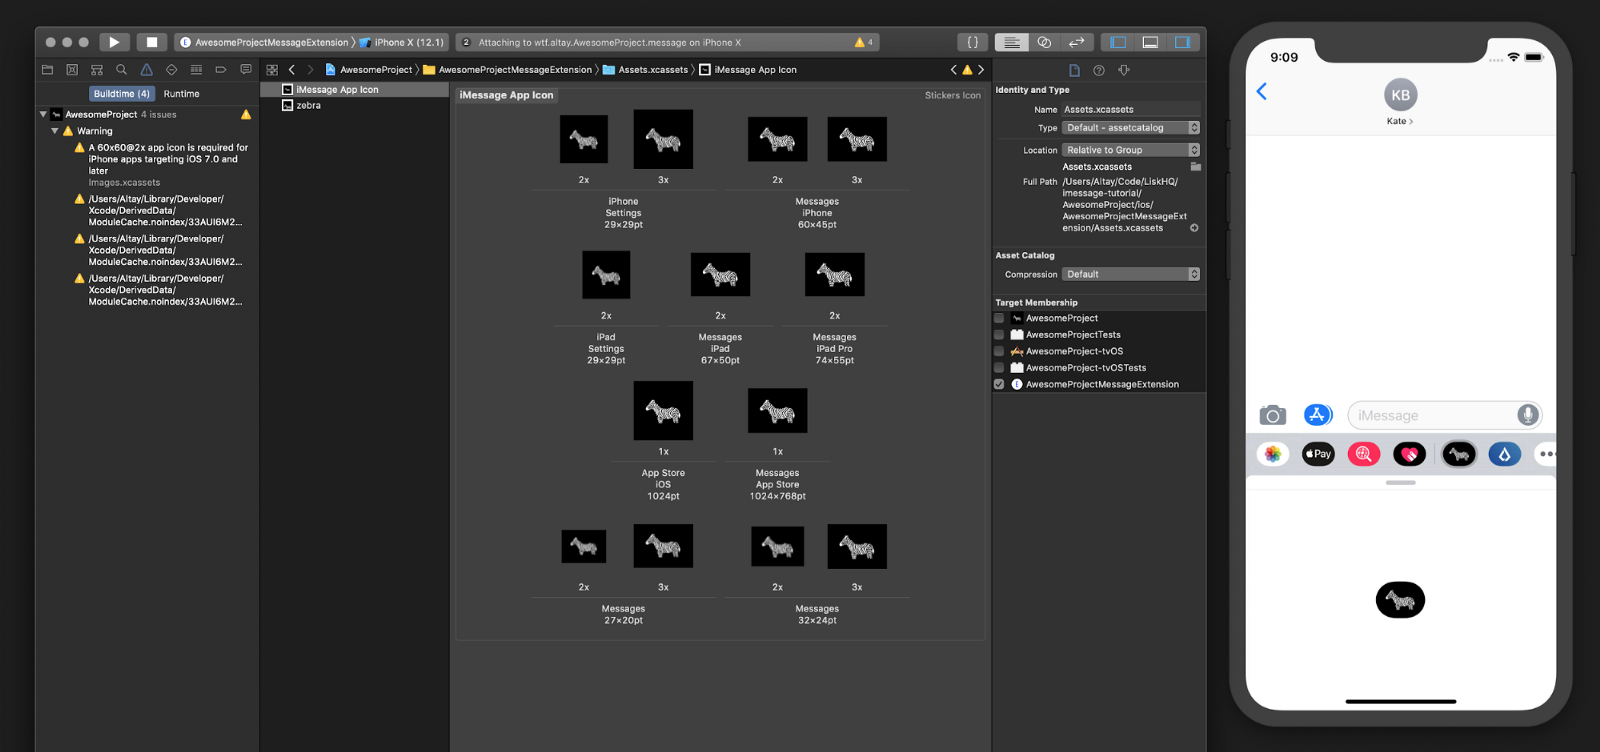
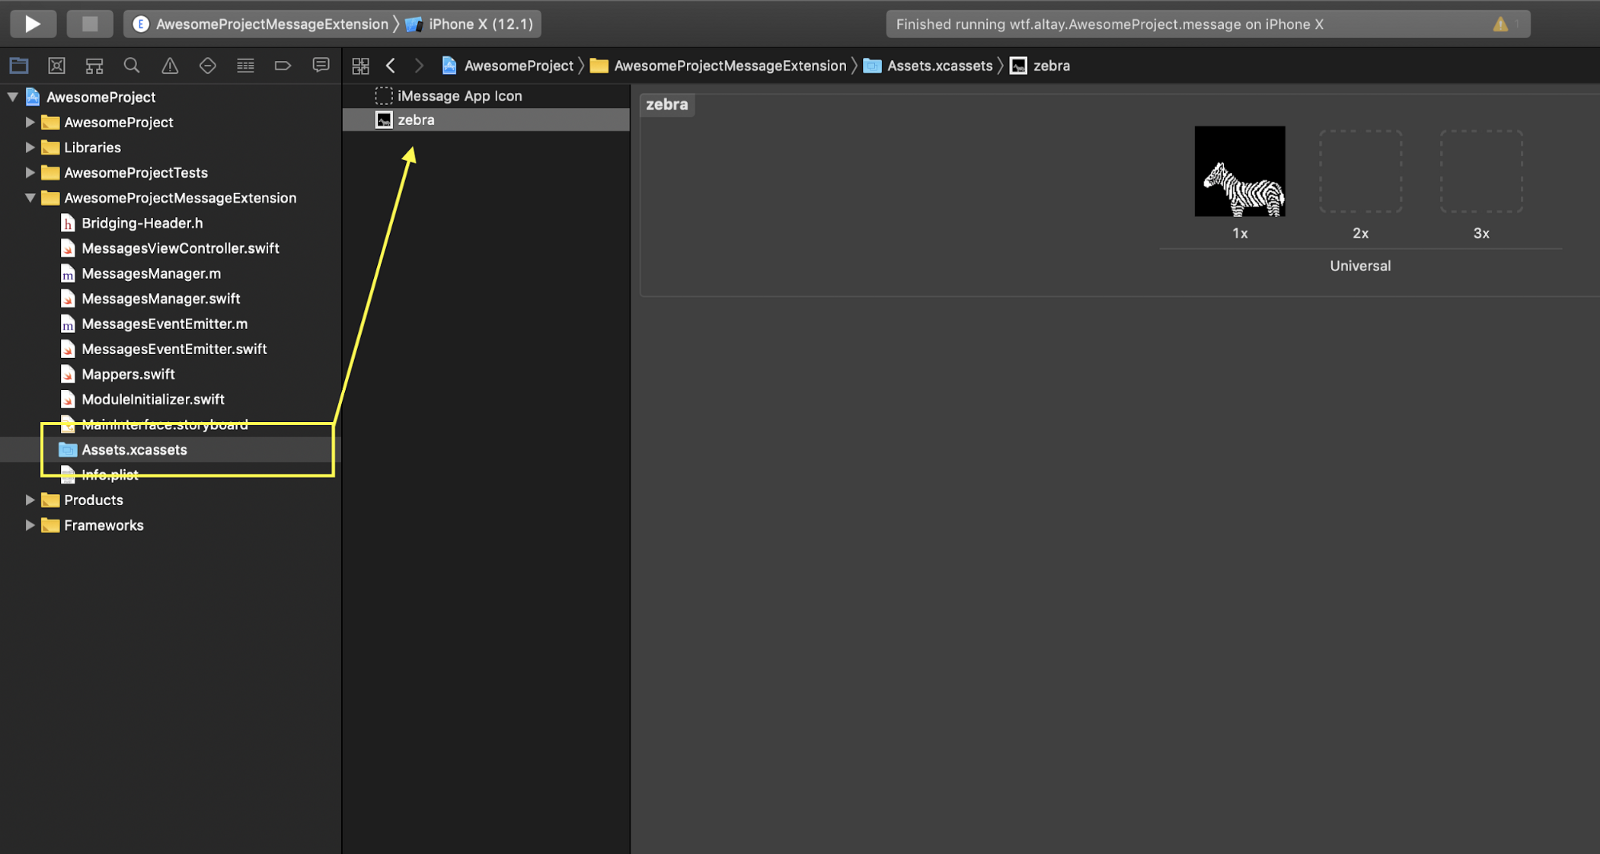 Assets section of the Xcode, where we add images in order to use in the Message templates
 Outcome of the test message
Using the URL field to share data
Now that we are able to compose and send a message, we create a very simple example to demonstrate the usage of url field.
What we are going to do is to put a timestamp and the identifier of the sender to the URL field and present it on the screen. We will also make use of the getActiveConversation method exposed by MessagesManager as well as the didReceiveMessage and didSelectMessage events from the MessagesEvents module.
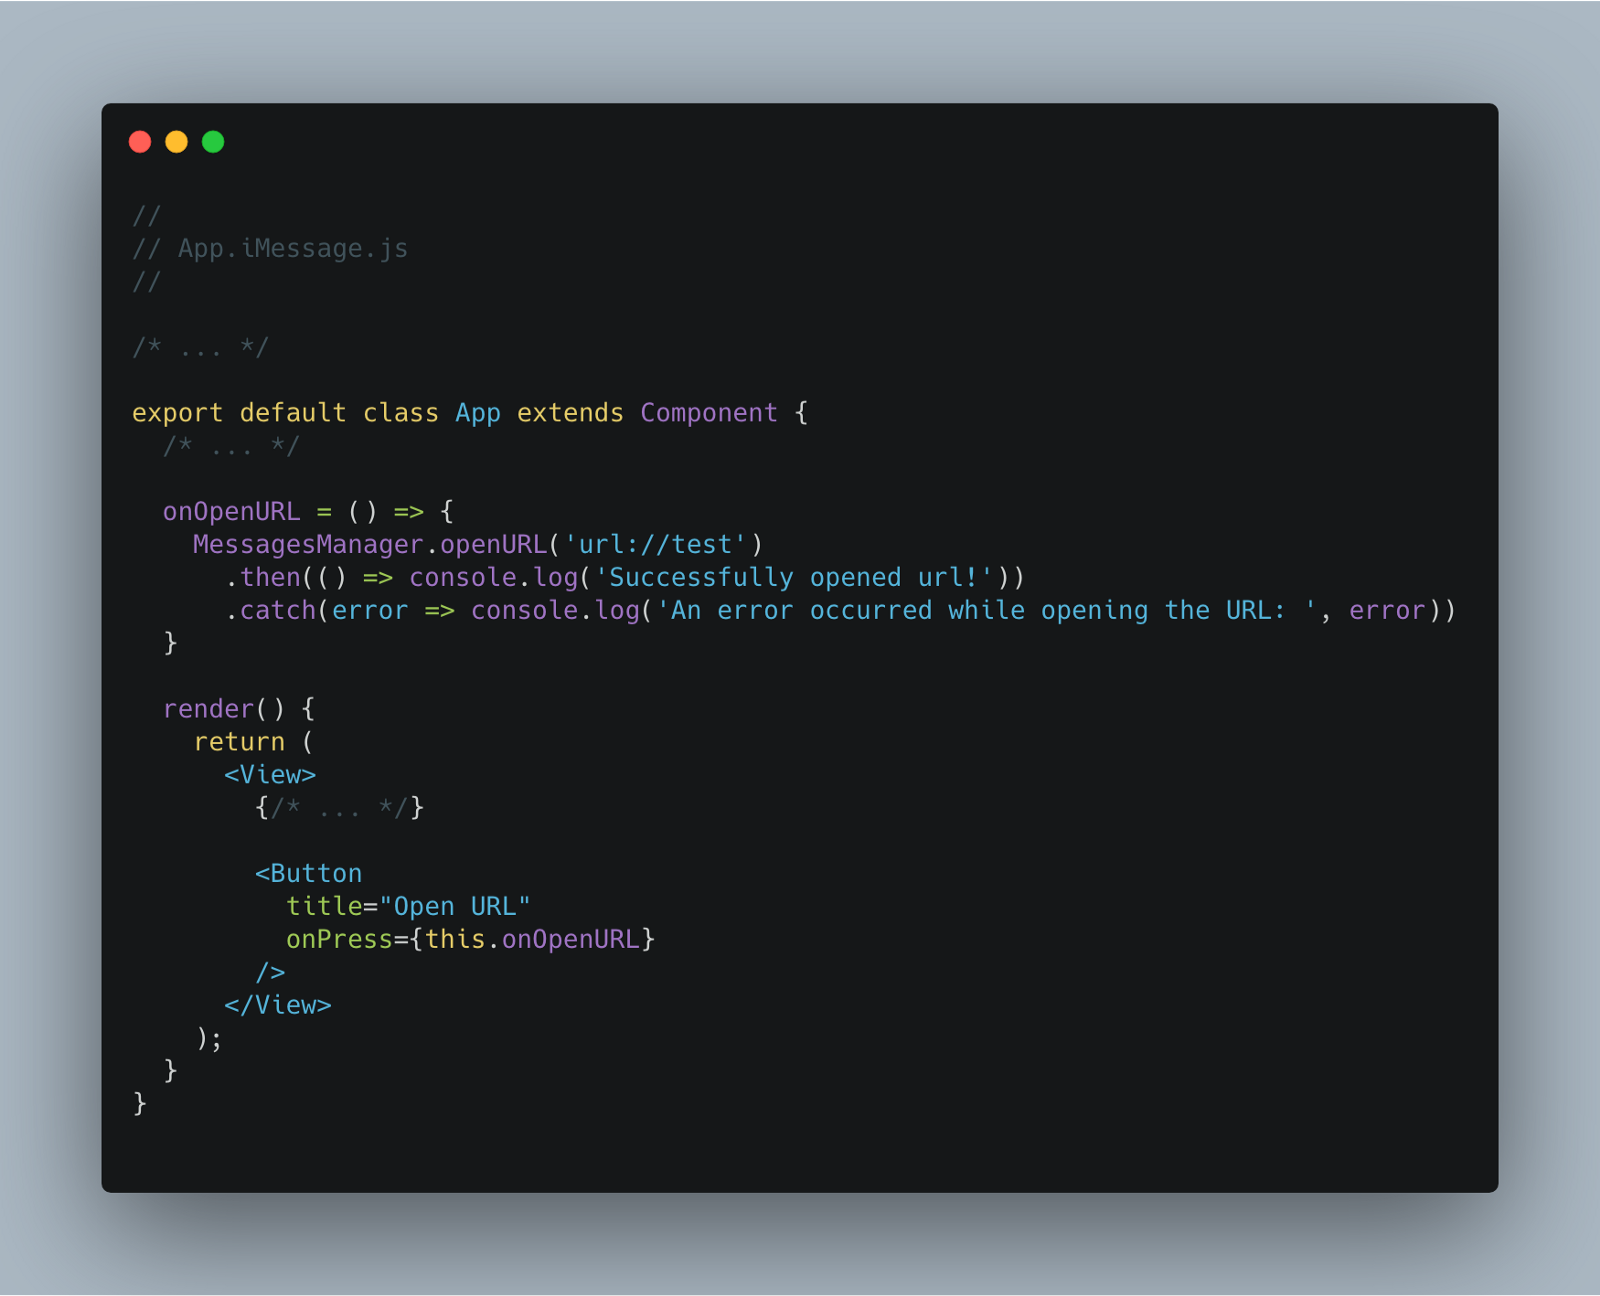
 Updating App.iMessage.js to make use of URL field
Now if we send a message as Kate to John (or vica-versa) we can observe the change in the timestamps and the sender IDs.
 Sending a message as Kate to John. Kate’s sender ID is CD8FBE2C-D25F-4683–85f5–669C6E42DDF8
 Opening and replying Kate’s message as John. John’s sender ID is 721FA6A5-CC6F-42FD-A840–4B846E634E62
If you want to share more data and handle complex logic, our recommendation is to use a third-party library for simplifying the URL construction and parsing logic. For a better example, you can check out the iMessage part of our open source Lisk Mobile application.
Extras
Unsettled Problems
Mysterious Simulator Crash
When the application is run from the Xcode, there’s a crash that happens right after we go back from the message detail screen to the list screen. We haven’t found the crux of this problem but we were able to reproduce it also with the example project from Apple’s official documentation.
 Mysterious Simulator Crash 🤔
Our workaround for the crash is to stop the Xcode right after we get everything running. It will make more sense if you take a look at the Remote Debugger and Reload Menu for Development section below.
Less Mysterious iOS 10 Crash
Unfortunately, we couldn’t make our iMessage extension run successfully within a simulator that has iOS 10. The interface of the iMessage extensions has been updated when there’s a migration from iOS 10 to 11. It might be related with that update but there was not enough information for us to track the problem so we ended up choosing iOS 11 as our deployment target of the iMessage extension.
Not sure if bug or feature: Simulator Refreshes Participant IDs
While running the iMessage extension in the simulator, the participant identifiers coming from the activeConversation object of Kate and John are changed each time you compose a message. Whether it stems from a bug or a feature remains to be seen, but we had to run the application on testing devices in order to make sure our participant identifier logic worked properly.
Gotchas
Remote Debugger and Reload Menu for Development
The setup we have made so far forces us to re-run the iMessage extension from the Xcode every time we want to see the latest version of the app after updating the JavaScript part.
Considering the mysterious simulator crash we have mentioned in the section above, this whole experience is kind of painful for developers coming from the realm of the hot reloading with time travel. In order to improve the developer experience, we have implemented a little utility by using the DevSettings module provided by React Native.
https://github.com/LightcurveHQ/react-native-imessage-extension/blob/master/DevMenu.js
And import it to our App.iMessage.js component as following:
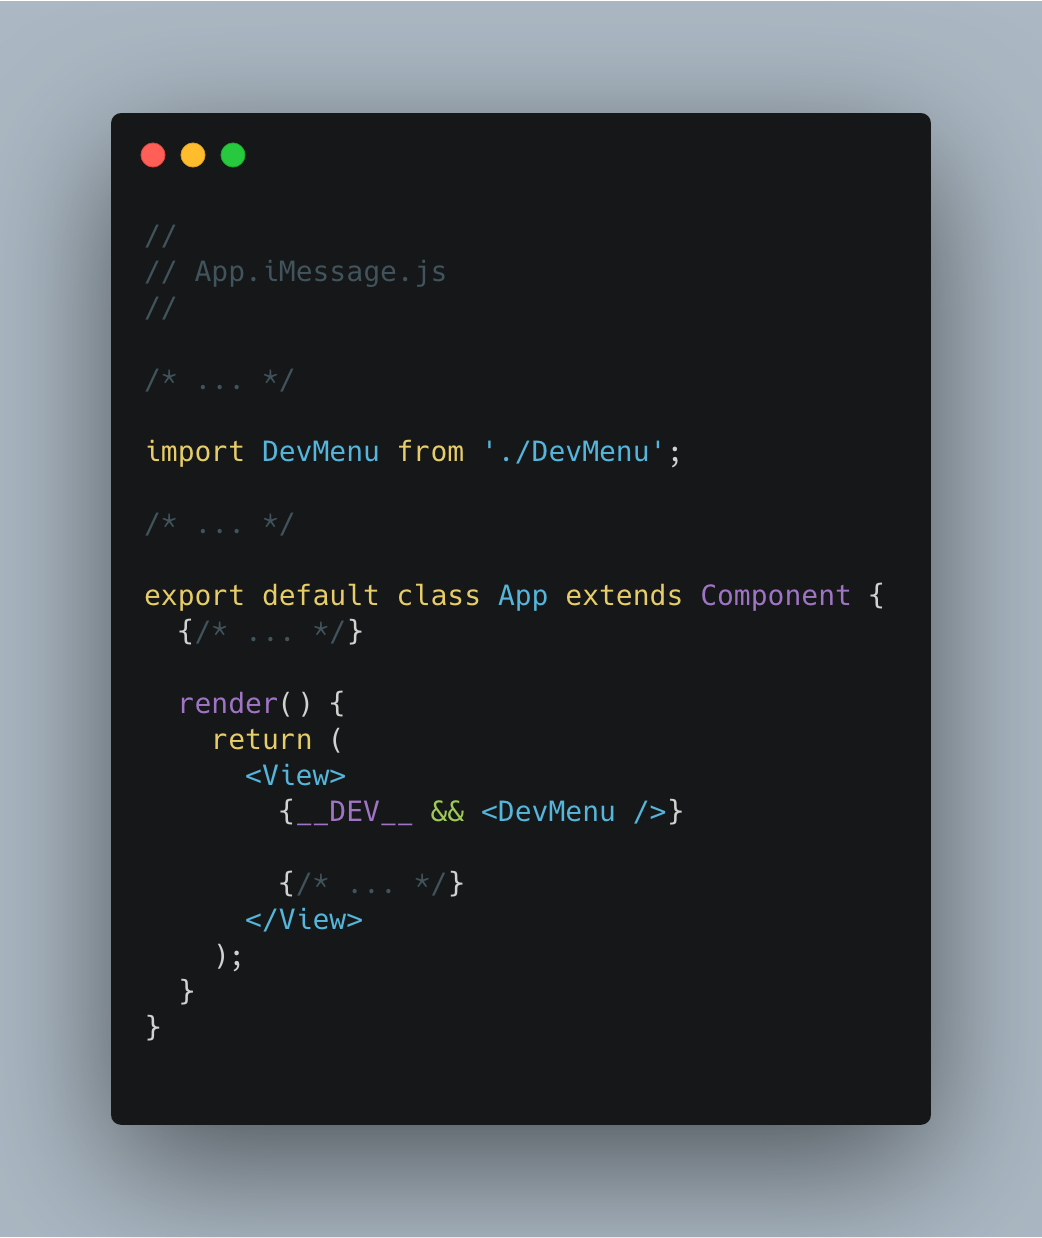 Usage of DevMenu component within the root iMessage component
Unfortunately, DevSettings module does not export a method to get the value of liveReload and remoteDebugging flags so we need to double click the buttons within our DevMenu component to make sure we sync their state correctly.
 DevMenu in action!
Deep Link Opener
In our Lisk Mobile application, we also needed a utility for opening the main application and redirecting the user to a specific deep link. We have resolved this issue by enhancing the MessagesManager.
After setting up the main application to handle deep links by following the guide from official React Native documentation, next step is to update the MessagesManager to provide a utility for opening deep links.
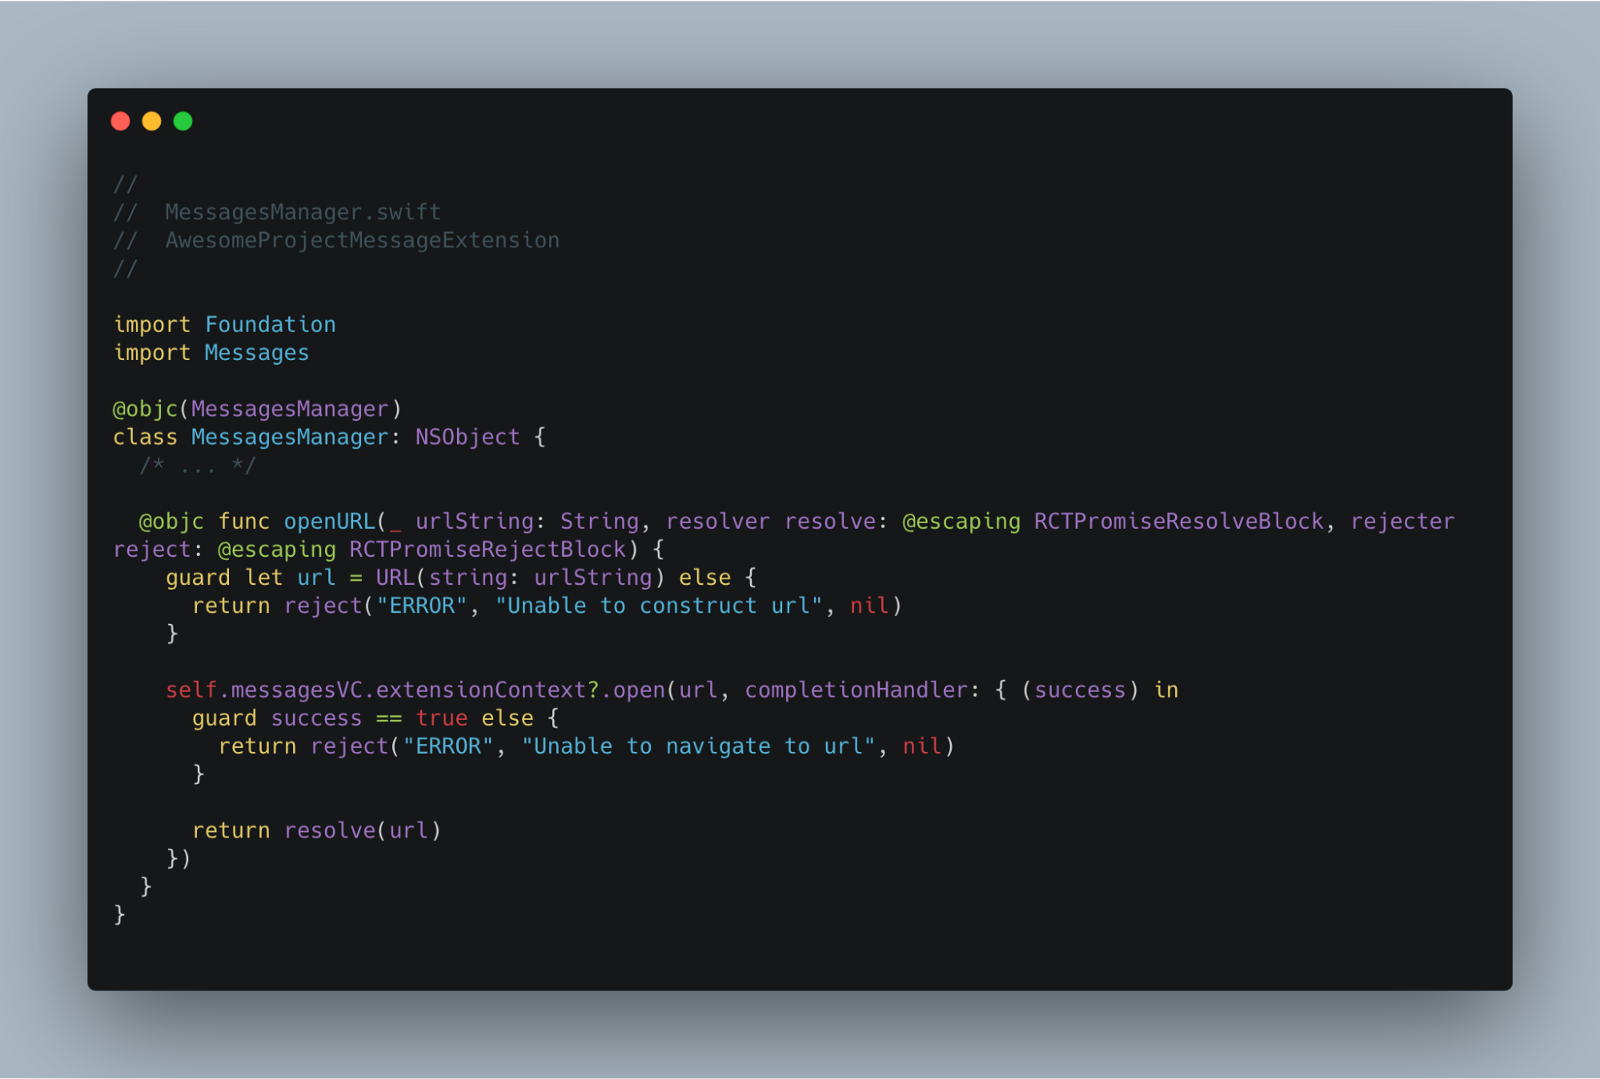 We have added openURL method to MessagesManager
 Also updated interface file of the MessagesManager to contain openURL method
 Usage of openURL method on React Native side
 openURL method in action!
Display a Loading View during the Initial Load
The natural behavior of iMessage extensions is to show the application logo uploaded in the assets section during the initial load as shown below.
 Default behavior of launch screen
In our case, we are also waiting for React Native bundle to be loaded until we see something to interact on the screen. Luckily, RCTRootView has a property named loadingView that allows us to provide a temporary view to be shown while the bundle is loading.
In order to enhance this experience, let’s create a view with the activity indicator and assign it to the loadingView property of RCTRootView.
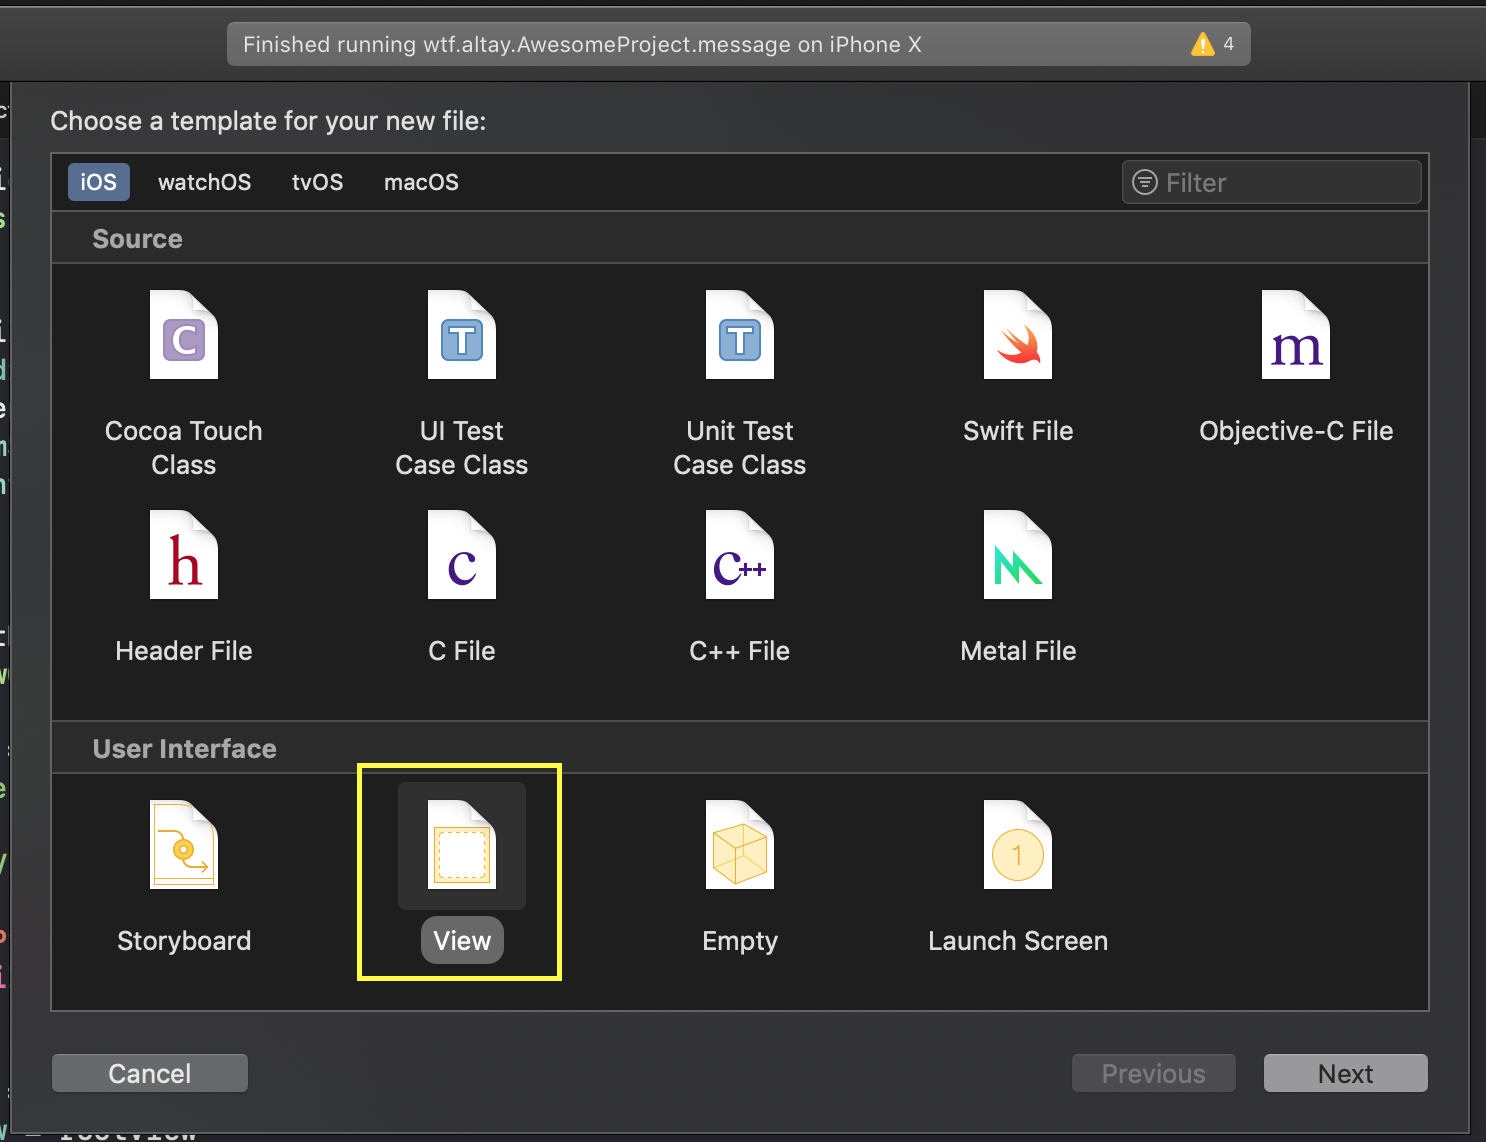 Xcode -> File -> New -> View
 Using storyboard to set the layout of the LoadingView
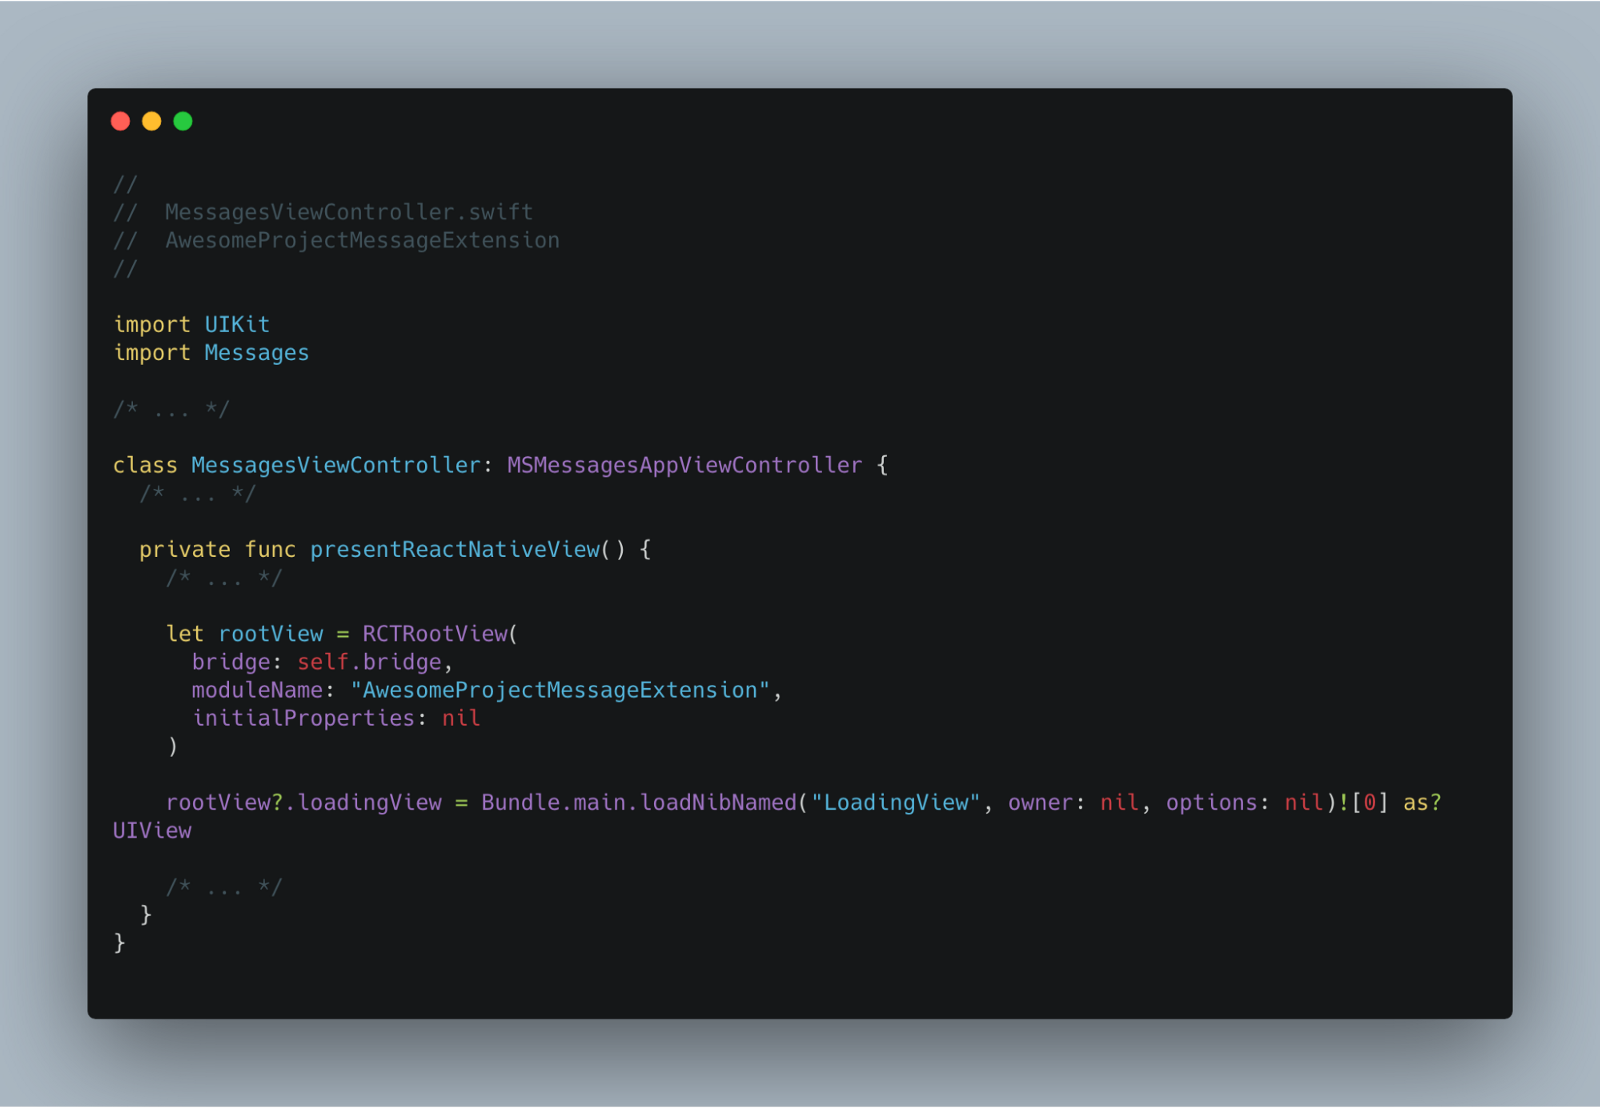 Updating the presentReactNative method of the MessagesViewController to make sure our RCTRootView instance uses LoadingView
 End result of this section: LoadingView is presented until the React Native bundle is loaded.
Controlling the Loading View from the React Native Side
Now that we have our blueprint for displaying that loading view, we can also spend a little effort to make it controllable from the React Native side.
This would be very handy if there’s a case you need to delay the initial render (eg: fetching data from the server) and don’t want to deal with creating another loading view that covers full screen for such a task.
First, the presentReactNativeView method of MessagesViewController needs to be refactored a little bit as following:
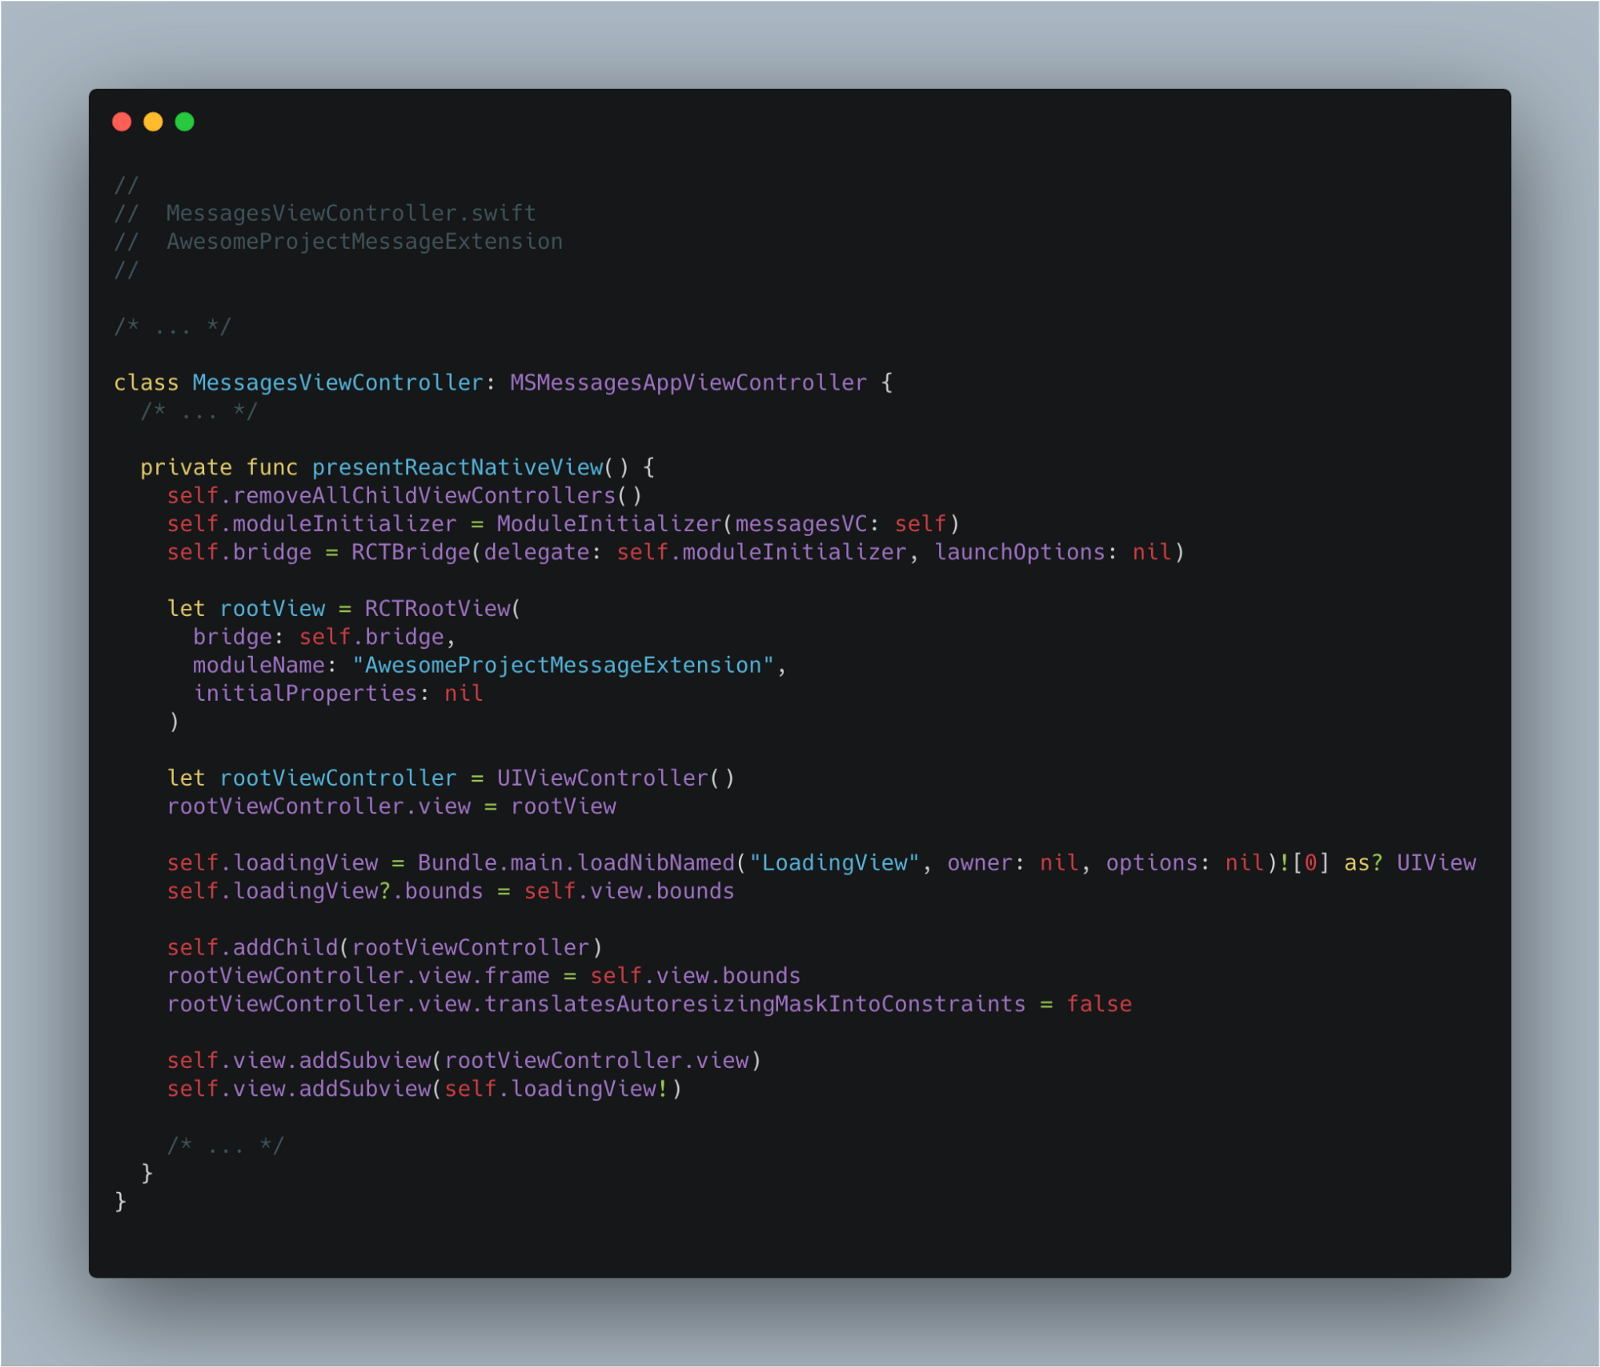 presentReactNative method initializes and presents a LoadingView on top of the RCTRootView, instead of using the RCTRootView.loadingView property.
 In order to control the presence of that loadingView, we have added two methods to the MessagesManager
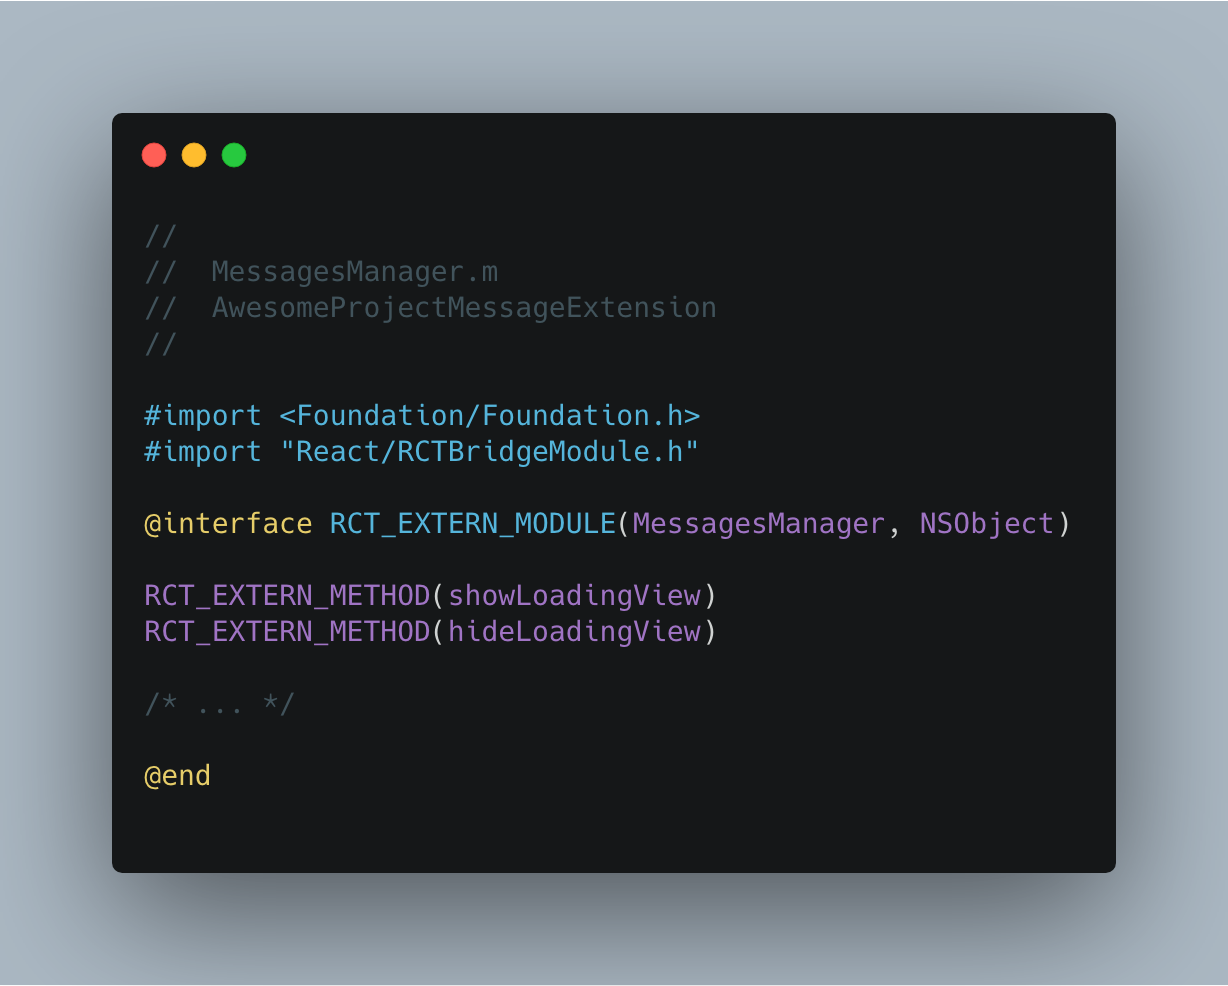 Updated interface file of the MessagesManager to contain methods for controlling the loadingView.
Now it’s time to make use of those freshly added methods in the React Native side. What we are going to do is to fake an asynchronous task in componentDidMount and delay the initial rendering of the content until that task is completed. We will also add an additional button to the sample set to toggle the loading screen again.
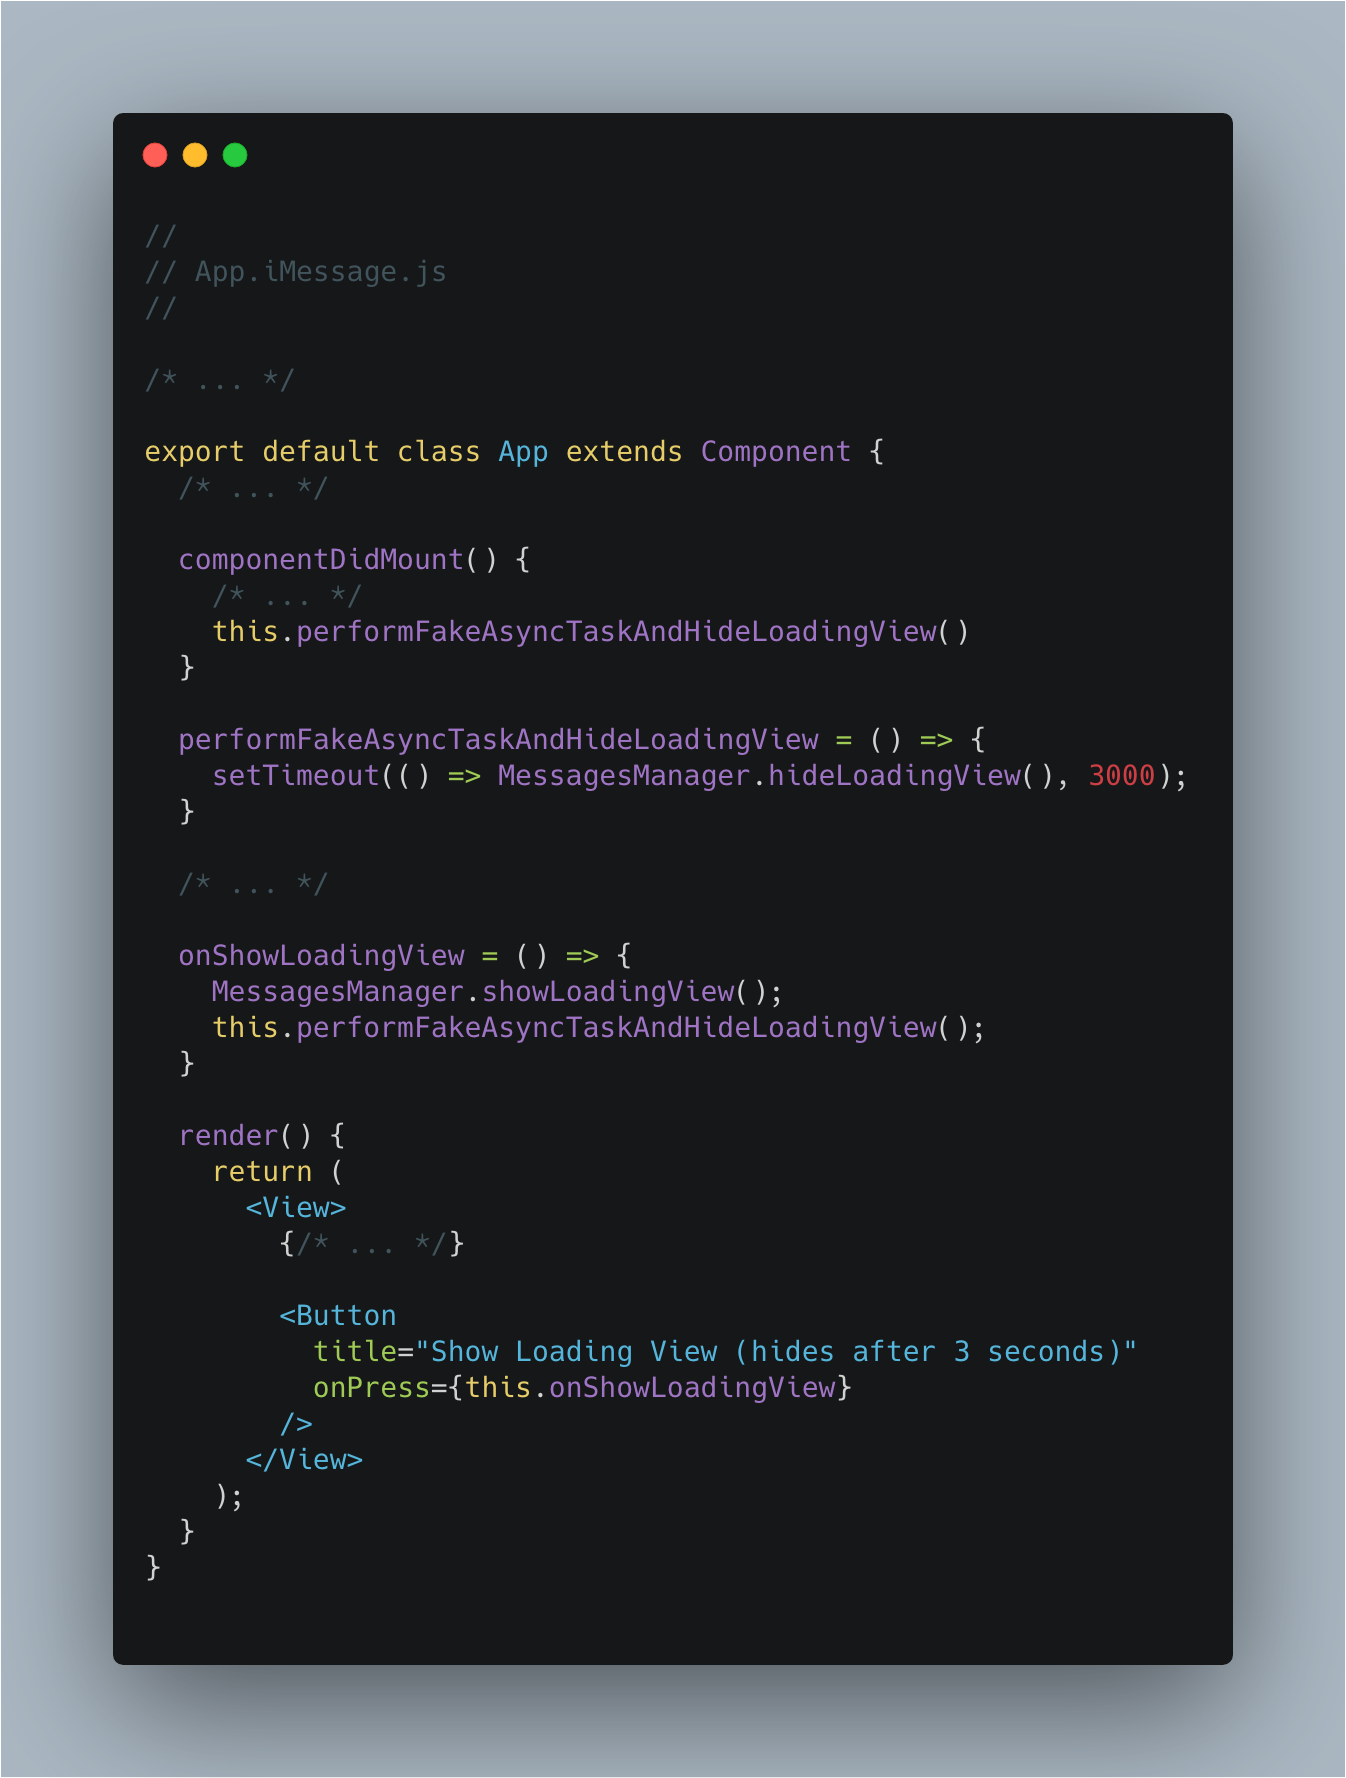 Making use of loadingView related methods on the React Native side
Final Thoughts
Working on user-facing applications in an insular software environment such as that of Apple requires innovative solutions. While Apple definitely provides comprehensive documentation aimed at helping developers coding with native iOS, connecting the existing pieces to the native ecosystem is another thing altogether. After deciding to implement iMessage extension for the React Native-based Lisk Mobile, we experienced this obstacle first hand. Nonetheless, we found writing a bridge between React Native and the native iOS-based app an exciting and educational experience. We hope this tutorial will save you time in implementing a similar feature to your React Native application as well!